So The Rocketeer is on my list of top ten movies, (which is actually about 30 movies long). I've always loved the look of the costume, especially the helmet. It has a great 30's art deco feel to it. Ever since I saw the movie I wanted my own helmet. Well I found out that a friend of mine worked at design Setters back in the 90's, and had a production made helmet. They were willing to let me mold it and cast up a few helmets, as long as I didn't make more than a few and that I destroyed the mold when I was done. So I made an ugly, quick mold and cast a few for me and some friends. it's taken me about 5 years of on again, off again work, but my Rocketeer helmet is finally done. I didn't take any pictures of the inside, but thanks to Valor for making such a great liner, I highly recomend picking one up if you are doing a Rocketeer helmet. So on with the pictures.
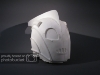
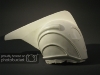
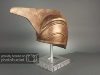
Here it is fresh out of the mold, before I did any trimming or sanding.


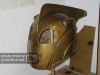
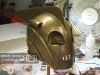
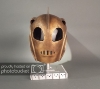
I trimmed out all the openings and then painted it with an automotive clear coat, with gold powder mixed in. Nice and durable.

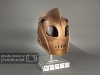
Next I started the weathering process. I first hit the helmet with some 0000 steel wool to give it a slight brushed look, and to give it a little tooth, so that the other paints would adhere better. I then used different acrylic washes, and removed areas with acetone and a sea sponge. I mixed a few different colors of rub 'n buff together to get a dark patina color for all the deep recesses. Rubbed it on and then used a clean rag to remove it from the high spots.


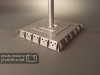
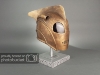
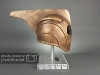
I also wanted a custom stand for the helmet. It took me a while to come up with a design, but I finally settled on a stand inspired by the design of the jet pack.
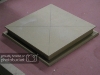
I started with three layers of MDF. I wanted a few hollow areas, so that's why I did the three different layers, with the middle layer being smaller than the other two.

I then started cladding the outside with 1/16" thick acrylic that I cut on the laser cutter.


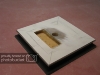
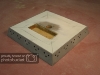
After I got all the parts glued on, I bondo'd all the seams, added fins, and painted it with an automotive silver, followed by a clear coat and some subtle aging. I also added some gum for luck. I made the gum out of epoxy putty and added a little color to it.


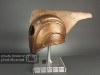
Here's the final thing with lenses, aging and stand. Thanks for looking


Here it is fresh out of the mold, before I did any trimming or sanding.
I trimmed out all the openings and then painted it with an automotive clear coat, with gold powder mixed in. Nice and durable.
Next I started the weathering process. I first hit the helmet with some 0000 steel wool to give it a slight brushed look, and to give it a little tooth, so that the other paints would adhere better. I then used different acrylic washes, and removed areas with acetone and a sea sponge. I mixed a few different colors of rub 'n buff together to get a dark patina color for all the deep recesses. Rubbed it on and then used a clean rag to remove it from the high spots.
I also wanted a custom stand for the helmet. It took me a while to come up with a design, but I finally settled on a stand inspired by the design of the jet pack.
I started with three layers of MDF. I wanted a few hollow areas, so that's why I did the three different layers, with the middle layer being smaller than the other two.
I then started cladding the outside with 1/16" thick acrylic that I cut on the laser cutter.
After I got all the parts glued on, I bondo'd all the seams, added fins, and painted it with an automotive silver, followed by a clear coat and some subtle aging. I also added some gum for luck. I made the gum out of epoxy putty and added a little color to it.
Here's the final thing with lenses, aging and stand. Thanks for looking
Attachments
-
 IMG_2076_zpsmcrgrswp.jpg195.9 KB · Views: 120
 -
 IMG_2076_zpsmcrgrswp.jpg195.9 KB · Views: 118
 -
 IMG_2076_zpsmcrgrswp.jpg195.9 KB · Views: 117
 -
 IMG_2076_zpsmcrgrswp.jpg195.9 KB · Views: 120
 -
 IMG_2078_zpstls9sfwz.jpg216.9 KB · Views: 109
 -
 IMG_2078_zpstls9sfwz.jpg216.9 KB · Views: 114
 -
 IMG_2078_zpstls9sfwz.jpg216.9 KB · Views: 111
 -
 IMG_2078_zpstls9sfwz.jpg216.9 KB · Views: 108
 -
 IMG_1925_zpskwusutvv.jpg272.6 KB · Views: 114
 -
 IMG_1925_zpskwusutvv.jpg272.6 KB · Views: 112
 -
 IMG_1925_zpskwusutvv.jpg272.6 KB · Views: 116
 -
 IMG_1925_zpskwusutvv.jpg272.6 KB · Views: 108
 -
 IMG_1929_zpsxysynmru.jpg238.1 KB · Views: 104
 -
 IMG_1929_zpsxysynmru.jpg238.1 KB · Views: 104
 -
 IMG_1929_zpsxysynmru.jpg238.1 KB · Views: 102
 -
 IMG_1929_zpsxysynmru.jpg238.1 KB · Views: 108
 -
 IMG_1938_zpsrvjioydc.jpg304.6 KB · Views: 118
 -
 IMG_1938_zpsrvjioydc.jpg304.6 KB · Views: 118
 -
 IMG_1938_zpsrvjioydc.jpg304.6 KB · Views: 112
 -
 IMG_1938_zpsrvjioydc.jpg304.6 KB · Views: 109
 -
 IMG_1951_zpsvtpyrvb9.jpg253.9 KB · Views: 101
 -
 IMG_1951_zpsvtpyrvb9.jpg253.9 KB · Views: 108
 -
 IMG_1951_zpsvtpyrvb9.jpg253.9 KB · Views: 106
 -
 IMG_1951_zpsvtpyrvb9.jpg253.9 KB · Views: 103
 -
 IMG_1955_zpsvrmeb0qc.jpg219.3 KB · Views: 112
 -
 IMG_1955_zpsvrmeb0qc.jpg219.3 KB · Views: 110
 -
 IMG_1955_zpsvrmeb0qc.jpg219.3 KB · Views: 115
 -
 IMG_1955_zpsvrmeb0qc.jpg219.3 KB · Views: 115
 -
 IMG_1959_zpsj8gis8gk.jpg224.5 KB · Views: 118
 -
 IMG_1959_zpsj8gis8gk.jpg224.5 KB · Views: 113
 -
 IMG_1959_zpsj8gis8gk.jpg224.5 KB · Views: 115
 -
 IMG_1959_zpsj8gis8gk.jpg224.5 KB · Views: 120
 -
 20150701_170645_zpsgizhp4rc.jpg186 KB · Views: 107
 -
 20150701_170645_zpsgizhp4rc.jpg186 KB · Views: 105
 -
 20150701_170645_zpsgizhp4rc.jpg186 KB · Views: 109
 -
 20150701_170645_zpsgizhp4rc.jpg186 KB · Views: 112
 -
 20150701_170555_zpskypampc0.jpg180.7 KB · Views: 100
 -
 20150701_170555_zpskypampc0.jpg180.7 KB · Views: 113
 -
 20150701_170555_zpskypampc0.jpg180.7 KB · Views: 109
 -
 20150701_170555_zpskypampc0.jpg180.7 KB · Views: 114
 -
 c4ccf2b5-cb48-4716-9c58-5ff13513c405_zpsfuugnk8g.jpg312.7 KB · Views: 112
 -
 c4ccf2b5-cb48-4716-9c58-5ff13513c405_zpsfuugnk8g.jpg312.7 KB · Views: 114
 -
 c4ccf2b5-cb48-4716-9c58-5ff13513c405_zpsfuugnk8g.jpg312.7 KB · Views: 117
 -
 c4ccf2b5-cb48-4716-9c58-5ff13513c405_zpsfuugnk8g.jpg312.7 KB · Views: 108
 -
 20150701_170136_zpsy10oflds.jpg183.2 KB · Views: 115
 -
 20150701_170136_zpsy10oflds.jpg183.2 KB · Views: 104
 -
 20150701_170136_zpsy10oflds.jpg183.2 KB · Views: 121
 -
 20150701_165652_zpsd7cvb3ve.jpg193 KB · Views: 129
 -
 20150701_170136_zpsy10oflds.jpg183.2 KB · Views: 115
 -
 20150701_165652_zpsd7cvb3ve.jpg193 KB · Views: 128
 -
 20150701_165652_zpsd7cvb3ve.jpg193 KB · Views: 126
 -
 20150701_165624_zpsulwt8ktn.jpg185.5 KB · Views: 121
 -
 20150701_165652_zpsd7cvb3ve.jpg193 KB · Views: 122
 -
 20150701_165606_zpsdagw9euw.jpg187.1 KB · Views: 112
 -
 20150701_165624_zpsulwt8ktn.jpg185.5 KB · Views: 116
 -
 20150701_165624_zpsulwt8ktn.jpg185.5 KB · Views: 112
 -
 20150701_165624_zpsulwt8ktn.jpg185.5 KB · Views: 111
 -
 20150701_165606_zpsdagw9euw.jpg187.1 KB · Views: 116
 -
 20150701_165606_zpsdagw9euw.jpg187.1 KB · Views: 106
 -
 20150701_165452_zpswcivrjzw.jpg177 KB · Views: 105
 -
 20150701_165606_zpsdagw9euw.jpg187.1 KB · Views: 106
 -
 20150701_165452_zpswcivrjzw.jpg177 KB · Views: 106
 -
 20150701_165452_zpswcivrjzw.jpg177 KB · Views: 112
 -
 20150701_165452_zpswcivrjzw.jpg177 KB · Views: 110
Last edited by a moderator:
")