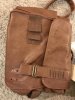
Omg mbotastic, that purse is coming out amazing!! I bought a generic military pouch from amazon and the heavy weave did a number on my machine. For future readers, I honestly think starting from scratch is the way to go-- there's just so many things that can go wrong altering a pouch, especially with the way the original's top flap extends down the right side of the pouch seamlessly.
I got the dyed part of my costume done, and after many attempts I figured out broomstick pleating! Later I want to do an illustrated write up because it's so easy to mess up. One tutorial I read had you twist the fabric until it wrapped around itself (the results weren't good,) another one had you twist the fabric around itself and then wrap *that* around a pole (identical results.) I finally used a method from a book called "manipulating fabric." Basically, you take your long strip of fabric, and using a long stitch you sew horizontal lines at about 10-15 inch intervals and gather those. You then take your gathered fabric and tie it to the top of a broomstick or, in my case, a PVC pipe. You then pull it down as taut as it will go, really trying to stretch the gathered fabric vertically. Tie it in the middle and bottom. Then you douse it in water (you might want to try stretching again here because the water's weight will have eased some of the tension.) Then you wrap the damn fabric with a breathable tape (the cheapest medical kind you can find will do) and you leave it to dry. I ran out of tape and used some muslin. I was really happy with the results! But it took so much trial and error and I could not find any kind of a visual guide, so I'm hoping to do one here in a bit. Apparently, if you spray starch on the fabric while its still wet but before you wrap it with tape it will really hold the pleat permanently.
I mention this too because it looks like the fabric we all ordered from that UK seller on ebay has run out. So if the only cotton viscose you can find doesn't have pleating, the broomstick method should help!

The pants took a while and even with the vinegar I got some bad freckling. Also I never want to dye fabric ever again. I just don't want to spam you guys with the barrage of images of failed dye attempts I had. I decided that, when the time comes, I will commission the padme lake gown. It's my dream dress, but if I try ombre dyeing, someone's getting hurt.
I used the McCalls pattern and I have to agree with people who are saying they tried reinventing the wheel with the pattern for their henley shirt. If you're like me and this is your first time making a henley shirt, you'd be better off stick to other patterns specifically for henley shirts.

A lot of us were worried that the crepe de chine looked transparent, but it really turns opaque during the dye process!

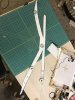
The broomstick pleating process. As you can see, the tabard was longer than the pipe so I had to fold it over the top and wrap it again. After leaving the tabards hanging vertically for a few days, I didn't notice any visible 'seam' from where the fabric was wrapped around the top of the pipe. I live in the dry Southern California region and left it out for about a week. According to "Manipulating Fabric," mildew shouldn't be a problem if you wrap it in a tape that is breathable.
Next I'm going for the belt because I am putting off the staff and goggles until I'm feeling more courageous.
I may have missed it, but to anyone else about to start on Rey's belt and cuffs, Atelier Heidi did this absolutely awesome belt tutorial!
https://www.youtube.com/watch?v=jwYDs7yB7i0
And now for something completely silly. I give you the first (very inaccurate) take on the head scarf.

")