The Tattooine Lounge

HECK YEAH!! Sorry Fuzz not this time... SK, I do plan to pick those up in person... When you get to it.. :D
Hey D,

The rockers you see are actually casts taken from a mold I created a few years back for the 1:1 Scale cockpit build. I had some extra rockers laying around and gave them to Fuzz for his project. I have a new set of molds. When we start making new rockers we always make extras. Consider those yours - when we get to it. :)
 
Small updates... but still working ...

This is when you decide you need to mass produce greeblies...
greeblie painting 00.jpg

greeblie painting 01.jpg

greeblie painting 02.jpg

Soft iron looks amazing!!

painting.jpg

side shot.jpg
I love the look of the 3 different tones together..
garbage greeblies.jpg

Soft Iron, hammered black and gloss dark grey..

tri-paint.jpg

adding some greeblies soon...

book lighting test.jpg

I put 1 1/2" holes in the back of the lower light bar to allow light dispersion to the books in the shelf as well. This was just a test lighting..

Red Panels.jpg

These will be on the bottom part of the shelf but on the upper back wall. I thought I had taken a picture but apparently I haven't yet... Don't worry, I'll show it soon.

Here is also a glimpse of some of the plans for the lounge.. it's a bit rough..
Over head view of the Tattooine Lounge plans.jpg


Light tests.jpg

My favorite part while building is turning off the lights to see SW coming to life in my booth...

It makes me and the queen grin every time...
makes me smile.jpg

Until next time!
 
UPDATES!!!

Well, the shelf has been installed!

But first all the little updates to the shelf!
For the lighting I decided to go with the under the cabinet lighting from HD, it is really the cheap knock off version of another brand I'm looking at for more intricate and hard wired in lighting, but that's another piece to the lounge. They came with a dimmer switch and 1 connector but that was for end to end connections, not the spliced connection I made.

led lighting.jpg

I then ran the wire from the lower section through the mid level (Book of Sith shelf). I hid the wires along the top with some simple tubing.

running the wire to the back.jpg

I also used larger tubing to hide the wiring going from the base to the top of the BoS shelf.

hiding wires.jpg

hidden wires.jpg

We added some pin stripping.


pinstripping.jpg

along with some exhaust port type greeblies and 3 red panels.

exhaust prots added.jpg

We also added the dimmer switch to the things needed to be modified... It was ugly...

dimmer switch 01.jpg

dimmer switch 00.jpg

I then added some weathering to the entire shelf as well as a few more greeblies. Mounted the dimmer switch and covered the wiring..

Weathering.jpg

weathering 01.jpg
weathering 02.jpg

Then, I took it to the Lounge!!

Installed 00.jpg

Installed 02.jpg

Ugh... all those stickers... They are gonna have to go.. I'll leave a few, but a lot of them are going the way of the Dodo..

Thinking about using magnetic vinyl instead of having to strip them.


Installed 05.jpg

It lights up the upper shelf a lot nicer than I had anticipated!! I still may buy another piece of acrylic to diffuse the back lighting a bit more though... I dunno... time will tell.

I also did some test fits on the light panel/light switch.
The lower baseboard trim panel cover fit like a glove!!

Test fit 01.jpg Test fit 02.jpg Test fit 04.jpg

Not too shabby for first time test fitting...

Test fit 00.jpg

The light switch is motion activated and I'm wondering if I still want to use it or cover it completely?
I have a method of holding the acrylic pieces to the panel without epoxy. This will allow me to move the acrylic to access the hidden wall screws. Any excessive light coming from the right side of the panel will be hidden by tubing or something of that nature..

acrylic holders.jpg back bottom section added .jpg test fitting acrylic.jpg

After the test fitting I got some more measurements for the location of the light switch.. I may cut out the section to allow it to still be used and still add to the light switch cover panel to resemble perhaps the operators room on the DS where R2 found the location of the princess.. something similar... LOL...
star-wars4-movie-screencaps.com-8018.jpg

Well, until next time! Thanks for looking!!
 
Happy 4th everyone! I got a few updates, but nothing too awful amazing..

I finally bought the door and have started laying out the back part of the door.

planning some more.jpg

graphing out takes FOREVER!! but....

backside.jpg

piecing it together.jpg

It helps when piecing everything together...

back side door testing.jpg

I got a bit of sanding and smoothing everything out but it's a start. I'll be ordering a door hinge mortising kit soon plus the strike and latch template as well.. It'll be worth it in the long run..
I am wondering if anyone has some better shots of the upper door greeblies or I may just have to scour SofaKing01 posts until I find his references (actual build)...LOL..

6309836610_e43f58e8db_b.jpg

I've also added some weathering to the light switch panel and am now having to order the LED strips..

weathering.jpg

I've also started planning on the bench now..
Still debating on chair height and how I'm gonna make it comfortable for my clients guest.. The client will not be sitting in it unless it was for a consultation..Still wanting to make it big enough to fit 2 people somewhat comfortably. I'm not even thinking about the table at the moment.. Also planning on creating a story behind each piece.

planning.jpg

Beginning.jpg

I've been staring intently at Tea's bench build. I just don't have the room for something of that size.. Mine will need to fit within 48"X48" area.. so, not a lot of room to work with. My bench isn't out of a YT-1300 freighter... Mine would still resemble Corellian looks, just out of a smaller freighter. :p
Well, until next time..

May the Force be with you!
 
Last edited by a moderator:
Even though it rained, we still had a good time.. I also have gotten a few things started..
inside the door.jpg
This is the interior of my door...
test fitting the side wall.jpg
Got rid of the cardboard and replaced them with wall of mdf..
Should have made this part longer but.... too late now...
more measuring for the greeblies..jpg

I did get started on the greeblies for the interior.. The dividers will be glued in place soon as well as the rest of the walls.. nothing has been glued yet, soon though..

When the exterior facade is added it gives and extra depth.. I'll upload a pic of that soon..


brb..
 
Small update...
I started getting the interior opened up for the greeblies to go inside.
I have no idea what they are or made up of but I'm gonna wing it!

interior work 01.jpg

When I started making the first set (yes the first set..)
I went a bit too shallow and was still going to use them because I'm lazy and didn't want to make another set...

interior work 00.jpg

So, when smoothing things out with a chisel, I made a mistake with pressure..

accidents.jpg

That did, however, give me the extra push to make new panels for the door. This time with the recess I wanted.
greeblie construction 00.jpg

Here are some of the greebie ideas..
greeblie construction 01.jpg

Still toying around with them while waiting for glue to dry... LOL..

interior work 02.jpg

I also realized that 3/4" MDF for the "padded exterior framing" to the door was going to be adding way too much weight...
So, I'm going to use foam and the StyroSpray stuff to harden it. But I must first cut them out!

gotta go with foam.jpg

I'll hopefully have more to add this evening as well..

Thanks for looking!
 
Hey D,

Door is looking great! We still have NO IDEA what the original greeblies used for the door are. We think the two main angled pieces might be old 60s or 70s headlamp housings / brackets but nothing has turned up.

Keep up the great work! :)
 
Hey D,

Door is looking great! We still have NO IDEA what the original greeblies used for the door are. We think the two main angled pieces might be old 60s or 70s headlamp housings / brackets but nothing has turned up.

Keep up the great work! :)


SK, I'm glad I'm not the only one!! HA! Thanks for the words of encouragement..

- - - Updated - - -

Wow man, that's a lot of work! Very cool. I love the concept and execution for sure!

Thanks Fuzz, I appreciate it..
 
One last update for my weekend -

Well, ACE hardware is going out of business, so I grabbed a few things...
ACE hardware sale.jpg

My toilet flange envy is lowering.. Fuzzual. Also grabbed some reflectors and door stops!! Grabbed a hose for a new build in the works..

Panel greeblies.jpg

Now I can get back onto the light switch panel!!

masked off.jpg

Looking to resemble the panel from the control room on ANH.
star-wars4-movie-screencaps.com-8018.jpg

Also started the bench finally (sort of) framed out a bit to give me a better idea of size.

framing 00.jpg

So many things going on at once... My head is spinning!! September will be here before I blink!!!
 
Last edited by a moderator:
It's been super busy at work and home.. got a few things done.
Here's the update!

The light switch cover is almost done.. just waiting to buy the LED light strips.

lots of glue.jpg

after the painting and adding those wonderful mosaic tiles (I found out upon reading a greeblie forum.... Yep SK that was your tip.)
I wanted to make sure the light would show through to the buttons and that the buttons would illuminate. I filled them with glue and added some scrap pieces to the edges to glue to the light switch.

i see blue.jpgi see red.jpg

IT WORKED!!

I then needed a way to connect it to the light panel and make it hold in place. I used a cabinet latch to hold it in place. I may need to "push" the wall in a bit to get it to fit flush, but you'll never see it..
clip installed.jpg

I am hoping to do a test fit this weekend sometime..

Here is the panel finished with the cabinet latch bolt hidden as well..
cover with knob.jpgfinal look.jpg
I'll of course add the acrylic just before installation..

Now to the door...
fill, sand, repeat.jpg

Mounted it directly to the door with screws and glue....
squish glue.jpg

Under pressure....

knob construction 00.jpg
I filled these little guys with hot glue to the top with a bulb....
They dried and cooled and sunk into the cap, giving it a recessed knob type look..
knob  construction 01.jpg
add some chrome paint and......
greeblie construction 06.jpg
awesome...

Next onto the disc looking greeblies...
greeblie construction 03 .jpg
These are 2 pieces.. one comes from the 4-2 liter coke holders that look like an X from Sam's. I cut the circle parts from the X and then I glued one to a diffuser from an alcoholic beverage mixer bottle.
I paint that and almost immediately it looks like SCIENCE!!
greeblie construction 05.jpgChrome paint greeblie construction 04.jpgDark Steel Paint

I also flipped the disc on each one...
Here is the top panel thus far...
greeblie test after paint.jpg

I'm looking for interior filter type pieces to be the 2 silver squares I have on at the moment.

Now for my fellow RPF'rs Anyone have an idea of what these are or better pictures?
6309836610_e43f58e8db_b.jpg

I have left a large enough opening inside the door to allow for batteries (if needed).

interior monolith.jpg

Also.. I have an idea for a door knob....
thermal detonator.jpg

shhhhh.... it's a secret/public idea of mine...

Until next time...
May the Force be with Us..
 

Attachments

  • 6309836610_e43f58e8db_b.jpg
    6309836610_e43f58e8db_b.jpg
    420.6 KB · Views: 80
Last edited:
Allllllllrrrrriiiigggghty then.... Well, It's been a bit hectic but some progress has been slllloooooowwwwllly made..

I got the foam cut but I haven't purchased the foam spray hardener yet, so... I decided to flip the door and begin the out facing side of the door. This side will face the outer hallway. It is to be the first thing my clients will see before entering my booth..

So, I decided to make my door an HIC.

Here we go!!.jpg

Let's begin! I contacted KingJawa and got the cast from him.. Thanks again KingJawa! I also read his "helpful hints" page http://www.therpf.com/showthread.php?t=208228&highlight=kingjawa . I will be adding a biometric thumb reading lock mechanism for the icing on top. But here are some of the photos I've taken throughout the process. I've read many other threads from several respected RPFer's (sounds funny doesn't it?)

cut away too.jpg

I'm gonna cut that foam right out of your rear..

HIC Screwing 00.jpg
Screwing with Han's head

HIC Screwing 01.jpg
This is so screwed up.

HIC Screwing 05.jpg
Han suffering from stigmata..

HIC silicone 01.jpg
The silicone begins!

HIC silicone 03.jpg
I'm sorry Mr. Solo sir...

HIC silicone 02.jpg
That moment you realize that you should have bought that second tube of silicone... DOH!

Spring forward after area has been sealed. On to the CARBONITE!!! (or wood glue, whichever you prefer)

HIC Carbonite 01.jpg
After reading many a threads, I learned that patience is the key at this point. Layering is slow building but the finale is awesome. So just chill when doing this part.

HIC Carbonite 07.jpg
I swear, the first night I did this I put a very thin layer on and I didn't expect it to dry clear. When I came downstairs to look at it, most of the glue had dried clear and for just a split second or 2 or 3, I actually considered that it evaporated??!!?! LOL Then I came to my senses and squatted down to let the light hit it right and that is when I saw the beginning of my HIC!

HIC Carbonite 02.jpg
These photos are from the second layering and afterwards..
HIC Carbonite 04.jpg
HIC Carbonite 05.jpg

I had to leave the area where the door lock will be going alone. So, it looks weird.

HIC Carbonite 06.jpg

MEANWHILE! back at the studio

I have done another test fitting and had to modify a few things but it should be permanent soon..
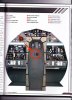
My Light switch cover!
Fit and lit.jpg
without the cover panel!
I'll need to take one of those soon..LOL..

Now, on to the bench. This has become a bit more that anticipated. I have a few updated photos but haven't really been working on it as much. I need to finalize the light switch cover and the door, both sides!

Here is a bit of a progress shot..
taking shape.jpg

It's taking shape!

top shelf.jpg

back shelf is now in view.

Well, that's all for now.. got a lot more coming soon.. Wait until you see this ridiculous lock for the door!! HA!
 
Last edited by a moderator:
Well, I installed the door!! So let's see the progress!!

Almost done.jpg
The backside is still waiting on me to order the styrospray... for the bumper pads.
Plus the acrylic for the clock (at least that's what Im turning mine into.)

Door Lock 01.jpg Door Lock 02.jpg Door Lock 03.jpg
This was the door lock for the booth.. It's way overkill but looks "Impressive, most impressive" so I thought.
Had to have it to get the appropriate measurements for the lock under border? For the carbonite to look as if it were part of the piece instead of a standard door knob set up..

Primed.jpg PRIMED!!

Shiny.jpg METAL.jpg It's amazing what it looks like under different lighting..

Now I forgot to take photos of the weathering process but I was influenced by FrightMaker (I believe is his name?) It worked very well.. I used Hammered antique pewter for the base coat and then an acrylic wash for the weathering. End result photo coming soon.

After this rip in space time photo opportunity of father and son, just hangin' out and chillin'.

father and son.jpg

"He would have disappointed you."

Awesomeness.jpg

Sorry, still playing with the lighting (without the weathering)

Biometric lock.jpg biometric lock 01.jpg

Door lock installed and powered up. (by the way, these pictures have weathering)

I had to make some minor changes to the back side and cut out some spots for the door lock to fit correctly.

Biometric lock 02.jpg biometric lock 03.jpg
Just a little touch up paint here and there and we'll be fine.

packed up.jpg transport.jpg

Borrowed the wife's van to get it there secretly and safely!

installed 00.jpg
This is the view from the hall way when door is closed.

installed 01.jpg

Inside booth with the door open and brighter lighting!!

Yay me!! Now to get to work on the bench!!
 
Last edited by a moderator:
Here's a question that I'd like answered, if anyone knows the answer. If I wanted to trigger a sound every time I opened my door (and I want to use any sound I decide). How would I go about this? I'd also like to be able to turn it off whenever I wanted as well.
 
Here's a question that I'd like answered, if anyone knows the answer. If I wanted to trigger a sound every time I opened my door (and I want to use any sound I decide). How would I go about this? I'd also like to be able to turn it off whenever I wanted as well.

You can buy a Raspberry PI setup (30 - 50 bucks) and there are plenty of online resources on how to make it do cool things you want.

Here is an example but you could use a sensor vice a door bell -

http://www.penguintutor.com/electronics/halloween
 
This thread is more than 5 years old.

Your message may be considered spam for the following reasons:

  1. This thread hasn't been active in some time. A new post in this thread might not contribute constructively to this discussion after so long.
If you wish to reply despite these issues, check the box below before replying.
Be aware that malicious compliance may result in more severe penalties.
Back
Top