A Man and his MPC Falcon: A New Modeler's Journey

SpamDaddy

Active Member
This will be the story of SpamDaddy and his Falcon, Falcon1 a MPC ROTJ Kit from 1989 in 1/72 scale (approx. 18" upon completion). This is as much a diary of triumphs and tribulations as well as a modeling thread guest starring all of you as the advisors for this epic narrative!Today, when I get home I will be tearing the seal on the plastic bag containing the parts. That brings to me this question:I am building Falcon1 (The MPC ROTJ Kit) as a stock build as recommended by Crackerjazz for the painting and building experience. My question is when prepping the initial pieces do I paint a base then a matte clear? Or do the matte clear then base? I have seen a few different ways in various forums and youtube videos. Obviously I want to use the method that insures the longest life of the paint job. Thanks for your thoughts in advance!Lee
 
generally, any clearcoat is one of the very last things you do. but then there are some here who clearcoat after every little painting step so determine how thick and detail filling you want your paint job. less layers the better in my opinion.

assemble
primer
base
more paint
weathering
clear if you think it needs it

them's the very basics.
i have no idea why somebody would clear coat and then paint it. we all have our ways i reckon. perhaps they used the clear as primer for whatever strange reason?
btw, "prepping the initial pieces" to me means trimming flash and sanding here and there to clean them up so they fit together.
 
Last edited:
You'll want to cut the parts free and clean up the edges. Always test fit your parts before you try to glue them together. Wash all the parts in slightly warm, soapy (dish soap works fine) water before you do anything to get the mold release off the parts, otherwise your primer may not stick. You should always start with putting a coat of primer on the plastic before paint, if not the paint may not stick too well. As far as techniques go for painting there are several. Some like to paint the entire model black for an undercoat and the paint the light colors over the top. Some like to paint the panel lines and recessed areas dark first and then lay down a base color close to the final colors. Still other paint the final colors to the primer and then rely on the weathering to alter the colors. There are several more techniques, but the ones listed I personally think yield the best results. Its up to you, and probably pretty far off from painting since you have assembled the ship yet. A project like this can take several months to build and paint in your spare time, sometimes it can take year(s). Spend some time reading through other build threads and watch some videos on youtube about painting and weathering when you get to that point in the project.
 
also there will be times when you'll find you have to paint some parts before adding them to the assembly. a cockpit before gluing it in to two plane fuselage halves is an instance. sometimes breaking the whole into subassemblies may be the order. you will find out what works for you.
there is a rule you may break once in awhile...don't try to glue paint to paint.
 
Thanks so much for all the advice. I guess removing the pieces from their stems and making sure I have clean edges is step one. Off to the hobby store before close!
 
Okay, step 1 commenced in earnest today as I finally found the time to properly clean the parts in warm, soapy water. I have started to remove some parts from their sprue. Emboldened by some of the things I have witnessed on here I ordered styrene round rods in the following sizes: .080 and .050 with the intention of using both to simulate the various piping on the ship. I find the removal of the molded pipes to be extremely tedious and the more I look at the removed area the more it seems there is very little in the way of greebly on the exterior side walls. Is there a place to buy a collection of random parts to "beef up" the greeby content?
 
Tony (FZ6) has some sidewall replacements. http://www.shapeways.com/shops/308bits?section=Falcon+MPC&s=0

I thought we were practicing painting though? : ) Reserve your energies for the second build (I'm sure it will either be a Bandai TFA Falcon or the upcoming Dragon). For now you should focus on building out of the box to get a Falcon flying quickly and whetting your appetite for more Falcons. I just don't want you to be discouraged and give up on your first one.

By the way, a good source of greeblies would be small model kit parts from your stash (may not be authentic but good for busying up the bare areas).
 
Last edited:
Thanks, Crackerjazz. I just wanna do some experimenting because this is my first kit. I'm not doing anything to crazy tho =D Thank you for your concern and willingness to help. I knew after reading this board for a few days this was the community I wanted to join because of people like you! Hopefully ypou will be patient through my X-wing, Star destroyer, and NCC 1701-D lol
 
So let me welcome you to the community. Also let me welcome you to the insanity that is the millennium Falcon. First this is the best and worst model you'll likely every build. a LOT of use cut our teeth on this baby.. its a decent size, has enough detail that you think its going to be a good model - then you realize that its got flaws that are begging to be corrected... and then you're hooked, into a lifelong obsession of getting it "right".

That is not to say that building it straight from the box its not a good model - it is and can be pretty spectacular with a good paint-job. But if you're like most of us after you're done it will nag at you that those side walls are just too damn high. that the sidewalls just don't have enough detail - that will transform into having the "correct" detail. the same with the rear engine deck. And before you know it your journey to scratch building and obsessive reference searching is on. Soon enough you'll cut your teeth accurizing the holy heck out of your 5th one of these swearing it will be your last... then your son/daughter/nephew/niece will start modeling and the cycle starts anew.

Not trying to scare you out of it... the MPC falcon is like the entry pass to this hobby... almost like the old Enterprise model - everyone has build one - and most have built several... always wanting to get it just a little better than the one before.

Welcome,
Jedi Dade
 
Last edited:
Hi SpamDaddy, oops, yeah, sorry I shouldn't be hurrying you up :) Take all the time you need. Don't rush about it; it will take away the fun in building. You're absolutely right -- do experiment -- that's how we all learn. Jedi Dade is correct about the MPC sidewalls being too high I guess that is the very first thing you have to take care of should you decide to go the distance. Tony FZ6's sidewalls with those yummy Mazda Rotary Wankel engine halves and Chevy Bel-Air '57 chassis will truly make your MPC Falcon a standout 5-footer. Parts can be expensive so buy a little at a time only as your budget will allow.

I should mention that the quality of prints that Shapeways is putting out nowadays is lightyears ahead of what parts were like not two years ago. Maybe sometime soonTony will build a sprue with parts for the engine deck -- won't it be nice to sand down the whole area and be able to glue on Panzer and F1 parts!

Oh, and very nice lineup of planned builds!
 
i would see if you can get all the parts to fit out of the box in the first place. this kit is a challenge to get together as it is.
if this is your first kit, of course you won't have built up a "stash" of kits to steal from. it means buying more kits, new or used.
 
I recently sold my MPC Falcon,....she was about 95% done.....I was really happy with it, but I wish I'd fixed the shape of it right from the start,...the kit really is pretty flat which makes the sidewalls too high, but with a bit of work it can be fixed

Get the shape right at the start & build upon that

J
 
@ Jedi Jade ------------ It's already starting it's gnawing but I am committed to building this out of the box and working on paint. It will take me sometime to build up the stock of supplies I need but to me that is almost as fun as working on the models. Acquiring the next "right tool" for the job and hoping it elevates my build. I am already hunting a second MPC and a Bandai 1/144 in my budget range then my buying of models will cease while I work on supplies. Thanks for the encouragement. : )

I just saw TFA today and it had some amazing MF scenes but darn that dish!
crackerjazz ----------- Not a rush at all I was going to go for the elaborate monster replica off the jump but as I realized what I was getting into it made sense to bring it down a notch and go with the stock kit and maybe just "play" with that a bit...I appreciate you dosing me some reality hehe
@MODel citizen ----------- yeah that's my problem no scrap parts cuz this is my first model in 31 years lol
Jaitea ------------- Must have been a nice offer to make you to sell it unfinished. I'm afraid to attempt a reshape of the primary hull. You guys make it look easy.

I can see parts are gonna be high. HH has a nice kit for sale that I am considering as far as detailing my MPC Falcon2 but for Falcon 1 I am gonna rough it
 
Last edited by a moderator:
Welcome to the club... as for tools and parts etc.

Dremel or at a mimimum a hacksaw blade to cut plastic.

ebay model lots 1/72 or smaller kits of anything WWII - ships 1/700. are great source for greeblies.

I also look at home depot as a greeblie source - little washers screws whatever really. dollar store toys, pens, office supply do-hickies... anything that once you paint it will look like it belongs :). eventually you'll graduate to hunting down the parts used on the 5 footer at kits 1/4 the scale used... Ozzy can tell you about that... He'll chime in here eventually.

Jedi Dade
 
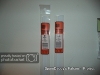
First update in a bit...after getting through the holidays and getting in a few large doses of SW Battlefront for my brand new PS4 (My wife loves meh!!!) I have returned to the task at hand - Falcon 1. I bought some plastruct rods which you will see pictured below to simulate piping but I am finding that they have a tendency to break at a 90 degree angle once stressed to hold shape (the .050 anyway - I haven't tried manipulating the .080 yet).

DSC00477.jpg


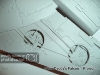
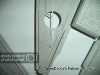
You can see in the pictures below the areas where the rods gave way and I cobbled together a finished product.
I am using tweezers and I also tried heat but its so touch and go due to the minute size of the plastruct. It easily melts with the least bit of over exposure to heat.

DSC00472.jpg


DSC00473.jpg


DSC00474.jpg


DSC00476.jpg


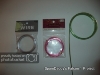
So I found myself taking down our Christmas tree and realized that a bit of wire I had used to fasten a string of lights to the interior of the tree offered the pliability and thickness that I was looking for so I went today to my local "Hobby Lobby" and purchased 3 packs of varying size (pictured below and found in the necklace making isle with all the charms). I have not used it yet but I have taken a length and formed the piping I wanted quite easily. It has a glossy finish so I dusted it up with scratch pads before painting it as a test and wouldn't you know it, it is holding the paint like a champ! I believe this will make simulating pipe MUCH easier than the plastruct and it is 30% cheaper for more product than the plastruct. The only issue there is that there are more plastruct designs and sizes than the wire.

DSC00478.jpg


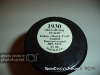
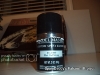
You will also notice the first sample I provide (top 3 photos) is painted using the plastruct and the second example (photo4 in the series above) is unpainted yet the hull of the Falcon is still the same color. That color is "Model Master Custom Spray Enamel Flat Gull Grey 1930" (pictured below). This is my base coat.

DSC00481.jpg


DSC00479.jpg


I am looking for all criticism, ideas, and input on the above.

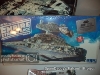
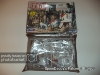
Last but not least 2 more models joined my "que" this week:

DSC00484.jpg


and

DSC00482.jpg


Excited to tear into all of these projects!
JEDI Jade I didn't think of that! Literally anything could make up the "busy work" that comprise most "greebly" as it is not really anything other than odds and ends to start with! Well, that's the latest on my end, looking forward to hitting all of your threads later tonight as for now I have to go be the "Dungeon Master to my kids and their friends for a fantasy adventure at the dining room table!
 

Attachments

  • DSC00477.jpg
    DSC00477.jpg
    39.1 KB · Views: 102
  • DSC00477.jpg
    DSC00477.jpg
    39.1 KB · Views: 104
  • DSC00477.jpg
    DSC00477.jpg
    39.1 KB · Views: 108
  • DSC00477.jpg
    DSC00477.jpg
    39.1 KB · Views: 101
  • DSC00477.jpg
    DSC00477.jpg
    39.1 KB · Views: 104
  • DSC00472.jpg
    DSC00472.jpg
    51.2 KB · Views: 95
  • DSC00472.jpg
    DSC00472.jpg
    51.2 KB · Views: 95
  • DSC00472.jpg
    DSC00472.jpg
    51.2 KB · Views: 90
  • DSC00472.jpg
    DSC00472.jpg
    51.2 KB · Views: 99
  • DSC00472.jpg
    DSC00472.jpg
    51.2 KB · Views: 93
  • DSC00473.jpg
    DSC00473.jpg
    36.5 KB · Views: 102
  • DSC00473.jpg
    DSC00473.jpg
    36.5 KB · Views: 105
  • DSC00473.jpg
    DSC00473.jpg
    36.5 KB · Views: 96
  • DSC00473.jpg
    DSC00473.jpg
    36.5 KB · Views: 103
  • DSC00473.jpg
    DSC00473.jpg
    36.5 KB · Views: 107
  • DSC00474.jpg
    DSC00474.jpg
    43.5 KB · Views: 114
  • DSC00474.jpg
    DSC00474.jpg
    43.5 KB · Views: 101
  • DSC00474.jpg
    DSC00474.jpg
    43.5 KB · Views: 114
  • DSC00474.jpg
    DSC00474.jpg
    43.5 KB · Views: 114
  • DSC00474.jpg
    DSC00474.jpg
    43.5 KB · Views: 107
  • DSC00476.jpg
    DSC00476.jpg
    49 KB · Views: 100
  • DSC00476.jpg
    DSC00476.jpg
    49 KB · Views: 96
  • DSC00476.jpg
    DSC00476.jpg
    49 KB · Views: 97
  • DSC00476.jpg
    DSC00476.jpg
    49 KB · Views: 98
  • DSC00476.jpg
    DSC00476.jpg
    49 KB · Views: 97
  • DSC00478.jpg
    DSC00478.jpg
    44.2 KB · Views: 93
  • DSC00478.jpg
    DSC00478.jpg
    44.2 KB · Views: 88
  • DSC00478.jpg
    DSC00478.jpg
    44.2 KB · Views: 91
  • DSC00478.jpg
    DSC00478.jpg
    44.2 KB · Views: 100
  • DSC00478.jpg
    DSC00478.jpg
    44.2 KB · Views: 91
  • DSC00481.jpg
    DSC00481.jpg
    45.7 KB · Views: 93
  • DSC00481.jpg
    DSC00481.jpg
    45.7 KB · Views: 87
  • DSC00481.jpg
    DSC00481.jpg
    45.7 KB · Views: 99
  • DSC00481.jpg
    DSC00481.jpg
    45.7 KB · Views: 77
  • DSC00481.jpg
    DSC00481.jpg
    45.7 KB · Views: 105
  • DSC00479.jpg
    DSC00479.jpg
    49.6 KB · Views: 102
  • DSC00479.jpg
    DSC00479.jpg
    49.6 KB · Views: 95
  • DSC00479.jpg
    DSC00479.jpg
    49.6 KB · Views: 97
  • DSC00479.jpg
    DSC00479.jpg
    49.6 KB · Views: 95
  • DSC00479.jpg
    DSC00479.jpg
    49.6 KB · Views: 91
  • DSC00484.jpg
    DSC00484.jpg
    71 KB · Views: 90
  • DSC00484.jpg
    DSC00484.jpg
    71 KB · Views: 85
  • DSC00484.jpg
    DSC00484.jpg
    71 KB · Views: 81
  • DSC00484.jpg
    DSC00484.jpg
    71 KB · Views: 87
  • DSC00484.jpg
    DSC00484.jpg
    71 KB · Views: 85
  • DSC00482.jpg
    DSC00482.jpg
    54.5 KB · Views: 93
  • DSC00482.jpg
    DSC00482.jpg
    54.5 KB · Views: 79
  • DSC00482.jpg
    DSC00482.jpg
    54.5 KB · Views: 78
  • DSC00482.jpg
    DSC00482.jpg
    54.5 KB · Views: 90
  • DSC00482.jpg
    DSC00482.jpg
    54.5 KB · Views: 73
Last edited by a moderator:
I think the hobby wire is a great idea, its pliable but can hold its form when static, I'll be using the same material on my own!
 
I've been using various widths of copper rod on my Falcon, it's a little more expensive but it's totally worth it for the pliability and clean finish, 0.5mm, 0.75mm, 1mm and 1.5mm widths cover pretty much all piping across the Falcon....they look especially good when you've got different widths next to each other, somehow makes it look more real
 
You are 100% correct, HH! I love the look of the wire piping. I know my quality of work is nowhere near most here but below is how things are shaping up so far. I am not repiping the entirety of Falcon1 just selecting certain areas to try and liven the kit up. You reworked the rear parts of the engine deck on the top side as pictured below - what did you use? I can't find anything that I could use to simulate the look...


This is the repiping so far:


Not a masterwork but I am learning AND having fun. I proudly displayed the before and after pictures with the actual product and her "discerning" eye detected nothing. She said, "What am I looking at or for?"
I said "It's totally different..."
To which she said, "I don't see any difference." I was beaming in my knowledge that I must be forging an unprecedented non-full-conversion the likes of which man kind has never seen! My work was undetectable to the untrained eye! I was a modeling savant! A few minutes later I was looking at HH's thread and she was looking with me and said...and I quote: "Oh my gosh, that guy's spaceship looks amazing? Can you redo yours and make it look like that?"
I was not just crestfallen I was virtually crushed and I responded "That's kind of what I was trying to do and it's not a "space ship" it's THE Millenium Falcon." She responded "Oh...well I better let you get back to it. You have a lot of work to do."
My tears have only just dried allowing me to share this experience with all of you.
Stay strong and don't show your wives!
 
This thread is more than 8 years old.

Your message may be considered spam for the following reasons:

  1. This thread hasn't been active in some time. A new post in this thread might not contribute constructively to this discussion after so long.
If you wish to reply despite these issues, check the box below before replying.
Be aware that malicious compliance may result in more severe penalties.
Back
Top