Nike MAG replicas (V2 and V3 only)

@McFLight, out of curiosity, I found your other post in cloneprops thread on his custom MAG. The guy made his MAG because he could. He has skill and because he did all the work himself, is not obligated to provide anyone, anything.

If you want to know why he didn't respond, 1. he is busy with his work and 2, he was obviously tired of all the people asking when he was going to offer kits. He made several kits and sold them off. Based on my experiences with molding and casting, his sales would not have covered even 1/4 of his initial outlay.

His assumption was correct and why he didn't release all the files. If he was to provide files for 3D printed parts, those that took them would still need to print them, mold them, then and cast the parts which is both time and materials costly for one offs. Very few would actually be able to do it much less want to spend the $$$$ (yes it goes into the thousands) to do it right.

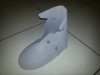
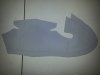
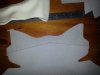
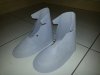
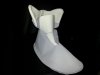
In the end, he gave us access to the 3D printed Ankle Buckle part and the mini MAG which you can reverse engineer if you really wanted to.

The patterns have been published (whether leaked or released on purpose) and can be used to create your own, more accurate MAG than any replica released to date.

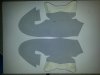
I am happy to share and provide the pattern work I have done so far. If this topic needs a new thread, cool. I would rather start new thread than have people sift through pages where I got it wrong in the past. I am still getting my head around what needs to go where, and now I think I have it sorted.

It is up to you now to take the next step, not expect everyone else to do all the work for you.
 
cavx Why? we are forced to contribute? I feel that my message did you not like hahaha cool guys,
if you need money for your work am ready to pay my friend this is my contribution:popcorn BTTFSpencer I am not rich otherwise I already have them underfoot bro":facepalm

it's possible to inquire ?? maybe you are tannen family:confused
 
Last edited by a moderator:
it is time that people share their knowledge. We love this film and this shoe. Why nobody wants to share? we are here to exchange knowledge on a common topic.
I think I speak for everyone here. We Want a complete tutorial (links, equipment to be used). to finally realize our dream. After several requests, some members never answers . Knowing that there are people here who could help us. So please ... Just do it.
thank you for sharing our community

You don't speak for me sir!

I don't know what forum you visit, but this place has a tonne of free info, tutorials and help. More than enough to mod some Mags, possibly build them from scratch, if you have the prerequisite knowledge of materials and processes. Its a place to come and learn and share. Right now you're bringing nothing to the table, while asking for a whole lot.
 
Last edited by a moderator:
These look great! You've really nailed the overall shape pretty much perfectly.

Excited to see how these develop :D

Thanks, I'd like to think the shape was correct given it is NIKE's own design :)

This is just a rough shell that was slapped together quickly as a proof of concept. If I get time tonight, I might start more precise version that has the liner as well so it is actually wearable. The seams on the inside of this one tend to be a rough to the foot.

I know the mesh is probably not the best material to use, but the benefits it gives are light weight and a material that does not need sewing. I would always sew the 3 main seams, but all the other seams can be glued or even heat fused and when 2 or 3 layers are bonded, give a nice firm self supporting shape. The heel sits a bit flat because the internal seam is a too wide and it on't allow the material to bend the way it should. When I first started doing this, I used to sew the edges by taking the thread over the edge in kind of spiral down the seam. Then I learned other ways which can give a flatter sitting seam and a stronger seam, but the stitches must be fine and fine stitches take time.

I also have a 1mm thin Neoprene that I think is the same material used on the MP MAGs. I knocked up a 3mm Neoprene tester but messed it up because I forgot to add the little extra needed under the heel. This meant I lost some height and the shoe lent back but that is comfortable to wear. The idea was use it to make a MAG is good because the slight stretch it has is quite sock like and the material is quite tough. I am just not sure how it will go on the seams as they will need to be sewn right around. I am thinking that if the 1mm was used with the 3mm, there would be no need for an EVA support as the 3mm NEO is self standing and way more durable than 3mm EVA.

- - - Updated - - -

@cavx Why? we are forced to contribute?
Because if you want something, you have to give something in return. Sure you can pay for the service, but then you don't actually learn along the way.

Learning and sharing things is what make this site so great.
 
Last edited by a moderator:
it is time that people share their knowledge. We love this film and this shoe. Why nobody wants to share? we are here to exchange knowledge on a common topic.
I think I speak for everyone here. We Want a complete tutorial (links, equipment to be used). to finally realize our dream. After several requests, some members never answers . Knowing that there are people here who could help us. So please ... Just do it.
thank you for sharing our community

Please stop speaking for everyone, you're wrong.
There are tons of infos, pics and tips from members who share their experience and issues.
I never had any trouble to find advices, searching on the thread or asking members here, maybe you should change the way you ask things or simply change forum...
 
Last edited by a moderator:
So I have made a start on this new MAG project. I had an issue with my files for the patterns where each was a originally a specific size to print on A3 paper. Tonight when I drove to the printing place, the files sizes were messed up and most parts were either too big or too small. The only two bitmaps that came out the correct size were the parts for the liner, so that is where I am now and probably a good place to start anyway. I went and corrected all the bitmaps, so maybe tomorrow I can print out the other 8 pages.
 
SoleCollector's article about the NIKE MAG stated it was the hardest shoe to retro and I won't argue with that. Anyone think a break down and discussion of these patterns deserves its own thread?

Anyway, as mentioned above, I have made a start to the liner with a bit of creative license. Note you will not find this part on the official MAG pattern. What I have done after identifying the parts is to group some parts together. If you look at images of the real shoe, you can see the internal seam between the 1st and 2nd lace (in the place the seam sites on the V2). The issue here is that ONLY the inner has the seam there, not the ouiter shell. Given the shell has the toe joined to the outer as one piece, I have modded this part to have the toe attached but moved the seam forward. The reason for the overlap is so that the two seams are not placed together and this will give more strength.

attachment.php


attachment.php


attachment.php


attachment.php
 

Attachments

  • Real Nike MAG Patterns Liner.jpg
    Real Nike MAG Patterns Liner.jpg
    476.9 KB · Views: 667
  • 20150706_234610.jpg
    20150706_234610.jpg
    137.5 KB · Views: 644
  • 20150707_074050.jpg
    20150707_074050.jpg
    124.9 KB · Views: 642
  • 20150707_074132.jpg
    20150707_074132.jpg
    125.4 KB · Views: 646
Last edited:
Hello everyone!

So I have a pair of the V2's, and want to convert them with better electrical components. The first step I want to take is creating the Nike Logo using an EL Sheet. Does anyone here have a template or a recommendation when it comes to printing out my own logo?

Once I finish this I will move onto replacing the side EL's. If you guys could point me in the right direction it would be appreciated.

Thanks!
 
The hidden seam is one part the Chinese got wrong on the V2. On the real shoe, the cuff is attached to the liner and the seam is not visible from the outside. Not that it matters too much as the ankle strap covers it anyway. The part that annoys me is the back seam of the shell should extend all the way to the top just under the cuff. It is not a third part added on like the V2.

attachment.php


So the liner's collar ends half way up and the white cuff attaches to this.

attachment.php


This bit of grey collar is actually part of the shell. It gets sewn to the shell on the outside and flipped over the top to sit on the inside of the collar. It serves three purposes - 1. it reinforces the main seam at the back making a T piece where it joins. 2. it completes the sewn trim on the collar. 3. it give a good wide part to glue the back of the cuff too. It might be possible to sew the cuff, not sure yet.

attachment.php


Making the cuffs. The patterns are neat in that any parts that need to be sewn and turned inside out are slightly oversized to allow this. You can see that from the grey collar part above.

attachment.php


I have just used a strip of 10mm EVA for the foam padding. It is probably a touch too wide but will serve the purpose here. What is interesting is how it takes the shape of the final part as it is glued on.

attachment.php


And this this is where I left for last night. I am supposed to sew under the foam, but will leave it for now. I don't think my sewing machine will be able to do that, so it will most likely be hand sewing which takes time and effort. The purpose of this build is just to see how all the parts go together, not a actual wear pair, so I will probably just glue it place. Once I have all the parts done, I will be re-doing the shoe uppers in material.
 

Attachments

  • 20150707_234010.jpg
    20150707_234010.jpg
    43 KB · Views: 596
  • 20150707_223931.jpg
    20150707_223931.jpg
    201.1 KB · Views: 612
  • 20150707_215412.jpg
    20150707_215412.jpg
    152.6 KB · Views: 603
  • 20150707_214414.jpg
    20150707_214414.jpg
    140.3 KB · Views: 610
  • 20150707_181932.jpg
    20150707_181932.jpg
    134.6 KB · Views: 624
Hello everyone!

So I have a pair of the V2's, and want to convert them with better electrical components. The first step I want to take is creating the Nike Logo using an EL Sheet. Does anyone here have a template or a recommendation when it comes to printing out my own logo?

Once I finish this I will move onto replacing the side EL's. If you guys could point me in the right direction it would be appreciated.

Thanks!

Welcome to the forum.

Save and print this sheet out and when you print it, set the printer to "fit to page" of an A4 sheet and you should good to go. I reversed the print for the last sheet I did so that the print is protected under the plastic.
 

Attachments

  • NIKE strap logo 2.jpg
    1.2 MB · Views: 70
Cuffs and Tongues are done.

attachment.php


The liners are pretty much done except the laces. I might have to cut out the big heel part yet as it does not seem to want to sit properly the way I have done mine. From what I can tell, it is done to stop the heel of your foot rubbing against the seam like happens in the V2s. It should also bulge out to take the shape of the heel profile of the shell. Mine wants to sit inwards more than extend out and I think this is because I didn't make it a separate part. If I do cut it out and make a new part, I am not sure how to attach it.

As you see from the (slightly blurry) photo, the 3 piece tongue sits better than a 2 piece.

I am also looking at the way I have made the liner and thinking about losing the toe section altogether. The only thing that is really needed there is a small part to attach the tongue, so the toe could go about an inch past the laces. I have made my liner from 2 layers and cut out most of the tow on the top layer. I might lose the bottom layer as well keeping the rim just for the purpose of alignment to the sole.

I am not sure if the RD MAG has one or two seams on their liner as I can't really find an image of both sides. What I did do was to move that inner seam forward to sit between the 1st and 2nd lace. The V2 has both seams in this place and that is wrong. The seam of the shell should sit between the 2nd and 3rd lace. The first join in the tongue seems to line up with the inner seam of the liner as well. Not sure if it supposed to, but it was handy that it did to get both tongues to sit at the same height.

I am not 100% happy with the shells, so will be re-doing those in the next day or so. I have unpicked the pair I made earlier and re-worked them but they were rushed and the back seam needs a some work, so easier to just start that part over. The inner seam is in the correct place on these patterns sitting between the 2nd and 3rd laces.

I went and got more patterns printed and once again had scaling issues. I don't think it was my bitmaps this time as I marked each with their pixel sizes and the properties stated that was correct. Yet each pattern printed about 10% too big. We worked it out in the end and at least this time, I have a complete set of patterns at the same scale.
 

Attachments

  • 20150709_225920.jpg
    20150709_225920.jpg
    78.1 KB · Views: 552
This thread is more than 3 years old.

Your message may be considered spam for the following reasons:

  1. This thread hasn't been active in some time. A new post in this thread might not contribute constructively to this discussion after so long.
If you wish to reply despite these issues, check the box below before replying.
Be aware that malicious compliance may result in more severe penalties.
Back
Top