Bengrim's Darth Vader reveal project

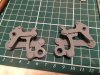
Got the vocoder keys back from my laser cousin made from steel as I'm going to take a cast from them and mould them from aluminium, but what a sack of Bantha fodder !!!!
He said the laser cutter had a dickie fit should have just chucked em in t bin ( trashed them ) for our American cousins
 

Attachments

  • IMG_0055.JPG
    IMG_0055.JPG
    1.4 MB · Views: 132
Last edited:
I've made a brass disc with centre hole @ 3.5mm and I think it looks more to the screen than the 4mm I've seen and originally cut so the rest will be 3.5mm I've also measured the outer holes ( 2mm ) in the correct position, not like my first attempt, now I'm going to draw up the molds for the black rubber backing thingy's
image.jpg IMG_0044.PNG
There are 4 discs per mask and if I'm planing on doing 25 kits then I need to be sure of my measurements 24mm disc 3.5mm centre hole 2mm outer holes, from centre of the disc the outer holes centres ive got 9mm centre to centre distance, now if you know of the exact measurements please please tell me before I make 100 discs and find out they are not correct, that would be demoralising and send me to my cupboard under the stairs in my dark and damp corner clucking like a chicken !!!!

BUT 3.5 I feel is the correct size centre hole
 
Last edited:
I thought I would try and put together a couple a pieces that have been laser cut from my measurements as I scaled and hand cut my first test pieces and then made a cad drawing from my hard work, now putting them together isn't that hard !!! The problem I have is bending the metal both the same, not so easy by hand ( need a better jig ) not hands and a hammer

first piece hand cut, hand bent with primer
IMG_0066.JPG
Second attempt laser cut and hand bent
IMG_0067.JPG
Glued together with no primer
IMG_0068.JPG
Need to find an easier way of bending these if I'm going to make 50 for kits :facepalm
 
I hand cut some reveal ears a while back then I did some cad drawings and had some pieces cut, so now it's time to assemble some laser cut pieces together to see how they look
first I cleaned up the pieces
IMG_0069.JPG
Then I made the holes the correct size for my ally tube
IMG_0071.JPG
IMG_0072.JPGIMG_0070.JPG
Then I made a spacer from copper and put it in between 2 pieces on the ally tube
IMG_0073.JPG
I then cut it off to length then opened up each end slightly to hold everything in place
IMG_0074.JPG
I then filed down the ends to clean them up
IMG_0075.JPGIMG_0076.JPG
More assembly tomorrow
 

Attachments

  • image.jpg
    image.jpg
    2.2 MB · Views: 102
  • image.jpg
    image.jpg
    882.7 KB · Views: 95
A little bit more assembly on the reveal ears
the larger hole has to have a sleeve so it can be filled later
IMG_0077.JPG
Filed the hole to the correct size to fit my ally tube
IMG_0079.JPGIMG_0078.JPG
Cut the sleeves to size and inserted them into the holes
IMG_0080.JPG
I then slightly opened up each end to keep them secure my special tool for this is the metal end of a pen
IMG_0081.JPG
Filed down and cleaned up
IMG_0083.JPGIMG_0082.JPG
 
Next part for assembly
same as before filed to fit my ally tube
IMG_0085.JPGIMG_0084.JPG
Then I cut 2 x 6mm and 2 x 4mm ally sleeves
IMG_0086.JPG
Fit the 4mm sleeves and opened up one end closest to the piece
IMG_0087.JPG
Then glued the 6mm sleeves over the 4mm
cleand off the excess glue and ready for the last part for this piece ( but not today ) my lathe belt hasn't arrived and need to make some correct size rivets and buy some small and very thin washers so they can pivot at every joint
IMG_0088.JPG
Nearly ready for rivets and final assembly
IMG_0090.JPG
Are they to everybody's liking ?
 
I am becoming insane by just looking at these WIP pictures...mad skills Ben, MAD SKILLS!!!
Thanks Marcus
i love working with my hands when I was a little boy ( not so long ago );)you couldn't see my bedroom walls or ceiling for shelves with model kits or aeroplanes and space crafts rockets hanging from them, but age catches up and I'm not as good as I was but thanks for the kind words :love
 
A little bit more
cut some very small ally pipe pieces 4 pieces for the outer pipes and 2 smaller pieces for the inner sleeves
IMG_0091.JPG
Glued them together
IMG_0092.JPG
Cleaned them up with a file, not fully happy with them at the moment but let's jus see where they end up
IMG_0093.JPG
Just placed on for a quick look, they need making smaller
IMG_0094.JPG
Made one smaller and cut down a 1mm pin/nail
IMG_0096.JPG
Glued into place..........BUT !!!!!
IMG_0098.JPG
I need to redo the centre hole as it's to small !!!
What a prized plum I am :facepalm
IMG_0099.JPG
I will post an update when I've rectified the centre hole
 
I just happen to like prized plumbs, especially with a center punch :lol

Steady hand on the rudder and ... a keen eye for what's ahead, sir :)

Chaïm
 
I just happen to like prized plumbs, especially with a center punch :lol

Steady hand on the rudder and ... a keen eye for what's ahead, sir :)

Chaïm
I know what's ahead Chaim, Sskunkys CFO ROTJ Vader mask and I need to pay more attention to what I'm making as I want this to be the best possible mask I can make, and I'm loving every minute
I just love the RPF
 
Update
made the holes bigger after my mistake and fitted the new sleeve and the little end pieces
IMG_0102.JPGIMG_0103.JPG
Now I need to make some rivets, I have some copper nails from a old roofing job
IMG_0104.JPG
From them to these
IMG_0105.JPG
from this
IMG_0108.JPG
To this
IMG_0109.JPG

I also cut some various size ally tube to use as washers/spacers to stop the pieces from binding when riveting is done
IMG_0107.JPG
Glued into place
IMG_0106.JPG
Put together the first piece to show the rivet and spacer in place before its fixed in place
IMG_0110.JPG
first piece fixed
IMG_0111.JPG
Second and third fixed
IMG_0112.JPGIMG_0113.JPG
First one all fixed, just a little refining to do, but first I will put the second one together first
the top one is my hand cut and filed
the bottom one is the laser cut and hand finished
IMG_0114.JPG
 
Update.....now the second laser cut hand finished Vader reveal ears are finished all I need to do now are slight refinements, fill the end holes, clean down with spirit and give them a coat of primer.

IMG_0704.JPG
The top set are hand cut, hand finished ( first attempt ) never to be used as there are mistakes made
the bottom set are laser cut and hand finished, all the copper rivets and sleeves all hand made but I will buy pre made aluminium ones next time to save time in putting these together, I will post a picture when I've filled in the holes and given them a coat of primer.
AND THEY SWIVEL
i love them to bits all the hard work has payed off
I'm a happy little bunny
 

Your message may be considered spam for the following reasons:

If you wish to reply despite these issues, check the box below before replying.
Be aware that malicious compliance may result in more severe penalties.
Back
Top