Kurtyboy's project updates: 24 July - More blasters

I cut a strip off my C3P0 belly wires matt for the ribbed wraps since I was too lazy to drill holes for individual wires.

Great work on the ND.621!

Looks like you used modern rifle sling attachments, and EL behind a transparency.

What did you use for the ribbed black greebie that wraps around both sides?
 
Six months since my last update? Maybe I'll try and squeeze a little one in tonight...

I didn't even catch the last update!

How did you make, or what did you use, as the piece on the Vader saber behind the shroud?

I am making that same saber... and not sure how to go about it.

Thanks!
 
Two diameters of aluminium U channel cut and filed into shape.

I didn't even catch the last update!

How did you make, or what did you use, as the piece on the Vader saber behind the shroud?

I am making that same saber... and not sure how to go about it.

Thanks!
 
I made mine from scratch with styrene.

There are a few ways this part can be tackled.
eed27d02d5d490c733f67ac55e424d40.jpg
405d855dd6f3b0d935dde6b358500f40.jpg
f675b85c45541aa57b69410efc65ec4e.jpg
76bbf38972a5aebf3f79db5b616e82d7.jpg
87d16f695633a8f8a76486ca99284072.jpg
 
Last edited:
It's about time I posted something. I've been working on a lot of stuff, both Star Wars and otherwise, but very little of it is actually finished. I learned a bit of 3D CAD recently and bought a 3D printer for prototyping, which has been a great help in developing builds, and have been spending a lot more time modelling in 3D than actually physically building. However, I'm really looking forward to seeing CNC'd parts come to fruition from my models. Modelling parts in 3D really helps with scaling and seeing how everything fits together.

Now on to some progress...

I decided to accurize my own Jawa blaster based around the resin venturi from Odiwan72. I've finished shaping the wooden shoulder stock and modelled and printed the mount. The trigger and housing are working spring loaded steel. I added a steel tube and bolts to the resin yoke, but it warped under the weight of the receiver and barrel, so I'm modelling a new one for steel CNC.

jawacannon3.jpg


jawacannon4.jpg

jawacannon5.jpg

jawacannon2.jpg

jawacannon1.jpg
 
I now have an ANH hero Stormtrooper to go with my stunt. It's based on RS armor. I accurized the belt to match the one Mark Hamill wore by removing the holster, turning the belt upside down (so it fastens from right to left instead of left to right), extended the holster straps and reattaching it, and added the comlink clip and grappling hook box. The box conveniently covered up the old holster holes.

The grappling hook is functional using a retractable dog collar and extends to about 5 meters. The hook is from Russrep but the blades are nearly 50% too big so I plan on modelling a new one. The switch is a vintage car dashboard type and is non-functional.

I think the helmet is an SDS recast. I took it apart and reassembled it slightly differently, enlarged the eyes and removed the vinyl decals and repainted all the details. The numbers of tube, teardrop, and trap stripes match the helmet worn by Mark Hamill, and I replaced the trim and mics with RS parts. I opted to mask the black stripes this time rather than hand paint.

hero4.jpg

hero5.jpg


hero7.jpg


hero3.jpg


hero6.jpg


hero8.jpg


hero2.jpg
 
Love it all! And you are SO RIGHT about the help that 3D modeling and printers provide in working out the way things fit together and all that good stuff.

Seeing those finished troopers makes me really want to finish up the legs on mine. I'm pretty sure I'll need someone here to help me with that, getting the fit right and everything.

Always enjoy seeing updates from you, good sir!
 
Project Updates 15 Feb 2016: Carbonite panel and bowcaster upgrades

Shhit, we lost Tom!...


Some Carbonite panel upgrades again. The last lot of 'nipples' now replaced with original parts.
View attachment 1004928

View attachment 1004929

Made my own highly detailed decals.
View attachment 1004930

View attachment 1004931

Upgraded resin viewer to real one and decided to include the hood to match the RotJ scene (this panel was not present in ESB). Also replaced a dead yellow LED.
View attachment 1004932

View attachment 1004933

View attachment 1004934

These decals were made with paint stencils which appears to be the case on the original prop (the rest are stickers).
View attachment 1004935

Ready to rock!
View attachment 1004936

View attachment 1004937

Bigturc's machined knobs will be the next upgrade. Cant wait!


Bowcaster also got some upgrades. The large and small amplifier knobs which were modern replacements have been upgraded with vintage ones. All bowcaster knobs are now vintage. :)
View attachment 1004938

View attachment 1004939

anhbow13.jpg


View attachment 1004940

View attachment 1004941
I'm just gathering parts for building a bowcaster. I'm surprised there isn't more resources such an iconic blaster. I was wondering what camera or where did you get the vintage knobs? Thanks
 
Memory is sketchy as it's been a while. A kodak 35 and a Leica II (or clone) if memory serves. I'm sure there's a thread around here with most of the details though.
 
Project updates 28 Jan 2017 - Resin Leia RotJ build complete / Bapty E11 stunt update

Hehe... thanks Mark.

Also getting there with my Bapty ANH stunt. I wanted the rail to be as accurate as possible so it's steel and wider than most. Was a nightmare to bend bend with hand tools but got it right on my third and final attempt!
bapty12.jpg


bapty13.jpg


Made an L bracket for the Hengstler.
bapty14.jpg


I need part of a Sterling magazine. I'm going to do the wood block version.
bapty15.jpg

I'm headed down this road myself - I have a handle a rear that need cleanup (ha ha)

I noticed on the real Bapty E11 there are rivets on the two inserts... but how do you rivet into solid metal?!
 
I'm headed down this road myself - I have a handle a rear that need cleanup (ha ha)

I noticed on the real Bapty E11 there are rivets on the two inserts... but how do you rivet into solid metal?!
I'd hazard a guess that the casting or whatever it was is hollow.
 
I'm headed down this road myself - I have a handle a rear that need cleanup (ha ha)

I noticed on the real Bapty E11 there are rivets on the two inserts... but how do you rivet into solid metal?!

I've kicked that idea around a bit as well and I expect that they just drilled into the solid insert and the expansion of the rivet locks everything in place. I'd make the hole in the sides of the Sterling match the diameter of the rivet then make the hole in the insert slightly larger so the rivet has just enough room to expand.
 
Well, it has been over a year since my last update so I thought I would post... something.

I last showed my hyperfirm Lewis gun with upgades in 2016. It had some added blued steel parts, but was still looking pretty bland:
lewis55.jpg


Next thing I did (probably prematurely) was the layered wood effect (thanks once again to Sidewinder for the master painter's tips):
stage1.JPG


stage2.JPG


stage3.JPG


Final result:
stage4.JPG


I then chopped the top of the receiver off so that I could add some more detail and moving parts.
Lewis57.jpg


Lewis58.jpg


Drew up templates for the parts and had them laser cut from acrylic (of course if I was to do it again I would model and 3D print).
lewis62.jpg


lewis63.jpg


lewis64.jpg


lewis65.jpg


Make way!
lewis65b.jpg

Plastic parts grafted on, still some seam work to do:
lewis66.jpg


lewis67.jpg


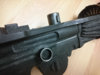
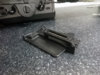
Lasercut steel feed arm added:
lewis69.jpg


lewis70.jpg


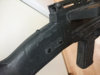
But still, this wasn't enough realism. I also wanted to improve the radiator side fins as they had lost their depth from being puttied up for the molding process:
lewis71.jpg


Poor Lewis underwent some more major surgery at this point. It was one of those "Should I do it or leave it? What if it goes horribly wrong... Aw screw it, I've started so I might as well continue!"

The fiberglass supporting rod that runs the length of the casting now fully revealed! Any added parts would have to be designed to fit around it.
lewis74.jpg


Test fitting a tube where the new steel gas tube will go.
lewis75.jpg


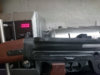
New machined steel gas tube (compared to real one). It was done like this with a split in it so it would fit around the fiberglass supporting rod.
lewis75.jpg


Also added a plate to the roof of the cavity to make it look neater. It should look much better once it gets a complete repaint. I dremelled a few inches into the barrel casting and added a matt black plate there as well.
lewis76.jpg


Add on parts: 3D printed radiator fins, barrel tube stump, and gas tube.
lewis77.jpg


It's a very tight fit in there but they fit like a glove.
lewis78.jpg


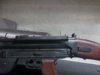
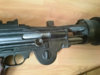
Final result. Now the radiator looks like a separate part which disappears into the barrel casing, and the gas tube disappears into the receiver.
lewis79.jpg


More to come...
 

Attachments

  • lewis54.jpg
    lewis54.jpg
    133.8 KB · Views: 126
  • lewis50.jpg
    lewis50.jpg
    156.4 KB · Views: 141
  • Lewis59.jpg
    Lewis59.jpg
    193.7 KB · Views: 140
  • Lewis60.jpg
    Lewis60.jpg
    128 KB · Views: 133
  • Lewis61.jpg
    Lewis61.jpg
    266.1 KB · Views: 143
  • lewis68.jpg
    lewis68.jpg
    376.6 KB · Views: 162
Last edited:
Thanks Ben, here's somem more:

With all the work that I've been doing, the flimsy rubber front sight that I had shaped took a bit of a beating. You can only re-glue torn rubber back togehter so many times before it becomes ****ed!
lewis80.jpg


So I made a new one:
lewis81.jpg


At this point I was thinking, it's starting to really look like a Lewis gun.
lewis82.jpg


lewis83.jpg


lewis84.jpg


But some things kept bothering me such as the horrible seams, so I did what I could to hide them. Added a metal plate here with stamped serial number. I really should've used steel, but aluminium was all I had and I was impatient.
lewis85.jpg


More seam work.
lewis86.jpg


lewis87.jpg


lewis88.jpg


I added a total of three metal plates witih stamped serial numbers. Also finished rebuilding the area at the back of the barrel casing where the top radiator fins are cisible.
lewis89.jpg


Real removable gas regulator key with machined gas regulator and "nipple". A lasercut blued steel plate hides where the cast in rubber parts were removed. Real screw added to front sling ring.
lewis90.jpg


As it looks today:
lewis92.jpg


The only remaining seams are the ones running the entire length of the barrel casing. 75% of them will eventually be hidden when I add all the ANH greeblies, but the front tapered portion of the casing will always look like crap. If this was resin or fiberglass I could easily fill and carve new grooves, but it won't work on rubber. An entirely new printed front section might be an option and it will mean I can also add a more convincing front radiator.
lewis91.jpg
 
Last edited:

Your message may be considered spam for the following reasons:

If you wish to reply despite these issues, check the box below before replying.
Be aware that malicious compliance may result in more severe penalties.
Back
Top