Update: Klingon Cruiser from Star Trek: The Motion Picture

star-art

Sr Member
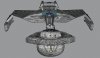
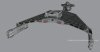
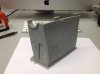
You guys know how it goes with these kinds of projects. Recreating an original filming miniature in "studio-scale" often takes years. In this case, I started working on this project back in 2005. And now, at *long* last, I've finished making patterns for it. Of course, I still have to actually build the model. I hope that doesn't take another 10 years! LOL

I still have a few parts to make "solid" so they can output properly. But, all the fine-tuning and tweaks needed to get the best possible likeness, along with the sculpting of finishing details, is finally done. Whew!

I have an album of pics posted on Facebook. (With all the hacking going on, I don't even bother updating my Website any more. It's easier to just post on social media these days.) Please note that the link below is viewable by all -- you don't need to actually be a member of Facebook to see the images:

https://www.facebook.com/media/set/...073741841.100000088429799&type=1&l=ef0136358c

PS These patterns were created in Rhinoceros 3D. This model was made for real-world output, not for rendering or animation, so the renders shown here are rather crude. There are lots of sharp edges that aren't good for rendering anyway. They are, however, perfect for 3D printing. BTW, this is all geometry -- no "tricks" like texture or bump maps.
 

Attachments

  • Complete05.jpg
    Complete05.jpg
    305.8 KB · Views: 384
  • Complete04.jpg
    Complete04.jpg
    457.6 KB · Views: 410
  • Complete03.jpg
    Complete03.jpg
    420.8 KB · Views: 507
  • Complete02.jpg
    Complete02.jpg
    368 KB · Views: 408
  • Complete01.jpg
    Complete01.jpg
    403 KB · Views: 369
Last edited:
Awesome!!! At the risk of raising another 10-year question have you made patterns for the photo etch greeblies?
 
Nice work. Do you have a 3D printer currently or are you planning on purchasing one? In my opinion, the detail would be more suited to an SLA style printer.

TazMan2000
 
Thanks! This is the Star Trek: The Motion Picture version. As it no longer exists, I want to be as true and faithful as I can in recreating this original version. I'm not a fan of the "makeover" that was done for Star Trek VI: The Undiscovered Country, although I do understand why they did it. For one thing, the model was in a rather bad state of repair and needed a lot of work. But, no, I have not made patterns for any of the gaudy add-ons they applied to the miniature in 1991.

TazMan2000, I do have a really good FDM printer that will create most of the structure. You're right, though, SLA is needed for a lot of the finer details. I hope to get a resin printer later this year. They are, however, very expensive, so, if that doesn't work out, I'm lucky that I do have access to one.
 
I think that's the one Jason Eaton has. I'd love to see some large prints done at the maximum resolution they advertise, 12.5 microns XY and 10 microns Z. If that machine can print a large part (like a hull) with the assorted greeblies as part of the hull model and do the entire print that resolution, you may not need pieces done in SLA. The drawback is something like that would likely that a very long time to print.
 
Yes, that's the same printer Jason has. I had some test parts made which is why I chose this printer. It's more than capable of printing the bottom hull with all it's various curves. I tried including scribed lines as well as raised plates and it came out great.

But, don't get the idea an FDM printer can make a complete assembly with greeblies, etc. It's best suited for making the underlying structure only. These printers don't print greeblies or fine surface details well at all (and they never will). SLA is needed for that.

The best you can hope for is printing the base structure and then filling/sanding it to clean it up. Or, as I plan to try, printing it and then adding "skins" of thin styrene (of course this only works for surfaces that don't have compound curves).

SLA will also be the only real solution for things like the "radome," bridge tower and bridge dome. I have some other ideas for it as well. . .

Here is a link to more pics of the printed sample parts:

https://www.facebook.com/media/set/...073741852.100000088429799&type=1&l=24de5a8fef

Also check out some of the parts that were printed a couple of years ago on an Eden Objet printer. These pics do a great job of showing just how big this model really is!

https://www.facebook.com/media/set/...073741845.100000088429799&type=1&l=91f72a9481
 

Attachments

  • 14711526_1327363537276581_7553660620492852847_o.jpg
    14711526_1327363537276581_7553660620492852847_o.jpg
    47.1 KB · Views: 187
  • 14717283_1327359930610275_794594537392929261_n.jpg
    14717283_1327359930610275_794594537392929261_n.jpg
    70.4 KB · Views: 340
  • 14731310_1327359880610280_3485201758538360154_n.jpg
    14731310_1327359880610280_3485201758538360154_n.jpg
    49.1 KB · Views: 218
Thanks very much for the reply! The quality of those test parts is very impressive.

Here's where I run into some confusion. This is a pic of a test part I had printed for my Enterprise D master on an SLA printer with an advertised resolution of 50 microns:

IMG_0211.JPG

That image, viewed at 100% magnification, is about 4x actual size. Notice the bridge area in particular...looking at this part sitting on my desk, I'd say the whole piece needs very little cleanup in general and I wouldn't touch the bridge blister itself. And this was printed at a resolution not as fine as the N2's maximum advertised rez.

I checked out the images of the sample parts you had printed and noted that the one you referred to a gentle dish shape was printed in an orientation that may not have been flattering to that particular piece. Looking at the design guide here:

https://i.materialise.com/3d-printing-materials/mammoth-resin/design-guide

If you scroll down to the section titled :"Surface Quality and Orientation", you'll see how your dish section may have come out differently had the geometry been oriented vertically as opposed to horizontally. I suspect that sort of orientation led to the nice results on the small, curved areas on my test part.

With all that said, since the N2 has such a fine advertised resolution, I have to wonder if it can, in fact, be used to print sections including greeblies or other fine details under certain conditions where orientation (and perhaps other factors) can be maximized. I'd really like to know this as a printer that can handle large parts which include finely detailed bits is exactly what I'm looking for.

I also checked out the pics of the Objet-printed parts....that's gonna be one helluva model!
 
Try not to get hung up on advertised resolution. That confuses a lot of folks. For a long time, two people I know who have an Objet printer refused to buy an SLA because they thought it couldn't offer superior quality prints. This assumption was based solely on the advertised resolution. As it turns out, the $3K Form 2 SLA produces *much* smoother prints than a $50K Eden Objet. Both of these guys now own both machines.

Polyjet material (like that used in the Objet) has a "fabric weave" texture that needs to be cleaned up. This is fine for some parts. But, imagine this happening on the "radome" of my Klingon Cruiser. It would be almost impossible to get in and around all the little bumps and details to clean up the base surface. You'd have to flood it with thick primer, softening all the details.

In contrast, the SLA prints are so clean, sometimes all you need is a coat or two of primer. I printed replacement bridge guns for the one and only *original* Battlestar Galactica studio miniature and they were so perfect I never touched them with sandpaper.

Now, regarding the dome test part I had printed, they tried it several times with different orientations. The results were all disappointing. This type of shape simply can't be printed on an FDM printer smoothly because it curves in two different directions at once. In such a part, you're going to see the "step" lines much more prominently.

I can assure you that an FDM printer will not give you a satisfactory finished "shell" for your starship. The best you can hope for is a semi-smooth surface that still needs a lot of sanding, filling, and primer. (Even though my test prints look great, if you run your hands over them you can still feel the corrugated texture.) This might work for a ship that has little surface detail (maybe an E-A with only deflector grid lines). For anything that has significant surface details, however, you will have to try Polyjet or SLA.

When I designed an accurate 1/350 replica of the Enterprise-E (see my FB page=>Photos=>Albums for pics) we pioneered the use of a thin Polyjet shell over a CNC-routed form or "plug" base support. This worked well, but the Polyjet parts still needed a good bit of clean up. If I had to do this again today, I would make the shell using SLA. I'd then support it by putting it over an FDM-printed ABS support structure. Keep in mind, the SLA resin warps and so it needs to be immediately glued onto a stable base.

Of course, the biggest problem with this approach is that the Form 2 can't make big parts so your shell would have to be split up like a jigsaw puzzle. But, there are DLP machines out there that can print larger pieces using the same SLA resin. I'm hoping a more affordable DLP machine that prints larger parts (roughly 8.5 X 11 in XY) at much faster speeds than the Form 2 will be available in the not-to-distant future. The largest skin panels on the 1/350 E-E were roughly 10X10 inches and that worked out just fine.

Hope that helps! :)
 
It sure does, thanks! I had the masters for my 1/350 Reliant conversion kit done on Objet machines and while the parts were nice, I spent months sanding/finishing.

I'm very surprised that the quality of the SLA parts I'm now getting is so superior to the Objet-printed pieces, especially since the advertised resolution of these new parts is inferior to the 16 microns advertised for the Objets...so I do get your point that resolution isn't everything.

I've been waiting and watching for years for a DLP machine with at least the specs you mentioned...since it hasn't materialized, I've been checking back in with FDM. Pleasantly surprised at how nice FDM-produced parts are starting to look but I can't spend a lot on a printer only to still face months of finishing work. Realistically, I can only buy one printer and I'll just to have to wait for a resin machine that can do larger prints.

Thanks again for sharing your thoughts!
 
If you buy a resin machine, you'll still need some sort of stable support structure. I've seen SLA parts warped as they came out of the printer. I've also seen how badly Polyjet can shrink and warp as well. I don't trust cheap cast resin to hold its shape over time, but I also don't trust printed resin. Even ABS can warp from the heating/cooling of the FDM print process.

If you print your masters in resin, it's very important that you immediately glue them down to a stable base structure. Or, if that's not possible, CNC-machine a high quality Renshape "plug" and assemble your shell over that. Then, get those parts into rubber ASAP! After that, make a casting master from a stable, no-shrink high-quality resin. Bottom line: Don't expect your printed master patterns to maintain their shape over time.

I hear you on only being able to afford one printer. I'm in the same boat and my FDM machine almost broke the bank. But, I also believe that the best possible solution (at least for me) is to have both a high-quality FDM machine that can print large parts in ABS and a resin printer that can print near-perfect greeblies and skin panels. The combination of both these technologies, IMHO, has tremendous potential to forever change the way I design and build models. :)
 
Last edited:
Thanks for the advice regarding resin warpage...will definitely keep in mind.

Looked through your 1701 E album, really nice work. Man, that was a one-off? Must've been one committed client! Had to smile upon seeing your "spacers and risers" solution: I did the same thing for the same reason, namely for parts that will be done in translucent fiberglass. Nice to know I'm on the right track.
 
This thread is more than 6 years old.

Your message may be considered spam for the following reasons:

  1. This thread hasn't been active in some time. A new post in this thread might not contribute constructively to this discussion after so long.
If you wish to reply despite these issues, check the box below before replying.
Be aware that malicious compliance may result in more severe penalties.
Back
Top