You are using an out of date browser. It may not display this or other websites correctly.
You should upgrade or use an alternative browser.
You should upgrade or use an alternative browser.
How to diffuse led lights to look solid?
- Thread starter jadebmr
- Start date
Zinger
Active Member
Go to your local recycling place (dump) and get a broken lcd monitor. Take the screen apart and there are some good lenticular screens and other diffusing layers in them. Try a few different layers. I've used them before with good results when it comes to diffusing points of light. I just realized wht your trying to do. For the effect you want its going to be hard to do. For it to retain enough light on the glass your not going to be able to see through it.
Any danger disassembling a flat screen?
In the old days, taking apart CRTs was a no no because of large capacitors that could hold a charge for a long, unpredictable time.
Zinger
Active Member
This is the effect I am going for. I know it is not possible to match it but just to make it look simmilar.
View attachment 729191
I was only thinking of the base on my earlier replies. To get the whole jar and the flower to glow is much harder.
The only way I can think to get that effectis to use a black light and UV activated paint. You could try UV meds in the base and lightly paint everything with a clear coat of invisible pink paint from somewhere like wilscored com
Any danger disassembling a flat screen?
In the old days, taking apart CRTs was a no no because of large capacitors that could hold a charge for a long, unpredictable time.
No, it has the glass layer and then the diffusing layers and fresnal lenses . The only hazard would be the tiny flouresant tubes on some of the older ones. Newer are leds. Unless your in California, then every parts of it is poison and will kill you on instant contact.
Monkey540
Sr Member
very nice work, but just a question for you. Why don't you have the rose light up as well, the material would also act as a diffuser.
I personally only lit the rose for the one I made for my wife and it's a nice source for the light.
My camera is terrible, and so is the lighting in the room, but the head lighting is nice:


I personally only lit the rose for the one I made for my wife and it's a nice source for the light.
My camera is terrible, and so is the lighting in the room, but the head lighting is nice:
Last edited:
Another thing that would help is to narrow the circular channel above the LEDs so that it is barely wide enough to fit the glass bell. You'd want the bell to essentially fit down into a groove, and the LEDs to be directly in line with the edge of the glass. That way the LEDs will really only be visible from nearly directly over the base.
Monkey540
Sr Member
Another thing that would help is to narrow the circular channel above the LEDs so that it is barely wide enough to fit the glass bell. You'd want the bell to essentially fit down into a groove, and the LEDs to be directly in line with the edge of the glass. That way the LEDs will really only be visible from nearly directly over the base.
I think thats a great idea, kinda like those laser etched plastic pieces with the led bases, the whole piece of glass should light up.
jadebmr
New Member
very nice work, but just a question for you. Why don't you have the rose light up as well, the material would also act as a diffuser.
I personally only lit the rose for the one I made for my wife and it's a nice source for the light.
My camera is terrible, and so is the lighting in the room, but the head lighting is nice:
View attachment 729256View attachment 729257
i like the idea of lighting the rose but the lights I had were too many. What did you use?
That whole base lit up looks really cool !!
Zinger
Active Member
Unless your in California, then every parts of it is poison and will kill you on instant contact.
Do you have a sister? Assuming you're a guy. Because I'm in love.
Zinger
Active Member
very nice work, but just a question for you. Why don't you have the rose light up as well, the material would also act as a diffuser.
I personally only lit the rose for the one I made for my wife and it's a nice source for the light.
My camera is terrible, and so is the lighting in the room, but the head lighting is nice:
View attachment 729256View attachment 729257
How did you light the rose?
Monkey540
Sr Member
i like the idea of lighting the rose but the lights I had were too many. What did you use?
How did you light the rose?
I ran wires up the length of the rose to the head and shrinkwrapped the wires to the stem with green shrinkwrap.
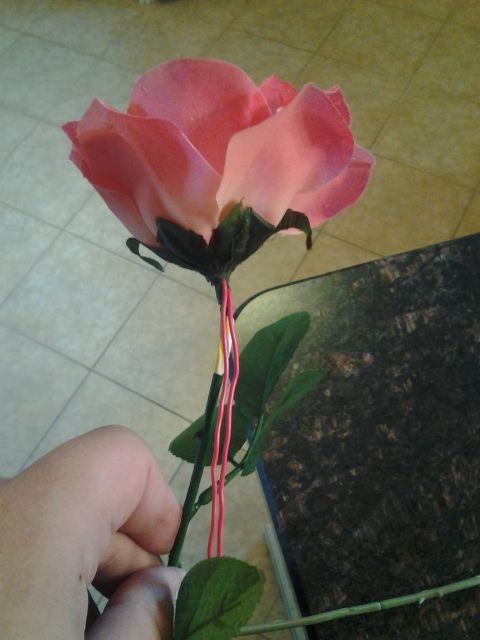
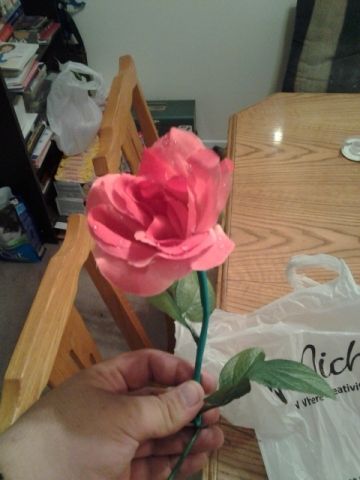
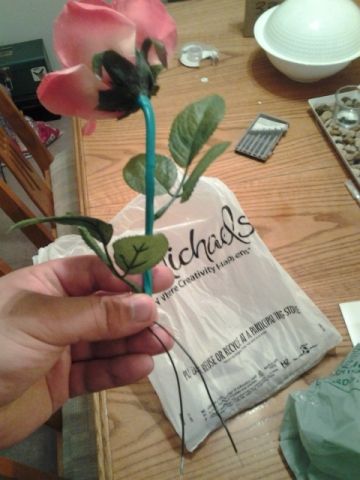
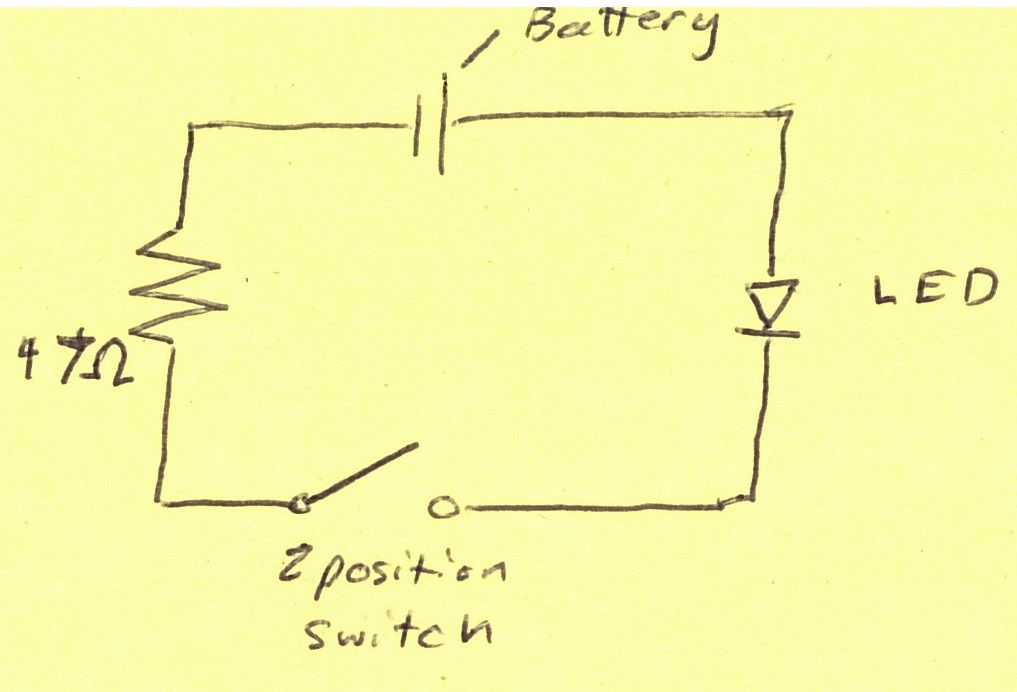
Single LED on a circuit with a resistor, battery and switch:
More info on my build here: http://www.therpf.com/showthread.php?t=193077
jadebmr
New Member
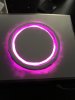
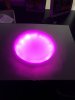
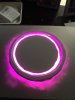
I am super excited with the progress I made. I originally wanted to make the top removable to service the lights if I needed to. Once I gave up on that and decided to make an access panel in the bottom for that I was able to get the plexiglass base on the way I wanted.
These pics just have the lights stuffed in the cavity any which way. I need to figure out a way to keep them from pointing directly up. I also still need to paint the edges to take care of the light bleeding out the edges. I am also going to physically attach the ring to the base. That should make the effect seamless.
Then I still need to paint everything up, drill the hole for the rod for the rose and finish the bottom panel.
doctorwholittle
Well-Known Member
Also, lightly sanding the LEDs will help diffuse quite well, but this is obviously quite a bit more work.I am working on an enchanted rose for my daughters birthday and wanted to know if there is a better way to make the circle of LED lights look more like a solid light? Right now they are attached at the bottom through holes I drilled. I tried a frosted plastic over it and it is better but still not what I really want.
The goal it to edge light the glass bell.
Any tips? I am open to different lights too.
Thanks in advance!!!
View attachment 729179View attachment 729180View attachment 729181
Sent from my SM-N920T using Tapatalk


That looks great. Its like its on fire!