You are using an out of date browser. It may not display this or other websites correctly.
You should upgrade or use an alternative browser.
You should upgrade or use an alternative browser.
Show your custom Lightsabers!
- Thread starter GreenCircleCube
- Start date
-
- Tags
- custom highrepublic lightsaber
DARTH SABER
Master Member
Just got this one yesterday.
gotta figure out what to do with it-

gotta figure out what to do with it-

Lichtbringer
Master Member
A protosaber.
Jedi Reali
Sr Member
Just got this one yesterday.
gotta figure out what to do with it-
I see a Dark Empire saber in there.
I recognize that board! It looks great man!
thanks!
...gotta figure out what to do with it...
Blaster! It's screaming for it!
JaxAndTheMoon
Sr Member
Hey guys!
I'd figure I'd drop one more thing here, since I don't really feel the need to do a whole thread about the topic. Also, since it's a custom idea that I had not seen here before, I thought it might find a good home here.
This is going to be a long read, but it's a new saber blade experiment that I tested and felt I should share here with those that build custom sabers!
So as we all know, star style LED's are the popular thing to do for sabers. To me, this just isn't bright enough, and I've also had some awful experiences with certain LED's that claim to be the brightest and what not. Not only that, but the color mixing that I needed just wasn't there, and I couldn't get it for the life of me. The idea of string blades interests me because it is way brighter and looks very nice, but colored LED's just aren't bright enough. White LED's are extremely bright, but I couldn't figure out what to use for a string blade other than the blue or green LED's that are made.
Finally, I ran into some luck when I was watching one of my friends put a film over his fog lights on his truck to change the color to more of an blue-ish tint. It hit me all of a sudden, as I realized that this film may be exactly what I need to make my string blades with the color that I wanted! I went to my computer and found a supplier on ebay that sells headlight film! I purchased plenty of super bright white LEDs and went to work!
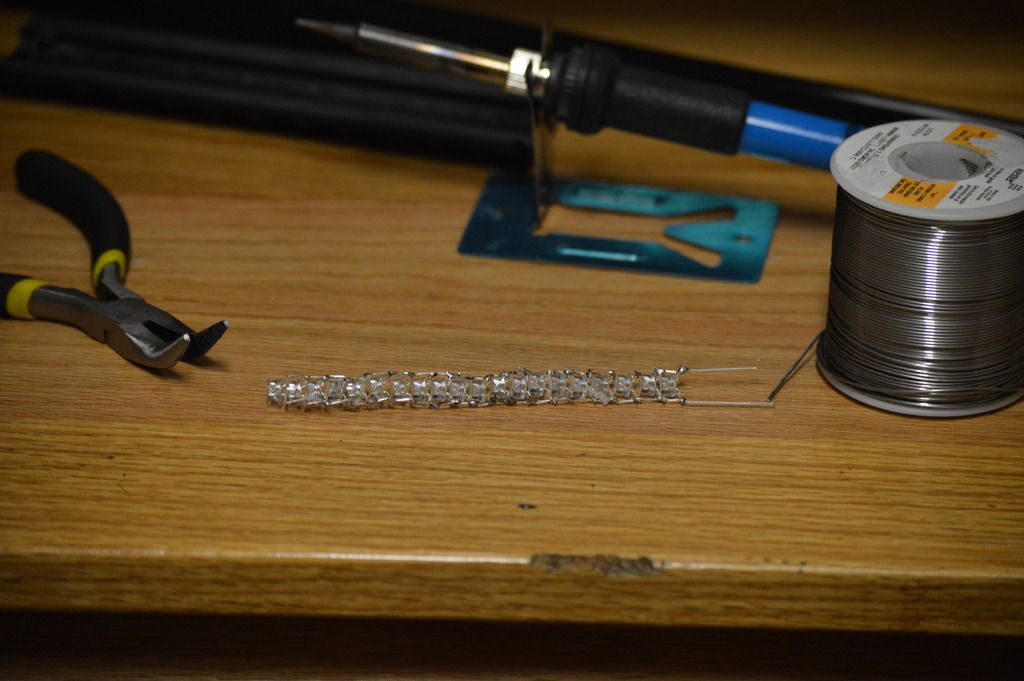
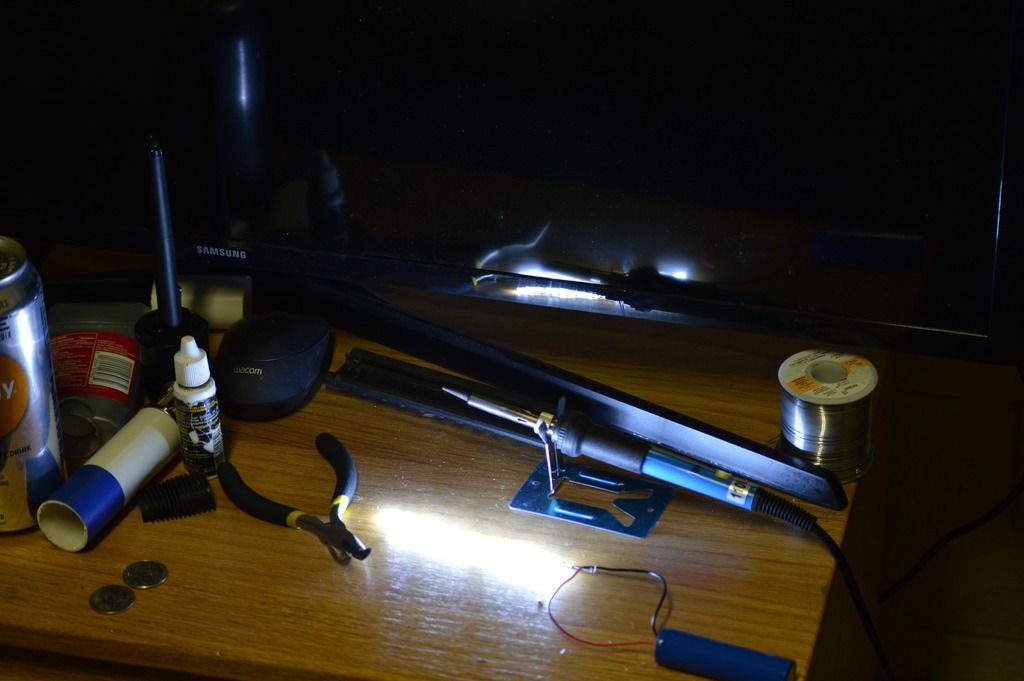
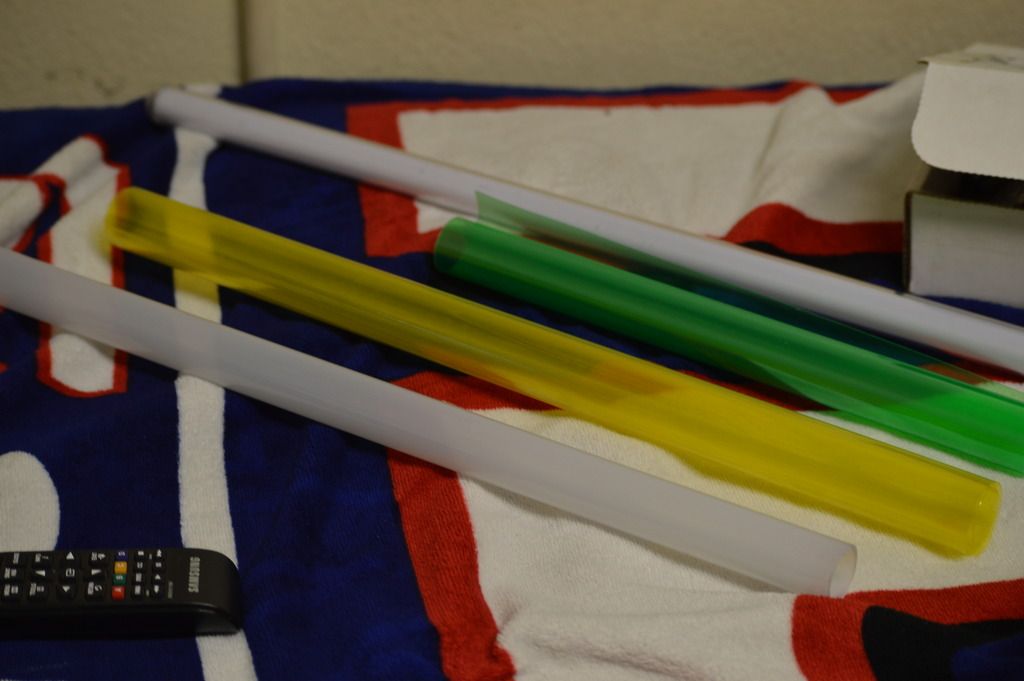
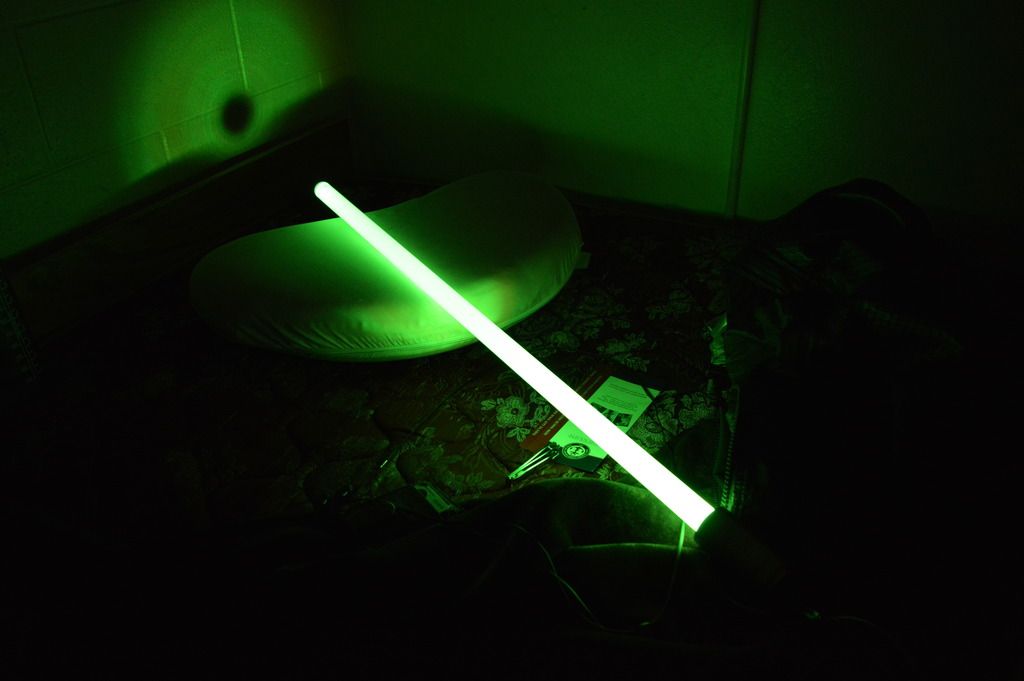
So the film comes in 48" sheets, and I bought both green and yellow to test out. At $5 a sheet, I don't mind buying two colors! I cut small sections off so that I can roll it easily and put it inside of a TCCS trans white show blade. I have some pretty thick foam diffuser that I got from a salvaged FX saber, so it blocks a good amount of the light unfortunately, but I said screw it and used it anyways, because these suckers are bright!
Like I said, it's bright! You can't really look at them without the diffuser over them, honestly.
Here's the small sections of film that I cut. They are rolled pretty thick, so I may test out thinner ones as well!
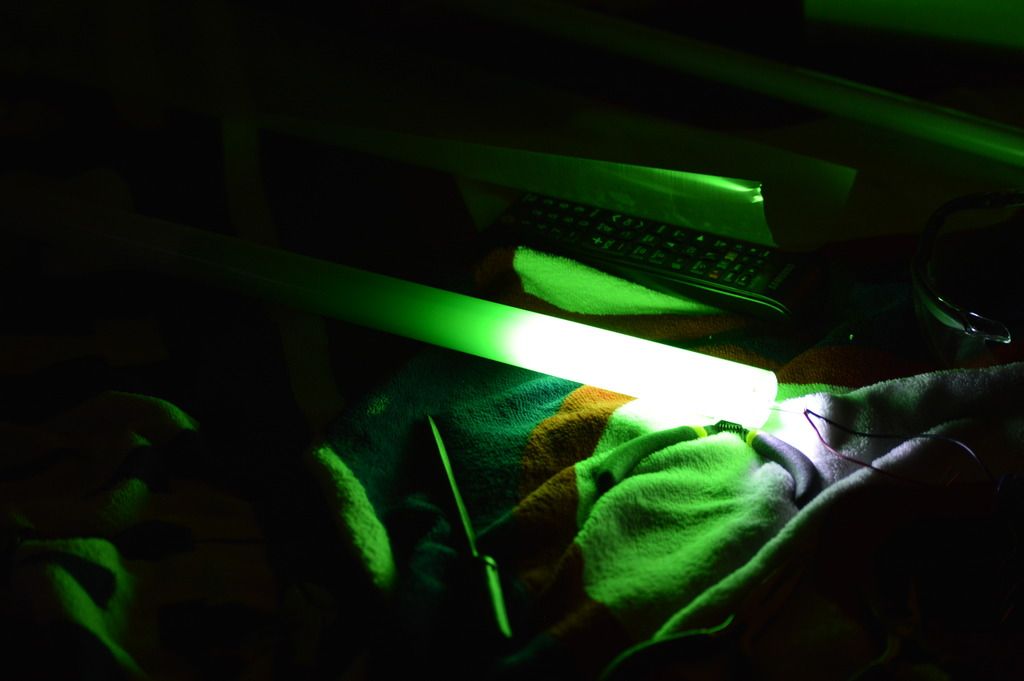
So before I go any further, I want to show you guys what I have here with my current situation. Many of you probably don't follow my threads, but I have been progressing with a yellow saber from SWTOR. I have a star LED for it, but the color is too orange, and in real life is not all that bright.
Here it is when I was experimenting with the color mixing with amber and green:
Don't mind the lack of sheets!! It was laundry day when I took this photo back in February! Or early March, I can't remember!
It looks good on camera, but in real life is extremely disappointing. The green was ok, but the yellow/amber just wasn't what I wanted.
Now back to the present day, I threw the green film in with the diffused LEDs.
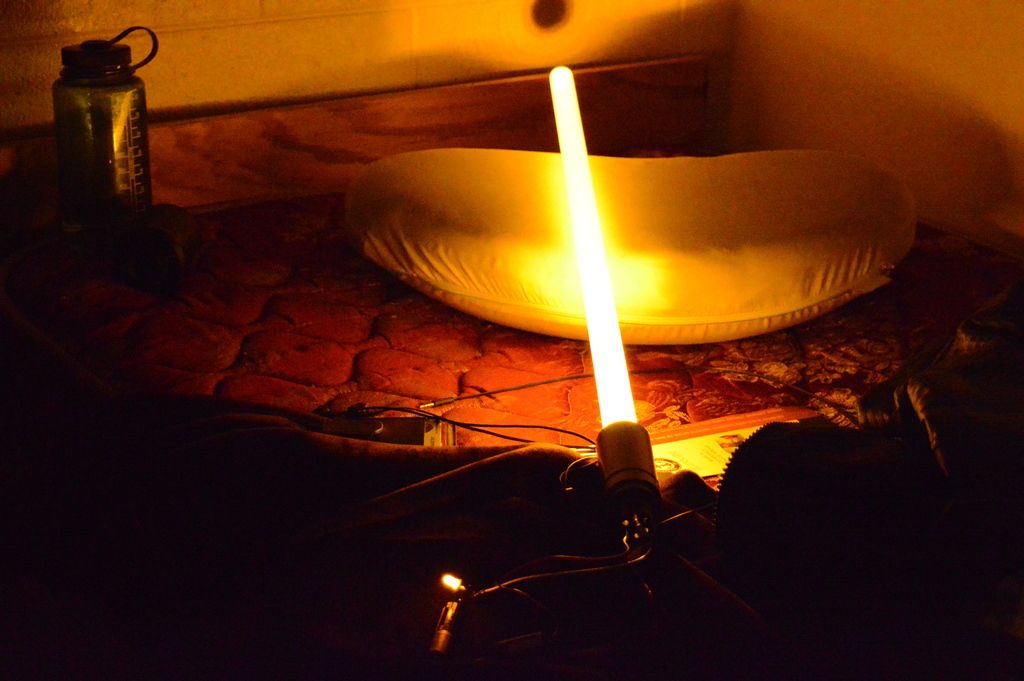
I know what you're thinking, probably something along the lines of, "But Austin, they look the same in the pictures, since photography adds the white core effect due to the light and the camera only being able to do this and that..." Yes, that's true! However, I can tell you that this saber is immensely bright on its own, and with the diffuser around the LEDs creates a similar core effect as it would in the camera. It's amazing that the film is translucent enough to give the edge of the saber that color that it needs, while the white is strong enough to boost through and still appear to have a core effect. It also lights up my whole room with just 20 of them over that spans maybe 4 inches long.
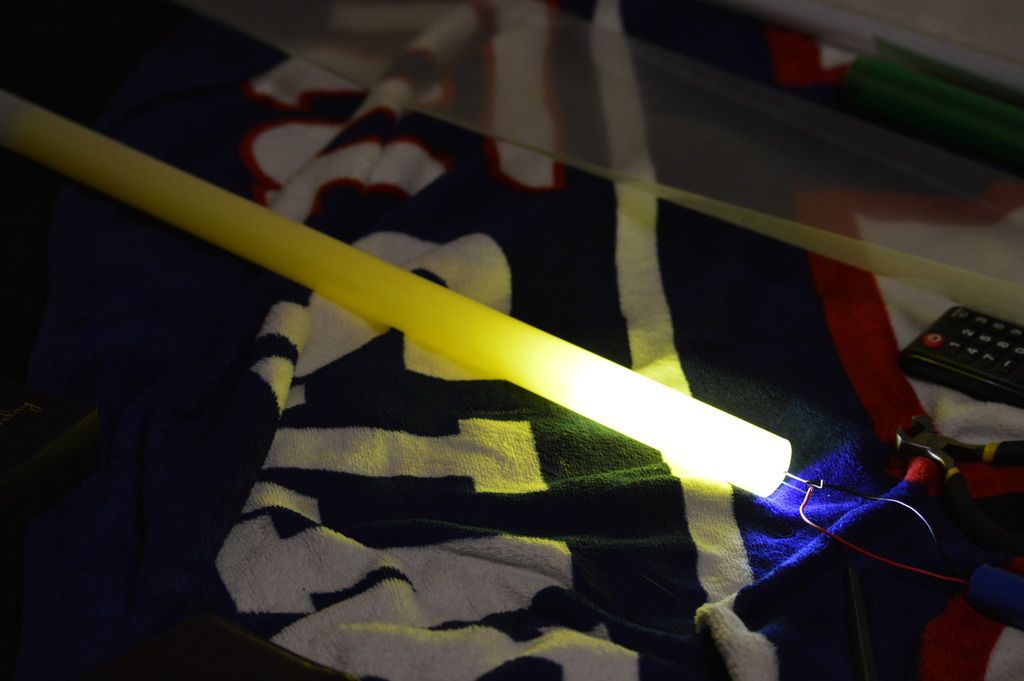
Here's the yellow film now...

This is perfect! It's exactly the right color, and is intense to look at in the dark. Even with my lights on in my room this sucker is mean looking.
So far, this has been a huge success, and I'm really happy with the results that I got. I want to get a white star LED now and give it a shot with this film, but that will come at a later time.
I hope you guys like this, and maybe it'll help someone out who's looking for answers like I was yet.
Thanks!
I'd figure I'd drop one more thing here, since I don't really feel the need to do a whole thread about the topic. Also, since it's a custom idea that I had not seen here before, I thought it might find a good home here.
This is going to be a long read, but it's a new saber blade experiment that I tested and felt I should share here with those that build custom sabers!
So as we all know, star style LED's are the popular thing to do for sabers. To me, this just isn't bright enough, and I've also had some awful experiences with certain LED's that claim to be the brightest and what not. Not only that, but the color mixing that I needed just wasn't there, and I couldn't get it for the life of me. The idea of string blades interests me because it is way brighter and looks very nice, but colored LED's just aren't bright enough. White LED's are extremely bright, but I couldn't figure out what to use for a string blade other than the blue or green LED's that are made.
Finally, I ran into some luck when I was watching one of my friends put a film over his fog lights on his truck to change the color to more of an blue-ish tint. It hit me all of a sudden, as I realized that this film may be exactly what I need to make my string blades with the color that I wanted! I went to my computer and found a supplier on ebay that sells headlight film! I purchased plenty of super bright white LEDs and went to work!
So the film comes in 48" sheets, and I bought both green and yellow to test out. At $5 a sheet, I don't mind buying two colors! I cut small sections off so that I can roll it easily and put it inside of a TCCS trans white show blade. I have some pretty thick foam diffuser that I got from a salvaged FX saber, so it blocks a good amount of the light unfortunately, but I said screw it and used it anyways, because these suckers are bright!


Like I said, it's bright! You can't really look at them without the diffuser over them, honestly.
Here's the small sections of film that I cut. They are rolled pretty thick, so I may test out thinner ones as well!

So before I go any further, I want to show you guys what I have here with my current situation. Many of you probably don't follow my threads, but I have been progressing with a yellow saber from SWTOR. I have a star LED for it, but the color is too orange, and in real life is not all that bright.
Here it is when I was experimenting with the color mixing with amber and green:


Don't mind the lack of sheets!! It was laundry day when I took this photo back in February! Or early March, I can't remember!
It looks good on camera, but in real life is extremely disappointing. The green was ok, but the yellow/amber just wasn't what I wanted.
Now back to the present day, I threw the green film in with the diffused LEDs.

I know what you're thinking, probably something along the lines of, "But Austin, they look the same in the pictures, since photography adds the white core effect due to the light and the camera only being able to do this and that..." Yes, that's true! However, I can tell you that this saber is immensely bright on its own, and with the diffuser around the LEDs creates a similar core effect as it would in the camera. It's amazing that the film is translucent enough to give the edge of the saber that color that it needs, while the white is strong enough to boost through and still appear to have a core effect. It also lights up my whole room with just 20 of them over that spans maybe 4 inches long.
Here's the yellow film now...

This is perfect! It's exactly the right color, and is intense to look at in the dark. Even with my lights on in my room this sucker is mean looking.

So far, this has been a huge success, and I'm really happy with the results that I got. I want to get a white star LED now and give it a shot with this film, but that will come at a later time.
I hope you guys like this, and maybe it'll help someone out who's looking for answers like I was yet.
Thanks!
MikeyDonuts
New Member
A hardware store saber I put together recently. Nearly all electrical conduit parts. The grip section is a combination of Slip Joint washers and O Rings.
I need to learn more about how all you guys are cutting out these curved and angled shrouds. Band saws?


I need to learn more about how all you guys are cutting out these curved and angled shrouds. Band saws?
A hardware store saber I put together recently. Nearly all electrical conduit parts. The grip section is a combination of Slip Joint washers and O Rings.
I need to learn more about how all you guys are cutting out these curved and angled shrouds. Band saws?
View attachment 613058View attachment 613059
i really like it!!
Medic713
New Member
A hardware store saber I put together recently. Nearly all electrical conduit parts. The grip section is a combination of Slip Joint washers and O Rings.
I need to learn more about how all you guys are cutting out these curved and angled shrouds. Band saws?
View attachment 613058View attachment 613059
Really like the grip - great idea!
BruceKenobi
Well-Known Member
Greetings fellow builders,
A long time ago in a galaxy far away i started on building my own lightsaber.
I started out on trying to build a graflex replica, but reading this forum i let go of that idea and i switched to a graflex inspired concept.
My saber started out as a stailess steel vacuum cleaner tube and after much grinding filing and sanding it ended up like this,
View attachment 611105
View attachment 611106
View attachment 611107
View attachment 611108
My idea was to create something in a style that could have been made by graflex, and in my opinion it turned out quite good.
The red button and "glass" eye (wich is made out of acrylic) are functional.
I changed the brass pins to a larger single pin not only because i thought it looked good but also because i could not find small brass pins that looked ok.
The "bunny" ears were to hard to replicate (as i don't own any machinery to make them) so were left out and replaced by an extra knurled screw wich holds the "stabilizing ring" in place, this is the only part that i am not quite sure off if it wil stay or go (maybe the opinion of fellow builders can make me change my mind).
The clamp is stil "work in progress" stil not sure if i wil be going for a (home made) replica or a tottaly different concept.
No grips until now, i am still thinking if i should go for Roy's excellent t-tracks or a ScottD style grip, QUESTION for ScottD: how do you make these wonderfull grips????
So here it is, i am very curious how you fellow builders like my work so far.
Any comment's or tips are welcome.
Perry.
Excellent work! I had thought about doing something similar myself, since I have no access to Graflex elements, and they are now quite expensive online, you seem to be quite good at "grinding filing and sanding", is it really a vacuum cleaner tube? what is the diameter? I could look for one, how did you make the stabilizing ring? Great Work!
Really like the grip - great idea!
I think this what I was trying a couple pages back and wasn't sure about. Mikey cracked it-- you just need to do a lot right on each other.
wailer
New Member
Excellent work! I had thought about doing something similar myself, since I have no access to Graflex elements, and they are now quite expensive online, you seem to be quite good at "grinding filing and sanding", is it really a vacuum cleaner tube? what is the diameter? I could look for one, how did you make the stabilizing ring? Great Work!
Thanks for the compliment, i had the same dilemma no acces to / to expensive graflex parts ( but hey, isn't it the true Jedi way to build your own saber )
Yes it is really a vacuum cleaner tube, i think the brand was miele (don't know where you come from but in europe well known).
The diameter is 35mm, this is slightly smaller than the original Graflex (a D-cell battery will fit).
The stabilizer ring was cut from the bottom part of the tube where the nozzle(?) fits on, hence the smaller diameter and i soldered in a copper ring i had lying around (to make it look a like flash bulb could fit in). Will post a picture of the emitter disasembled soon.
I don't know if you have a place nearby where you can bring your broken home apliances for recycling, but here in the Netherlands this is a good place to find the tubes.
Tip! Google for graflex template (images).
Perry
Last edited:
BruceKenobi
Well-Known Member
Thanks Perry. I haven't heard of miele, I'm sure in this continent I'll find mostly american stuff, I'll look into it. Diameter is 35mm? ok, I dunno the Graflex original diameter (yes I'm a disgrace!). I really like the finishing, it looks like a Graflex! Thanks for the tip on the emiter ring. That whole part is the Graflex signature tip, and you've managed to make an excellent copy.
Lichtbringer
Master Member
Miele is a company like Whirlpool. Makes fridges, washing machines and dryers, vacuumcleaners, .......
Original Graflex is 38,1mm dia.
Original Graflex is 38,1mm dia.
BruceKenobi
Well-Known Member
Thanks Michael!
wailer
New Member
Thanks Perry. I haven't heard of miele, I'm sure in this continent I'll find mostly american stuff, I'll look into it. Diameter is 35mm? ok, I dunno the Graflex original diameter (yes I'm a disgrace!). I really like the finishing, it looks like a Graflex! Thanks for the tip on the emiter ring. That whole part is the Graflex signature tip, and you've managed to make an excellent copy.
Again thanks for the compliment glad you like it.
This is the same type of tube i used,

The stabilizer was cut out of the smaller tube, one tube is long enough to make 2 or maybe 3 sabers.
The tools i used were a dremel, some good files and linnen backed sanding paper.
This sanding paper is extremely strong and sharp and with a fine grit you can use it to get back the finish.
Stainless steel can be very tough to work with but once finished it only needs a quick wipe to keep it clean so no need for extra protection.
Last edited:


BruceKenobi
Well-Known Member
excellent!! very good finish!
Similar threads
- Replies
- 20
- Views
- 1,197
- Replies
- 0
- Views
- 442