You are using an out of date browser. It may not display this or other websites correctly.
You should upgrade or use an alternative browser.
You should upgrade or use an alternative browser.
Builds By Baz- Full scale Mk II Colonial Viper
- Thread starter sandbagger
- Start date
sandbagger
Master Member
OOOoohhh that sleek, sexy shape! A couple of hours of sanding has produced spectacular results.


Also got the template plans for the last set of fuselage formers. Engines next!


Also got the template plans for the last set of fuselage formers. Engines next!
Last edited by a moderator:
sandbagger
Master Member
Thanks JB. 
Module 5, the last one in the fuselage, bringing it to full length of 8.4 metres. Progress shots.


Module 5, the last one in the fuselage, bringing it to full length of 8.4 metres. Progress shots.
Last edited by a moderator:
sandbagger
Master Member
The last fuselage module, (5) is now assembled, attached and ready for bracing and skinning.


Attachments
-
 GE6Q7bL.jpg71.6 KB · Views: 259
 -
 GE6Q7bL.jpg71.6 KB · Views: 263
 -
 pOKq1J9.png721.5 KB · Views: 248
 -
 pOKq1J9.png721.5 KB · Views: 266
 -
 uBj4yNs.jpg92.6 KB · Views: 256
 -
 qGILjOO.jpg74.7 KB · Views: 257
 -
 qGILjOO.jpg74.7 KB · Views: 254
 -
 uBj4yNs.jpg92.6 KB · Views: 264
 -
 GE6Q7bL.jpg71.6 KB · Views: 250
 -
 pOKq1J9.png721.5 KB · Views: 249
 -
 qGILjOO.jpg74.7 KB · Views: 253
 -
 uBj4yNs.jpg92.6 KB · Views: 255
 -
 GE6Q7bL.jpg71.6 KB · Views: 222
 -
 pOKq1J9.png721.5 KB · Views: 130
 -
 qGILjOO.jpg74.7 KB · Views: 134
 -
 uBj4yNs.jpg92.6 KB · Views: 257
Last edited by a moderator:
Lt Washburn
Sr Member
This is really fantastic. Is this always going to be outdoor, or do you have another location for it when it's done?
As this is the internet, I also have to notice the cat. Yours?
As this is the internet, I also have to notice the cat. Yours?
sandbagger
Master Member
This is really fantastic. Is this always going to be outdoor, or do you have another location for it when it's done?
As this is the internet, I also have to notice the cat. Yours?
It's modular so I can break it up, tip each piece on it's end and store away. Yes, cat is mine.
- - - Updated - - -
Great build mate:cool!! Now, my question: do you have enough space, between ship and ceiling, to put that top engine?
Thanks mate. No, I don't have room for that, but the ship will be relocated before I get to that.
AndoShinobi
Member
Absolutely amazing work Sir.
I was very happy to see your progress as I checked in this morning and I’m very much looking forward to the end result. (As I’m sure you are!)
Thank you for the inspiration and sharing your wonderful building skills with us.
I was very happy to see your progress as I checked in this morning and I’m very much looking forward to the end result. (As I’m sure you are!)
Thank you for the inspiration and sharing your wonderful building skills with us.
sandbagger
Master Member
Launch-tube garage..... hmmm... me likey!
- - - Updated - - -
Bless ya mate.
- - - Updated - - -
Absolutely amazing work Sir.
I was very happy to see your progress as I checked in this morning and I’m very much looking forward to the end result. (As I’m sure you are!)
Thank you for the inspiration and sharing your wonderful building skills with us.
Bless ya mate.
sandbagger
Master Member
I have a bit of welding to do inside, that I've been putting off.
Some alignment lugs at each opposing end of the modules where they meet.
Feet under the cockpit that come all the way to the skin, so I can rest it on a pallet and frame without breaking it.
Frames at the bottom of the first and last former of each module, so that if they are dropped during assembly, they don't break on the ends.
Finally, some rings welded under the frames that I can slide poles under. through the sides of each module, for manual handling and positioning of the modules during assembly and disassembly of the ship.
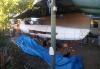
This new phone camera is ****.


Photo showing modular sections on end for transport and storage.


Some alignment lugs at each opposing end of the modules where they meet.
Feet under the cockpit that come all the way to the skin, so I can rest it on a pallet and frame without breaking it.
Frames at the bottom of the first and last former of each module, so that if they are dropped during assembly, they don't break on the ends.
Finally, some rings welded under the frames that I can slide poles under. through the sides of each module, for manual handling and positioning of the modules during assembly and disassembly of the ship.
This new phone camera is ****.
Photo showing modular sections on end for transport and storage.
Last edited by a moderator:
sandbagger
Master Member
Tonight I welded support rails under the chassis frame and raised the fuselage to correct height. Now I can work out the landing gear attachment points. I've been putting this off for a while but it has got to the point now that I have to do it because the build is progressing way faster than I thought it would. Having the fuselage higher will also make it easier to finish skinning the underside.


Last edited by a moderator:
Lt Washburn
Sr Member
Congrats on the progress! It really is looking great.
Do you know the methods used to build the real prop? I feel like I read they carved the whole thing out of monolithic blocks of foam and then skinned it and added the framework and structure later. Sort of the reverse of your method?
Do you know the methods used to build the real prop? I feel like I read they carved the whole thing out of monolithic blocks of foam and then skinned it and added the framework and structure later. Sort of the reverse of your method?
I had a friend whose Dad built boats for a living, they built it with a wood frame and then used foam.When they had the shape they wanted they fiberglassed the over the foam to make the shell. When the Fiberglass was done they stripped the foam out. Then they built the inside.
sandbagger
Master Member
@Lt Washburn, they used formers like I am, but once the solid blocks of foam were carved using the formers as guides, they were removed and the blocks glued together. The skin was a spray-on polyurea that formed a hard coat on the outside of the foam. Struts were drilled/forced through to reinforce parts of the ship and to provide attachment points.
- - - Updated - - -
@13doctorwho, My formers will stay in as my foam is only a thick skin, rather than a solid block. Once the fibreglass is on, the foam could be pulled out, but there is really no point. It will stay in as well.
- - - Updated - - -
@13doctorwho, My formers will stay in as my foam is only a thick skin, rather than a solid block. Once the fibreglass is on, the foam could be pulled out, but there is really no point. It will stay in as well.
Last edited:
Lt Washburn
Sr Member
Did they compensate for the missing formers, or did it get glued together smaller?
Well, the foam could make it sea-worthy!
Well, the foam could make it sea-worthy!
Similar threads
- Replies
- 31
- Views
- 2,682
- Replies
- 2
- Views
- 319