First build .. Bespin Bin

DarthDerf

Member
Hey.. looking to build a work station at the studio I work at. I am trying to make an area that will hold a few items, a paper towel roll holder (I may just buy this and incorporate it into the piece.), a glove box holder/dispenser as well as container for garbage (garbage can).

I am basing all of my build off of ESB Bespin City concepts and overall feel.. I am kinda designing this on-the-fly. I have the trash can design and a few others kinda figured out and wouldn't mind a little feedback, even though it isn't laid out plans.. I wouldn't mind suggestions on lighting and other effects. I am currently trying to figure out the lighting to get that"orange" glow of the carbonite chamber stairs etc...

I would eventually like to build an HIC, throne room window, falcon Dejarik table area and a TK outfit capable of meeting 501st regulations but that is to come..

Let's cross one bridge at a time..

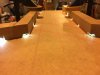
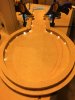
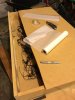
Here are some photos of what is going on...
IMG_1474.JPGIMG_1502.JPGIMG_1507.JPG

I found another post where someone was building a office area and they did a stage area with lighting resembling that of the carbonite chamber steps but I can seem to relocate it. I just was looking at ideas on how to light up the platform area with that orangish colored steps.
carbonite_chamber_steps_by_cloudartistmaster-d967eal.png

Will be building an area that holds my power supply and other items that will resemble the carbonite chamber control board.
IMG_1488.JPG

This is also all the fault of Fuzzual's Smugglers Room. He has inspired me...
Thank you Fuzzual...

Hope to add to this post again very soon...
Thanks for looking
 
Last edited:
Hell yeah DarthDerf!!! Suweeet!!!

I did an LED Strip with foil lining and then an orange plexi over the top. But I'll be honest, the post that Matty Matt made looks a heck of alot better. Mine does not "light up" like i would want it to.

Keep going brother, this is exciting.

**Not sure if you need any reference, but I took these photos when I was at Celebration last april. It was a small mock up, but I loved the details. It helped me anyway.

IMG_4837.jpgIMG_4838.jpg
 
Thanks for the words of encouragement.. I believe your quote describes my build as well... lol
Thanks for the chamber details.. those are always welcome. I will be contacting you later when painting is involved like, Did you paint straight on the PVC or did you use the fusion paint first to kinda base coat it then added the weathering (which is in itself a whole other headache)

One step at a time right?

Ok, well back to it...
 
Thanks man.. I don't have a table saw so a lot of my cuts are horrible! ... but that will add to the "worn" look..HA! Just wrapped some orange wrap around a light just to see this...
IMG_1519.JPG

Gosh this gives me goose bumps... right here.. in my garage... I have Star Wars!! This is too cool...

Can't wait to actually start adding all the lighting and painting.. This small project has gotten a bit larger...
 
Well, I figured out how I'm going to do the lighting.. in lit areas it is still bright enough to see the lighting and in the dark it's awesome...
Since it is Halloween time and orange lighting is over abundant, I took advantage and tried a few options. I liked option 3 which consisted of string lights zip tied to make a small line and the tracing paper with plastic sheeting from the local hobby shop (Hobby Lobby, name drop) to get said effect..
IMG_1537.JPG


IMG_1538.JPG

I also decided to go on and put some primer down to get a feel for the piece...

IMG_1544.JPG

While this was drying, I took the time to test out some other paints that are offered from hammered to metallic. Just to see the difference... I really liked oil rubbed bronze... I also got distracted by taking apart an old mac powerbook G4.. I'm telling you, some of the "innards" of the powerbook were awesome...
IMG_1543.JPG


Well, now that I got that out of the way, my big question is, do I just go carbonite chamber look or go Bespin style? I kinda want my palette area to resemble the landing pad from Bespin
serveimage-4.jpeg
question.jpg

The entire piece is actually a workstation now... I am also going to try to replicate the carbonate chamber controls... sort-of...
star-wars5-movie-screencaps.com-12293.jpg
I need somewhere to place paper towels, gloves, water bottles and other misc. stuff... mainly the aforementioned.

Suggestions would be nice!! If not, I'll do what I normally do..... IMPROVISE!!

Control panel is next...
 

Attachments

  • IMG_1536.JPG
    IMG_1536.JPG
    1.5 MB · Views: 106
Seriously, I listen to Star Wars Awesomeness on Spotify while making this... Try it out... I made the playlist... It has it all.... and it's just for us "Star Wars Purists" ...


I may add to it eventually, the Clone Wars cartoon is starting to grow on me....
 
Last edited:
On the other hand... anyone have any tricks-of-the-trade on weathering?

Also, who should I contact on getting an HIC form? The Han part? Eventually I'd like to make the full set up but for now, I want to make a door with Han... I also want to make a body sized (carbonite box shaped) mirror... The thoughts just flood in....
Looking into a Dvorak table set up as well.... any and all references would be appreciated...
 
Thanks JaxAndTheMoon, I believe that I have turned this mole hill into a mountain!!! I am really enjoying the thought of having a Star Wars experience for my clients that do not even know they are receiving it!!!! They will eventually make the connection...LOL... I really just enjoy seeing a SW themed area in front of me...
 
Last edited by a moderator:
I really just enjoy seeing a SW themed area in front of me...

sean-w-cup.jpg
Dude, I know what you mean. :p

Looking forward to seeing how your Quik-Tube pieces turn out. I've considered using two of those tubes to finish out my ceiling centerpiece. But I don't know what type of finish to use on them. I know I don't want a spiral seam showing. Or maybe it doesn't matter that much if I painted them flat black. Can't decide.

Keep building.
 
Well now, I've moved a bit forward today with a couple of new additions to the build.. not much but it is moving forward..

Today I started out with adding to the landing pad/set up area.


IMG_1559.JPG

I will next time use hard wood for this type of configuration but I'll improvise for now!!

I wound up deciding to use LED lights for the time being.. hopefully they last forever or at least a very ling time... I just now realized that I can't permanently glue the lights in...What if one burns out? I need to be able to replace them.. Hmmm..... playdoh.. I'll use playdoh to anchor the led lights into the holes. When they dry, they'll become kinda brittle and if needed, just wiggle the wires and the playdoh should crumble if not, tug harder... lol..
IMG_1556.JPG

Routed out a track (which wound up being unnecessary) then drilled out some lighting holes and then hand sawed the interior ports to give me this effect..
IMG_1564.JPG

Depending on the depth of the led lights, it "throws" the light to give me the effect I'm looking for. Once everything is figured out, I will glue* (change of plans) them in place to get the right effect.

As far as the concrete tubes go, @Amazing DJ, I am going to sand them down with this monster of stripping destruction
IMG_1550.JPG

I will use it to do this!!
IMG_1549.JPG

Success!!! There is no wax and there are no spiral grooves... Now to test out some theories...

1) try to use polyurethane coat to smooth it out, sand and then paint color add details, reapply polyurethane coating?
2) try fiberglass bondo stuff?
3) wood putty used like bondo and sanding to smooth out and paint/polyurethane coat?
4) metallic/hammered paint to hide imperfections then sand, add details and polyurethane coat?

Who knows?? I'll get back with you...

I did (however) try wood putty in the spirals without the heavy sanding... wax is still on it!! This would probably work if the piece wouldn't be handled or touched often.
IMG_1548.JPG

I'll test this out as well just for curiosities sake..


My set up has to be able to be wiped down/sanitized.. so, I am having to try out polyurethane coatings (basically bar topping) to allow for chemical sprays to be applied for disinfectants.. I have to have it sanded without wax to be assured that the coatings can be coated correctly so they can be cleaned.. Although this part (the tube) is actually just going to be the garbage can...HA! I would like it able to be wiped down however for not only cleanliness but for aesthetic appeal as well.

I am planning for something along the lines of this for the upper part of the tube/trash bin...
duel4.jpg
The background part, that is...
This is if I even use it for a garbage can... I am still debating... I have left a 12" gap on the left for the actual biohazard trash bin I use daily anyway. I was just going to make it look cooler.. but I could still use the tube as a shelf type set up as well and use the original opened area for the trash bin... Ugh... choices...
Using the regular trash bin is an idea that is growing on me and using the tube for a shelf is sounding so much better..
I could then put a facade in the back ground behind the regular trash bin that would have the vertical dash - dot lines...
dsref3.jpg
That could be cool...


Welcome to my brain.....
 
Thanks again @JaxAndTheMoon!

That moment, when you realize that you should have done this on the 1/2" MDF instead of the 1/4" board.....
IMG_1610.JPG

Well, you improvise....
IMG_1606.JPG

You also double, triple, quadruple check......
IMG_1605.JPG

then you readjust and move on...

I also smoothed out a bit of the molding on the work platform/docking bay as well as attaching the left light platform.....
IMG_1607.JPGIMG_1609.JPG

I'm actually hoping to receive the Falcon drone or I'll buy it, just to have it take off form the platform with the lights on to re-create the Bespin scene (sort of).
Screen Shot 2015-10-15 at 11.56.11 PM.png

Also, a friend nabbed me this Black Series T.R.Us First Order Stormtrooper "Officer" today and I can't let them stay incarcerated inside a plastic prison, so, I open them...... And let me tell you, this dude is awesome!!!

I don't know why it won't let it post portrait... Oh well... probably image size...
IMG_1594.JPG

Oh well...By the way...I got my tickets for Episode VII!!!! Wood Hooooo!!! Can't wait!!

P.S. Did you notice, that if you flip him upside down the "snow"trooper's armor almost spells cold!! HA!!
IMG_1595.JPG

This is possibly the suit I will want to make to attempt to join the 501st.. ??
 
Last edited:
Ok, well I got distracted/hyped up after the trailer!! I've been working on the build just not keeping up with new notes... I dunno, am I commenting/posting enough? Anyhow, I finished the upper part of the work table/ landing pad.
IMG_1630.JPG

I also did a test run with the lighting..
landing lighting test.jpg

I have then moved on to the carbonite chamber area.. here is the rough cut with rotozip tool..

By the way, I went with the 1/4' board instead.. just seemed to work better... add the acrylic topping (eventually) and it'll get thicker and a bit more sturdier...

carbonite chamber rough cut.jpg

I then used the handy dandy hand file to shape the areas to satisfaction and then take a quick hand height check.
carbonite chamber height test.jpg

I then add the control panel tube and the (now bottle table/bespin trash bin drop tube)

carbonite chamber test fit.jpg

Oh...... the lighting opportunities that have made themselves present...

carbonite chamber test lighting.jpg

Seriously though... I am giddy with excitement... This is too cool....

This weekends cuts are also going to help me recreate the bottom of the landing pad on Bespin... I cheated and bought a dog cone...
dog cone underpinning.jpg
This gives me my arc though.. I'll transfer that to the thin plywood stuff I have and then reshape it to the tube..
I also have plans to make the lower part of the landing pad into a spare equipment piece holder.. Don't know which just yet but I'll figure it out soon enough...

Until next time....
May the Force be with you...

Also Fuzzual I would definitely be looking into the present holiday selection of lighting for lighting options...
 
Last edited by a moderator:
Alrighty... let's see.. I've totally changed where the trash can originally was going to be and added a different piece. It isn't Bespin though... It's all Death Star.. detention block level...
I've decided to make an actual garbage chute grate garbage can cover...

I also have added the side walls to the landing platform...

We started by routing out the side wall slots..
side wall grooves.jpg
I then did some cutting and made walls!! Yay me!
side walls.jpg

The shelves shell.jpg

side walls b.jpg

We will be adding shelves to the right side in the very near future....

Well, as for the garbage can...

bio test fit.jpg

Test fit the can...

On to the fun stuff...
hole saw.jpg

getting the back drop panels for the garbage chute...

panels rough.jpg

These are still rough and I have some filing to do...
I then built a shell around the can with the idea of adding some greeblies (I think that's the term) to the side panels to give it some flair but mainly wanted the feel of the detention block escape.
Detention block.png

So, I made this...

garbage chute.jpg

garbage chute test fit.jpg

garbage chute drawn.jpg

blasted garbage chute A.jpg

I also added some wood bondo stuff to the ends to give it that "just blasted by a princess who is ready to get the Hell out of the detention block"..

Well, that's all for now I guess.. I'll update again soon... and thanks for peeking....
 
This thread is more than 7 years old.

Your message may be considered spam for the following reasons:

  1. This thread hasn't been active in some time. A new post in this thread might not contribute constructively to this discussion after so long.
If you wish to reply despite these issues, check the box below before replying.
Be aware that malicious compliance may result in more severe penalties.
Back
Top