YenChih Lin
Master Member
too shiny if they are making the Voy the same as TNG… pass.
")
too shiny if they are making the Voy the same as TNG… pass.
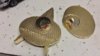
I did that many years ago. Here is a pict I have of the two I own. Left is one in the original condition. Right is one that I sanded the face smooth and re-painted. If I was doing this today, I would probably opt for bondo to eliminate the raised shield edge.
View attachment 191521
This would be for my own enjoyment as I have looked for these pins for nearly 20 years without any luck and they haven't been manufactured for a long time or I would buy them. In fact, I bought 3 of the re-releases from Starbase Atlanta, only to find out that they were not the originals I thought they were. They only had 4 of them in stock. I was very disappointed when they arrived.

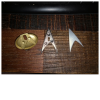
See the attached picture I took demonstrating one of the largest differences between them. The Roddenberry has the same thickness as the QMx, however, it does not have the same length. Additionally, the oval of the Roddenberry replica is offset, presumably due to the shortened length.
I'm getting an "invalid attachment" error trying to view the linked image.
So, the issue I have between the QMx and the Roddenberry.com version is the following:
QMx states they used the original molds. Roddenberry states they did a recast from the screen-filmed props.
Roddenberry.com states “ Replicated from screen-filmed props, this item represents the actual pieces that were worn on the shows” via this link. It also states 1:1 replica.
QMx states “Our TNG communicator badge was crafted using one of the only remaining sets of original molds, which was painstakingly restored in our artisan model shop. With the restored molds we were able to replicate the prop's size and shape exactly.” via this link.
See the attached picture I took demonstrating one of the largest differences between them. The Roddenberry has the same thickness as the QMx, however, it does not have the same length. Additionally, the oval of the Roddenberry replica is offset, presumably due to the shortened length.
View attachment 847739
Basically, not sure whom to trust on this issue. The original 1987 Lincoln Enterprises replica does match the QMx dimensions more closely (given the piece I have). Anyway, I know this is an old thread, but I just found the site
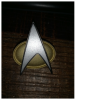
 Here is a picture of the copycat badge that I am still waiting on in the mail. These badges back then were made out of some type of alloy, most likely pewter. Can anyone confirm it is pewter?

...take a picture of your pin head on, with no angle so I could try and scratch build the gold piece if I can't find one to buy?


Here is a picture of the copycat badge that I am still waiting on in the mail. These badges back then were made out of some type of alloy, most likely pewter. Can anyone confirm it is pewter?
View attachment 848402View attachment 848403
I would love if someone created a badge in 3 separate parts, one part for each color. The gold oval, A black delta with inset area, and silver inset.


Thanks for the pictures! I wish I could find one of those again!
Someone did create a 3 piece badge. I have one (see below)
View attachment 849664
I took it apart and painted it with the proper color of paints and also flattened the black. here is a picture of the 3 pieces.
View attachment 849678
Here is a pic of all 3 together. I think I will have to find some "coppery" color paint to use as the gold is just too yellow.
View attachment 849679
paint job came out very nice.