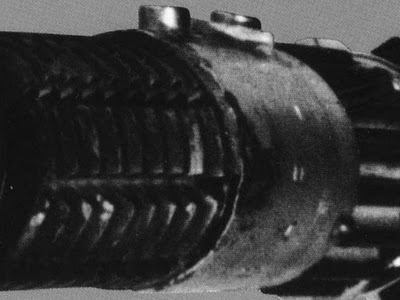
Obi ANH Sabers: What do you have?

it's so interesting to see each one opinion,each quest and vision of the perfect obi.
I know chaim,and seems serenity too,and marv,want the full vintage parts obi,as a static.
my own quest is more a revel fx obi,as it would be if it would really work.
Depending on skill,money,and researches,funny to see so many results,a guy making one using legos,other guy building a scrap from plasic,some resin casts,and so many different obis!

definitely my favorite saber!
 
The cubes have some pitting and wear, but it's to be expected of something that was sitting in the soil for god knows how long. I'd say it's likely option two of your list, that it was probably surface cleaned at some point to slow the rust.

I guess there might be something lost in my explanation here... The reason why I believe those particular cubes are still painted/oiled is because of this photo:
samepl10.jpg


The black is too consistent across all the cubes in the other photo, but in this one (and the larger versions I've seen), you can see the cubes where the change from black to shiny metal looks like worn off paint/bluing/oil. It's not just untreated metal, as they've been darkened in some way. If the lighter section of the other photo was worn like those, it would be much more apparent.

Anyway, I'll take better photos of my saber when it's finished.

Seems saber on top is painted,because the shape of cubes doesn't seem very neat.
If real grenade,maybe it has been restored.
The worst scenario:
-found,then cleaned,I mean,grinded to a white color,painted black,and warnished
The best scenarion
-found and just cleaned using a metallic brush,by hand,and then protected using black paint or warnish
Even best
-found,uncleaned,just protected using frameto,but then,no shiny look

Seems yours may be the second one,but it's just what I can think after seeing this photo.

but bottom has no paint,easu to see not glossy,just used by hand on the cubes,no more.
The golden color near the emitter makes me think the foot of grenade was here,and the cap too.
I think the grenade was found quite soon after the war,or kept in a storage,with air rust only,no under earth rust,like actual dug items.
if dug,was dug wuite soon,if not even in the 70's it would be more rusty.
but I'm sure the grenade was rusty,because painting would have other look,and the colored rings would be visible,even on a bkacl and white photo,especially the red ring.

Serenity,for you photo,you can try to take it about one metter farther,and with bigger zoom,will flatten the image and give even closer result.
 
Last edited:
And what a buzz it is to see the real deal! It's years since that tentative post I made late one night, expecting to be flamed for suggesting it. I never expected the reaction that it got. It's given me a lot of pleasure in the years since then, seeing all the acquisitions and discoveries about the balance pipes. Congratulations on getting hold of this one! :thumbsup

You wouldn't happen to still have copies of the pictures/blueprints that were posted? I have them saved somewhere, but haven't been able to locate them for a few years.

Thanks,

Chris
 
the white spots on the last photo can either be reflecion of a oily material on a rough material,but it's difficult to know!

Your opinion is really right too.

If I base my opinion on the 3 existing photos,existing screenshots,and my knowledge about how steel changes with rust and use,and how colors can appear once changed to B&W,prefer to keep my original idea.

On the lateral views,the clear groove sand darker area,and then lighter cubes make me really think about "used old rusty item"deep in the groove the rust is reddish and like powder,then it darkens,because of manipulation,but not used enough to me removed,and on the tips it's removed,and some areas keep the rust,because the metal has been deeper eaten.
And,I admit,I love old items and create fake old items,examinating each variation,to create a better fake,made some fake antiques,knives in the past,just for fun,and lots of connoisseurs didn't even think about fakes,even I told them BEFORE showing items,they just thought I as joking...

But the original pictures only are not enough to proove my idea or yours.

that's why it's so funny!
 
This is what i had, before financial hardship forced a sale.....It wasn't terribly accurate, mostly parks, with MR bubble strip proper transisitors, and JD decals.....i did all the mods, bashing, weathering, paintwork myself!OBIWAN 001.JPGOBIWAN 006.JPGOBIWAN 007.JPGOBIWAN 008.JPGOBIWAN 004.JPG
 
This is what i had, before financial hardship forced a sale.....It wasn't terribly accurate, mostly parks, with MR bubble strip proper transisitors, and JD decals.....i did all the mods, bashing, weathering, paintwork myself!View attachment 179452View attachment 179453View attachment 179454View attachment 179455View attachment 179456

Any spiecifics on those transistors? All the ones I keep finding are pretty small and the details look nothing like the chronicles photo - even vintage motorola transistors
 
Yep, I've got them here somewhere - will dig them out and let you know.

You wouldn't happen to still have copies of the pictures/blueprints that were posted? I have them saved somewhere, but haven't been able to locate them for a few years.

Thanks,

Chris
 
Here they are, found them still on my old ImageShack account. I've marked the one that caught my eye back in the day. It sort of jumped out when I was looking through Rolls Royce pages for the IG88 combustion chambers.

Just as an aside, there's an oil filter element that I'm sure was used on the sandtrooper back as well as Dengar's backplate. JFWIW.

a23nq2_Could it be....jpga24nq2.jpga24nq3.jpgb53qx5.jpgderwentcoupler1a2kz0.jpgderwentcut1a1jg2.jpgderwentcutnw1.jpg

- - - Updated - - -

I've also wondered about the locking ring for the interconnector - could it be the 'O' on the stormtrooper backplate? Probably not, I guess.
 
Any spiecifics on those transistors? All the ones I keep finding are pretty small and the details look nothing like the chronicles photo - even vintage motorola transistors
Now that i think of it....the transistors were replicas made by one of our esteemed members here, can't remember who......

Rich
 
interesting pictures.

Would mean there are two "obi emitters " per combustion chamber?
However I don' t see the 6 holes inside existing original balance pipes?
 
I once thought the stormtrooper backplate O might be from the Derwent but I compared a real one next to my old GF armor and it was quite different. Sorry I can't find that photo right now but if it turns up I'll post it.

Here they are, found them still on my old ImageShack account. I've marked the one that caught my eye back in the day. It sort of jumped out when I was looking through Rolls Royce pages for the IG88 combustion chambers.

Just as an aside, there's an oil filter element that I'm sure was used on the sandtrooper back as well as Dengar's backplate. JFWIW.


- - - Updated - - -

I've also wondered about the locking ring for the interconnector - could it be the 'O' on the stormtrooper backplate? Probably not, I guess.
 
There's a male and female emitter per chamber which are clamped together. I used to have the male one but recently upgraded to the correct female. At least that's been my understanding of it!

Male:
obi4.jpg


Female:
realobi4.jpg
 

Attachments

  • obi4.jpg
    obi4.jpg
    52.1 KB · Views: 75
really interesting kurtyboy.
Would it be possible to shoot them dissasembled,on white paper?
Several shots,and if possible them stuck together like the original mounting?
 
Here they are, found them still on my old ImageShack account. I've marked the one that caught my eye back in the day. It sort of jumped out when I was looking through Rolls Royce pages for the IG88 combustion chambers.


View attachment 179610View attachment 179611


Man, I remember when these were first posted and I spent an hour coloring these two pictures in and identifying/naming each part, so that everybody could reference them and be on the same page. Those were the days :lol

-Fred
 
Wow!

Marv, would you be able to post some more pictures of the cleaned up balance pipe? Looks awesome.

Took a while to get it all done, but here you go. I was shocked by the finish. Not as immaculate as I would have thought, but then I guess these would have been done by hand and not with a CNC :)

Emmitter1.jpg

Emmitter2.jpg


Just need to put this together now :)
 
Take that and your good fortune and get out of here. :lol

I love the little quirks and imperfections. They create character and makes it kind of unique. But if you want a perfect one, feel free to send that one my way... :)

Have you decide what to use for an assembly adapter?
 
This thread is more than 3 years old.

Your message may be considered spam for the following reasons:

  1. This thread hasn't been active in some time. A new post in this thread might not contribute constructively to this discussion after so long.
If you wish to reply despite these issues, check the box below before replying.
Be aware that malicious compliance may result in more severe penalties.
Back
Top