PORTAL 2 - Animatronic Wheatley - 05.09. - Painting and Weathering!

Re: PORTAL 2 - Animatronic Wheatley Replica - 07.02. - Equalizing effect, Video!

Here is a link the my drop box, it has a OBJ file of the game model and the textures maps. https://www.dropbox.com/sh/2zokd7blea4816q/AAD114055XNk4ggYbPsDLF-ya?dl=0
I don't have a work log but I will put one up soon.

Also Wheatley's side panels only open up when he is attached to GLaDOS' body. He also loses his handles when this happens. So unless you are going to build a GLaDOS body to attach him too I don't think you will need to have that function.
 
Last edited:
Re: PORTAL 2 - Animatronic Wheatley Replica - 07.02. - Equalizing effect, Video!

Dude I would like to hug you instantly! Thanks so much for sharing this model.
I'm quite frustrated now since my errors are pointed out when looking at the file but better now than later in the process of actually building it! :lol

This is SUCH a great help! Again, thank you ever so much!

Yeah I try to keep the opening/closening mechanism in if I can manage to pull it of without loosing too much stability.
The problem I'm having now is how to pull Wheatley's face from left to right as the up/down motion is done by the stepper motors holding the "rails" running inside of him.
 
Re: PORTAL 2 - Animatronic Wheatley Replica - 07.02. - Equalizing effect, Video!

Yeah I had to rebuild most of what I had made to make it more accurate as well. Was worth it though, added a ton more detail and gave me ideas on how the parts could fit together.

As for the eye, could you have a motor pull a cord attached to the part connected to the rail?

That's exactly what I was planning to do.

There should be a stepper motor in the very center where the rails connect on the backside. It pulls/pushes welding wires inside of the rails whereas the wires are connected to the eye part. However as the eye slides along the rails it only can move for around 10° to the left and the right as the eye would get stopped by the rails.

Hope that makes some sense...


The rails are too long here of course. Just to get an idea of the concept.
1.JPG


I shortened the rails to an appropriate lenght but if I would move the eye the rail would need to be shortened a fair bit for it not hitting the eye.

3.JPG


Now I was just thinking about splitting the rail itself in two parts whereas the inner (red) part is fixed and mounted to the motor which tilts it up and down.
And have the blue part of the rail drive around... :unsure Quite hard to figure out...

2.JPG


Thanks a lot for your input man, I really do appreciate it very much!!
 

Attachments

  • 2.JPG
    2.JPG
    42.8 KB · Views: 195
Re: PORTAL 2 - Animatronic Wheatley Replica - 07.02. - Equalizing effect, Video!

I was thinking of doing a similar thing on my own. But since it is a half scale there is even less room to work with so I am just having it as a possible model. Just LED, changeable eye piece and speakers. Maybe the arm that we see holding wheatley before you pick him up. Use him as a lamp or something.

This is how I did it in my model. By not having the rails move like in the game it provides more stability and allows the eye to move around.
rail mechanic.jpg
 
PORTAL 2 - Animatronic Wheatley Replica - 16.02. - Pupil "finished"! Video!

Hey everyone! :)

Finally an update on the process. I spent the last days designing the eye corpus and the eye pupil of Wheatley and I stumbled over some problems I need to figure out before proceeding even further.

Since the pupil of Wheatley is stand-alone I was able to finish it up and 3D print it which you can see here. Unfortunately there are quite a lot of a holes in the print due to missing infill structure to keep the top layer filament from caving in.
Even though I’m a perfectionist I’m really not that concerned about that since lowering the infill percentage helps me greatly in saving weight for the stepper motors to move.

_MG_8431.jpg


The star shaped indents are for putting NeoPixel sticks in there (which you already saw in action in the video in the post before). And the middle round slot is for having a round PCB with also RGB LEDS stuffed in there to illuminate the center of Wheatley’s eye.

_MG_8435.jpg


After soldering cables to the NeoPixel sticks I printed a little helper to be mounted in my vise to easily align the LEDs and combine them to pairs of three.

_MG_8437.jpg


_MG_8441.jpg


And having them all stuffed inside the pupil and connected up the whole thing looked like this. A mess!

_MG_8452.jpg


_MG_8456.jpg


Of course there had to be something to cover up the LEDs and diffuse them in order to get a nicely lit eye. And at the best avoid any sorts of hot spots.
This was done using some smoked 3mm acrylic which was perfect for the job. I had to cut it first though to fit the eye. A quick sketch in AutoCAD did the job and the print was glued onto the acrylic ready to get cut.

_MG_8461.jpg


Now… diffusing the LEDs is next. I was lucky to get my hands on some industrial used diffusion film which is AMAZING! Only 5mm above the light sources it removes and hot spots and spreads the light evenly.

The photo is horrible, I know.

_MG_8468.jpg


Here's a video :) It looks kind of stuttery but the motion is quite fluid (damn you 30fps!!).


So my plan was to catch the audio signal from Wheatley as he speaks. With a microphone. Which was my first idea. Quite a dumb one. Because I didn’t think of all the ambient noise the mic would also catch and misinterpret :D Thanks to sjanish for pointing that out!

The other option and final solution is to feed the audio signal not only to the speakers but to an analog input of my Arduino which does all the calculations and make the LEDs turn depending Wheatley’s voice and speech. Will be included in the later update as I got to finish up the eye first!

Thanks for checking out guys!
 

Attachments

  • _MG_8431.jpg
    _MG_8431.jpg
    281.3 KB · Views: 169
  • _MG_8431.jpg
    _MG_8431.jpg
    281.3 KB · Views: 155
  • _MG_8431.jpg
    _MG_8431.jpg
    281.3 KB · Views: 145
  • _MG_8431.jpg
    _MG_8431.jpg
    281.3 KB · Views: 151
  • _MG_8435.jpg
    _MG_8435.jpg
    257.5 KB · Views: 153
  • _MG_8435.jpg
    _MG_8435.jpg
    257.5 KB · Views: 162
  • _MG_8435.jpg
    _MG_8435.jpg
    257.5 KB · Views: 151
  • _MG_8437.jpg
    _MG_8437.jpg
    260.8 KB · Views: 160
  • _MG_8437.jpg
    _MG_8437.jpg
    260.8 KB · Views: 162
  • _MG_8437.jpg
    _MG_8437.jpg
    260.8 KB · Views: 164
  • _MG_8435.jpg
    _MG_8435.jpg
    257.5 KB · Views: 170
  • _MG_8437.jpg
    _MG_8437.jpg
    260.8 KB · Views: 159
  • _MG_8441.jpg
    _MG_8441.jpg
    407.7 KB · Views: 163
  • _MG_8441.jpg
    _MG_8441.jpg
    407.7 KB · Views: 155
  • _MG_8452.jpg
    _MG_8452.jpg
    345.1 KB · Views: 161
  • _MG_8441.jpg
    _MG_8441.jpg
    407.7 KB · Views: 159
  • _MG_8441.jpg
    _MG_8441.jpg
    407.7 KB · Views: 170
  • _MG_8452.jpg
    _MG_8452.jpg
    345.1 KB · Views: 157
  • _MG_8456.jpg
    _MG_8456.jpg
    262.3 KB · Views: 154
  • _MG_8452.jpg
    _MG_8452.jpg
    345.1 KB · Views: 153
  • _MG_8452.jpg
    _MG_8452.jpg
    345.1 KB · Views: 161
  • _MG_8456.jpg
    _MG_8456.jpg
    262.3 KB · Views: 148
  • _MG_8456.jpg
    _MG_8456.jpg
    262.3 KB · Views: 157
  • _MG_8456.jpg
    _MG_8456.jpg
    262.3 KB · Views: 162
  • _MG_8461.jpg
    _MG_8461.jpg
    404.9 KB · Views: 159
  • _MG_8461.jpg
    _MG_8461.jpg
    404.9 KB · Views: 159
  • _MG_8461.jpg
    _MG_8461.jpg
    404.9 KB · Views: 145
  • _MG_8468.jpg
    _MG_8468.jpg
    150.2 KB · Views: 160
  • _MG_8468.jpg
    _MG_8468.jpg
    150.2 KB · Views: 140
  • _MG_8461.jpg
    _MG_8461.jpg
    404.9 KB · Views: 159
  • _MG_8468.jpg
    _MG_8468.jpg
    150.2 KB · Views: 140
  • _MG_8468.jpg
    _MG_8468.jpg
    150.2 KB · Views: 153
Last edited by a moderator:
Re: PORTAL 2 - Animatronic Wheatley Replica - 16.02. - Pupil "finished"! Video!

This is looking so great. You reminded me I have let heard back yet on my samples. I'll need to touch base with them again. If you still want the audio rips let me know. I have the raw files on another machine. I also did a high rate MP3 convert for more general use.
 
Re: PORTAL 2 - Animatronic Wheatley Replica - 16.02. - Pupil "finished"! Video!

Wow! Some major sharing here! Thanks to Slythenperior:)) And great work on the eye PropBox! Eager to see the next update.
 
Re: PORTAL 2 - Animatronic Wheatley Replica - 16.02. - Pupil "finished"! Video!

If you are looking for a way to get the eye to change with the audio, may I suggest you look at how those that have made daleks have done it. They rig of the ears to flash when they talk, I think you might be able to modify something along those lines. Here is a PDF on how they do it. I don't have the technical know how to either understand or modify it but you might find it helpful.
 
PORTAL 2 - Animatronic Wheatley Replica - 07.04. - Face mechanics finished!!

Hey everyone :D

Sorry for the silent last months but I haven’t really had any time to continue with Wheatley the way I had hoped I could. Unfortunately my motivation sitting in front of 123D design and work on the model was quite low so yeah… that’s how life goes!

But now all my energy kicked back in and I’m proud to present you Wheatleys face in it’s full glory. It’s just a screenshot from 123D though so no 3D printing has been happening so far apart from smaller bits and pieces I finished off.
Wheatleys face was BY FAR the hardest thing I have ever come across to design considering I had to make sure to replicate all his expressions as accurate as possible. If you’re looking at it now you should see all the mechanics I managed to stuff in there.
It’s quite simple you might say but I had quite the headache to design those and stuff them in there as there is not much space to work with. So a few movements are limited due to a lack of exactly this space.
However I reached all my goals I set myself to implement and I’m really proud of myself :)

Here are a few pictures for you to look at. It maybe not all makes sense but I’m onto making a video explaining all the details :) apologies for now!!

So let’s start…

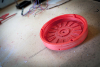
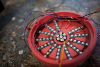
This is the base of Wheatley’s face. Bear in mind those parts aren’t finished completely as I’m currently planning the mounting mechanics for all the bolts, servos and electronics to keep it all together safely :D

sketch009.jpg


sketch007.jpg


The black parts on the image below are the mounts to attach Wheatley’s face to the rails running inside the sphere. Those are going to be mounted via M4 and M5 bolts.

sketch010.jpg


sketch003.jpg


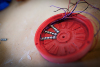
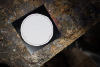
One of the hardest tasks was how to do cable management.

As Wheatley’s “heart” (Arduino) will rest in his back I needed to figure out a way to guide all the cables inside his eye to the back. I’ll be using four of the six pistons which are running from his eye to the backside – exactly what I needed ! :)

Those pistons are mounted using ball joints to move around as the eye moves too. For this purpose I had to design the sockets for the joints (transparent/silver in the images)
After a little modification I had them hollowed out and a tunnel was made running inside the eye itself connecting all the different parts where servos, leds and cables will be.

It’s quite hard to understand but hopefully the pictures help.


sketch001.jpg


sketch002.jpg


sketch008.jpg


Mad paint skillz should represent the cables :p

sketch011.jpg


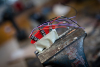
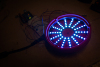
The next thing are the eye lids.
One servo at the top and one at the bottom are each pulling on a string the lids are attached to. If the servos let go, some weights inside the lids will pull them back down to the ground.
And as the servos are rather quickly and gravity is too some serious fast movement is guaranteed :)

sketch0051.jpg


sketch004.jpg


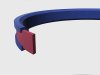
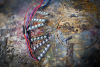
Apart from the movement of the pupil which is basically mounted on centered ball joint and pushed/pulled by two servos (next update) one of the main movements I implemented is to turn the front ring of the eye.

You can see the purple part which is hinged on a grey and green lever. The green one is attached to a servo sitting in there. If the servo turns the purple part is moved up (or down). Since this part is mounted on Wheatley’s front face this gives me the freedom to turn it in every direction for around 35°. Not much, but it’s there :)

sketch0051.jpg


sketch005.jpg


sketch012.jpg


sketch013.jpg


As said I will try to come up with a little video to show you guys all the mechanics in action but you will have to bear with pictures for now :)

However… THANKS FOR CHECKING OUT! Feel free to ask questions if you have any. Happy to answer!

Cheers!
Mario
 
Re: PORTAL 2 - Animatronic Wheatley Replica - 07.04. - Face mechanics finished!!

I still can't believe that 123D can make CAD this detailed with all the different surface directions.

On your eyelids, it looks like you are allowing zero-tolerance contact between the inside of the moving lid surface, and the static surface behind it. You will get a lot of friction across this surface, I would recommend putting in some thin runners. These are long vertical half-round or triangular lines. They would reduce the contact from a large surface, to a series of small points. The runners don't have to be very big to create this effect.
 
Re: PORTAL 2 - Animatronic Wheatley Replica - 07.04. - Face mechanics finished!!

Good to see you're back. As always stellar work.
 
Re: PORTAL 2 - Animatronic Wheatley Replica - 07.04. - Face mechanics finished!!

I still can't believe that 123D can make CAD this detailed with all the different surface directions.

On your eyelids, it looks like you are allowing zero-tolerance contact between the inside of the moving lid surface, and the static surface behind it. You will get a lot of friction across this surface, I would recommend putting in some thin runners. These are long vertical half-round or triangular lines. They would reduce the contact from a large surface, to a series of small points. The runners don't have to be very big to create this effect.

What a great idea, thanks a lot!!
To be honest I was going to leave a 0,25mm gap in between the lid and both back and front elements to reduce friction but using small runners is definitely the better way to go :)
I will try to come up with something and present it I guess today or tomorrow. Greatly appreciated dude :)

Good to see you're back. As always stellar work.

Thanks mate :D Yeah, finally the motivation is kicking in!!
 
Re: PORTAL 2 - Animatronic Wheatley - 07.04. - Face mechanics finished!!

Just in case you were considering audio, I found all the original ripped files I have. They're all in lossless format still.
 
Re: PORTAL 2 - Animatronic Wheatley - 07.04. - Face mechanics finished!!

Just in case you were considering audio, I found all the original ripped files I have. They're all in lossless format still.

I also found quite a big zip-file somewhere on the webs with all the files in there :) Thanks though!!!
 
Re: PORTAL 2 - Animatronic Wheatley - 07.04. - Face mechanics finished!!

Wow! Lot's of work on that blueprint there! Very detailed:cool
 
Re: PORTAL 2 - Animatronic Wheatley - 07.04. - Face mechanics finished!!

Glad to see you back at it. Have you made any progress with the circuit? Here is mine flashing 40 LEDs.

 
Last edited by a moderator:
Re: PORTAL 2 - Animatronic Wheatley - 07.04. - Face mechanics finished!!

zapwizard here you go!!
Redesigned the lids and added some runners (guess that's what you meant?).
Now I'm curious if I would be better off going with the left or the right option.
The left one got a litter bigger runner with a corresponding groove on the part it's running on. Whereas the right option just is a 0.3mm high runner.
Notice I put two little ones on the sides either to keep it aligned.


runner.jpg


Wow! Lot's of work on that blueprint there! Very detailed:cool

Yeah it's crazy, with every day it's getting more and more ridiculous :D


Glad to see you back at it. Have you made any progress with the circuit? Here is mine flashing 40 LEDs.

https://youtu.be/j35WY3cPQiQ

I haven't made any progress since I wanted to sort out the model itself before :( Will keep you up2date though!!

AAAAAAWESOME! Gosh this looks so great!! :eek
 

Attachments

  • runner.jpg
    runner.jpg
    86.2 KB · Views: 95
  • runner.jpg
    runner.jpg
    86.2 KB · Views: 91
  • runner.jpg
    runner.jpg
    86.2 KB · Views: 92
  • runner.jpg
    runner.jpg
    86.2 KB · Views: 99
  • runner.jpg
    runner.jpg
    86.2 KB · Views: 92
Last edited by a moderator:
Re: PORTAL 2 - Animatronic Wheatley - 07.04. - Face mechanics finished!!

The smaller runner (right) is more what I was thinking. I would also add one to the middle-most part of the eyelid. The idea is to make a sort of linear bearing that slides over the other surface.
 
This thread is more than 6 years old.

Your message may be considered spam for the following reasons:

  1. This thread hasn't been active in some time. A new post in this thread might not contribute constructively to this discussion after so long.
If you wish to reply despite these issues, check the box below before replying.
Be aware that malicious compliance may result in more severe penalties.
Back
Top