Tom's: Gary Kurtz Darth Vader Stunt Lightsaber

thd9791

Master Member
RPF PREMIUM MEMBER
Not sure where this lightsaber originated - but @redbutton and I are both building one of these! I'll post mine here...

(let me know if anyone wants credit for these, not sure whos photos they are)
Slave.jpgslave2.jpg

Thanks to Anakin Starkiller I found out the main body of the saber consisted of a Heiland Strobonar and a Graflex Slave. The strobonar is disassembled and the grey plastic ring supporting the flashlight-type head is slid around the graflex. I dipped mine in boiling water and it expanded and slid on perfectly.

Trouble is...I wondered, how do you attach the two flashes together? The Strobonar is an empty tube and the graflex is the same size and one solid piece.

After shaping the grey part, here's what I did.

DSCN4097.jpgDSCN4098.jpgDSCN4099.jpg

I bolted a chunk of 1 1/2" dowel to the graflex. I had to trim the edges by hand to get it to fit inside the Heiland Strobonar.

It still wouldn't slide on though, too much friction. The endcap wouldn't thread into the body either... while it was attached to the graflex.

So I disassembled the whole thing, and ended up slamming the dowel piece into the strobonar. it worked, considering wood is more pliable than metal.
DSCN4101.jpg

Then, the endcap had enough wiggle room to go on. Nut inside against the dowel.

DSCN4104.jpg

here are the pieces
DSCN4102.jpg

After this was all tight together... (I specifically went rough on carving the grey part so it would look like something the effects team mocked up quickly)
DSCN4118.jpg

Then I cut a piece of plastic I had lying around and drilled the correctly placed hole to screw it to the grey piece. May glue this down too.
DSCN4107.jpgDSCN4105.jpgDSCN4108.jpg

and finally I had to cut off the excess threaded rod. ended up having to disassemble the thing again, so I could cut it flush with the endcap..
DSCN4114.JPG

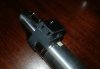
Now we have a tight fitting body! I noticed the thing holding the card is a metal C shape on top of a fabricated box with buttons on it, just like the energizer saber. I wonder which came first...

T track are red, spray painted black with screws or rivets in....Theres that weird black clip on the back of the emitter...a block of something for the D ring...and a rubber clamp area.....any tips on bending those bunny ear tabs without breaking them?
 
Wicked!
teecrooz just sent a slave down Vancouver way, so this is happening next!

*musthurrybeforemove... musthurrybeforemove*
 
Last edited by a moderator:
So awesome to see more of you actually putting this together! Great job so far!

I've got almost all the pieces on their way to me at the moment. I'm using Roy's T-tracks and for the clamp I'm going to customize a solid clamp I bough in the junkyard.

I found a strobonar in pristine conditions with its original box and everything that originally came with it. Still waiting on it as the seller wouldn't ship to Puerto Rico and I had my brother in Texas but it for me. Should be here any day now.

Yesterday I received the graflex slave and I already removed the bunny ears. Also built from scratch my interpretation of the wiper hook.

The one piece I'm missing and considering building from scratch is the D-ring holder chunk. I plan on using my cast of the energizer saber as a reference for the piece, as they seem to match in shape and size.

c6858593321e13fa6e9a30eb0de3833d.jpg


Sent from my iPhone using Tapatalk
 
So awesome to see more of you actually putting this together! Great job so far!

I've got almost all the pieces on their way to me at the moment. I'm using Roy's T-tracks and for the clamp I'm going to customize a solid clamp I bough in the junkyard.

I found a strobonar in pristine conditions with its original box and everything that originally came with it. Still waiting on it as the seller wouldn't ship to Puerto Rico and I had my brother in Texas but it for me. Should be here any day now.

Yesterday I received the graflex slave and I already removed the bunny ears. Also built from scratch my interpretation of the wiper hook.

The one piece I'm missing and considering building from scratch is the D-ring holder chunk. I plan on using my cast of the energizer saber as a reference for the piece, as they seem to match in shape and size.

http://uploads.tapatalk-cdn.com/20161019/c6858593321e13fa6e9a30eb0de3833d.jpg


Sent from my iPhone using Tapatalk
nice scratchbuild! how'd you fold down your bunny ear tabs without splitting the metal¿
 
The black mid-band looks like cracking rubber.

Where's the original prop being displayed?
 
nice scratchbuild! how'd you fold down your bunny ear tabs without splitting the metal¿

Thanks! I just gently but forcefully pushed them in with thin pliers. It doesn't take much effort so be careful once you start pushing, but at the same time they are pretty sturdy. Just make sure you push them once and maybe a little more for adjustment. Avoid having to push back and forth. I'm sure you will be fine.


The black mid-band looks like cracking rubber.

Where's the original prop being displayed?

I've noticed some are using textured rubber for the build. However I believe this was a smooth piece of rubber before it started drying and cracking. However I do like the textured look I've seen use on other members builds. Sets is even further apart from the other Vader hilts, yet it looks very much like a Vader saber.

Man I wish I could find a slave unit!

For some reason they have become a bit harder to come by but if you keep your eyes on the Bay, I'm sure you will score one. In fact there is a lot going for auction that has two of them in the bunch of parts. look up: Vintage Heiland Graflex Lot.

I just found mine last week but the prices have gone up a bit. I paid $130 for something I've seen go for as little as $30 or less in the past.
 
I also have to add, I tried hammering the pin out of my bunny ears first. Using a punch made the brass pin expand and get jammed inside the ears. I had to chop off the head and just remove the ears with the rod still inside.
 
Same here. I had to use my dremel to carefully eliminate the head. Once it was off, they slid out easily.


BTW- I've been meaning to ask you guys. Has the saber ever been matched to any production documentation? I know its a stretch to screen match, but maybe in behind the scenes photography or any other documented material??
 
Howdy, Here's some of progress on my Vader stunt lightsaber. I popped the pin out of the bunny ears using a bit from a small dremel
attachment i.e. the shaft, and did pretty much what Tom (thd9791) did. I only bent the rabbit ear tabs a bit not sure how else to
to do it. and get them flat without snappin' them off. Any suggestions? Thanks for looking!VaderStunt3.JPGVaderStunt2.JPGVaderStunt1.JPGVaderStunt4.JPGVaderStunt5.JPG
 
Heh... you guys aren't encouraging me here... I picked up a MOM ROTJ kit and need to convert my Graflex top.... starting with the bunny ears... sounds like there's no sure-fire easy way to remove the pin....
 
Yeah, I saw the eBay auction. I just can't bring myself to pay the ridiculous prices that folks are demanding for anything that says "Graflex" on it.

I guess I should've bought a bunch of them back in the day when I found my 3 cells for $40 a pop.
 
Same here. I had to use my dremel to carefully eliminate the head. Once it was off, they slid out easily.


BTW- I've been meaning to ask you guys. Has the saber ever been matched to any production documentation? I know its a stretch to screen match, but maybe in behind the scenes photography or any other documented material??

None so far, but I do wonder if it was made to cast and make a rubber/resin throwing saber. though I don't see the box on the emitter, it is a Graflex top. The only other Graflex Vader saber we know of was bladed and had screws all over it.
thrownrotjvadersaber.jpg
 
I just realized the emitter shoulder has been trimmed more than we thought! The slanted part at the back has been taken off and the box itself has been shortened!
 

Attachments

  • DSCN4108.jpg
    DSCN4108.jpg
    1,015.7 KB · Views: 371
  • slave2.jpg
    slave2.jpg
    26.4 KB · Views: 379
Yup. I've been meaning to mention that, but was waiting to receive my own Strobonar ( still in the mail). Also I dont thing there is a screw on the top. there doesnt seem to be a reference point as to how much to trim from the top. However from the back it looks like they removed the slanted portion. Here are the only reference pictures I've gotten so far.


IMG_3720.JPGIMG_3734.JPGIMG_3735.JPG
Slave.jpg
slave2.jpgVader_ESBv2.jpg
vader77saber.jpg

( My apologies for the lack of credits on the pics. I cant remember who posted each of them)
 
hmm the control box is a bit more complicated too, looking at the side view. thanks for all these!
 
hmm the control box is a bit more complicated too, looking at the side view. thanks for all these!
I've removed the back and holding it at different angles...I think the top was left alone, and your'e right no screw!
 
@juajn7fernandez Appreciate the reference photos.


Oh man don't mention it! That's what we are here for. Besides all those pictures where shared by other forum members. I'm just paying it forward :D


Sent from my iPhone using Tapatalk
 
Last edited by a moderator:

Your message may be considered spam for the following reasons:

If you wish to reply despite these issues, check the box below before replying.
Be aware that malicious compliance may result in more severe penalties.
Back
Top