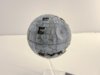
I would take a look at Mr Color's Mr Surfacer 1500 Black... That stuff goes on very, very thin. I use it on all my models from 1/48 to 1/2,700,000 (the Death Star 2)... If you look here, I've used Mr Surfacer and then a base coat on top with no loss of detail at all: