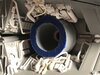
Hi Invar, Looks like you straightened the tower out so that gap will be there at the bottom. You have to build up around the base like I did until it sits flush. I added some extra spruce horizontally so the bottom of the tower would sit into it hiding the seam since it was not going to be glued. In your case since you want to be close to the ILM studio model you can extend or sand down the panel lines on the squares at the bottom and add longer one to go past the seam hiding it. I would probably sand the vertical panel lines off and add a piece that would go over the seam to the bottom and add the panel lines back in with some .20x.20 or .30x.30 spruce. You would never see the seam and it would be close to the ILM one. You definitely have the skill to sculpt the extra piece you will add with the bevel edge along the top.
You are using an out of date browser. It may not display this or other websites correctly.
You should upgrade or use an alternative browser.
You should upgrade or use an alternative browser.
Zvezda Avenger-Class ISD-II - WIP
- Thread starter INVAR
- Start date
INVAR
Sr Member
I added some extra spruce horizontally so the bottom of the tower would sit into it hiding the seam since it was not going to be glued.
Genius! That is what a better mind is capable of accomplishing in foresight. I am not especially gifted in that area.
In your case since you want to be close to the ILM studio model you can extend or sand down the panel lines on the squares at the bottom and add longer one to go past the seam hiding it.
Thanks! Fixed that gap and although the bridge angle will not be exactly where I wanted it, it will be better than the kit's angle.


gt350pony66
Master Member
genius...")
INVAR
Sr Member
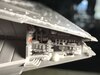
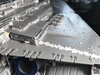
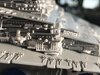
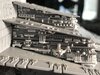
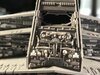
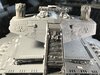
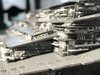
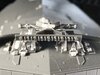
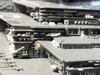
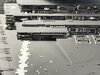
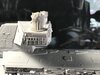
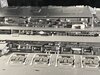
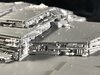
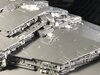
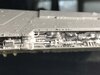
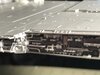
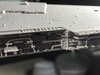
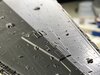
Okay - PHASE 1 FINISHED! As requested by Ged, I dry-fit the sub-assemblies and took about 85 close-up pics of all the greeblies I have spent the last 2 years carving and gluing to approximate the ILM 8 foot model for reference to all the modelers here.
A reminder that I am not a master model builder, only a novice - and I took a lot of liberties with adding details because the Zvezda is not accurate in the base plastic to accommodate all the details without major surgeries - of which I relented to doing a few only. The following posts will be pic-heavy of each section in close of all the greeblies glued to the model. It includes brass PE from a battleship also but mostly sheet and pipe styrene that had to be carved and glued into shapes to approximate the ILM filming model.
I feel relieved that this portion of my time in Greebie hell is finished and I can move onto the electronics and fiber, and then onto priming. I see light at the end of this build! Thanks to everyone here for your encouragements, advice and discussion. I'd like to remember Robiwon (Robert Cass,RIP) who really got me started and his build inspired me to go deeper into detail and to try my hand at lighting and fiber, and thanks to Fett-ish and gt350pony66 for model provision and sundry parts.


INVAR
Sr Member
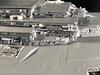
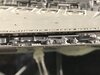
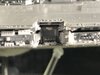
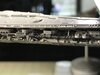
Rear engine section and wedding cake area and Garbage Chute/neck
Attachments
-
 Dry Fit Greebs40.jpg1.3 MB · Views: 296
 -
 Dry Fit Greebs41.jpg1.2 MB · Views: 276
 -
 Dry Fit Greebs42.jpg1.3 MB · Views: 277
 -
 Dry Fit Greebs43.jpg1.4 MB · Views: 232
 -
 Dry Fit Greebs44.jpg1.4 MB · Views: 276
 -
 Dry Fit Greebs45.jpg1.4 MB · Views: 286
 -
 Dry Fit Greebs46.jpg1.5 MB · Views: 246
 -
 Dry Fit Greebs47.jpg1.6 MB · Views: 273
 -
 Dry Fit Greebs48.jpg1.4 MB · Views: 260
 -
 Dry Fit Greebs49.jpg1.3 MB · Views: 282
INVAR
Sr Member
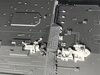
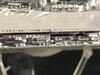
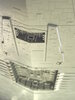
Tower Array, starboard side wedding cake
Attachments
-
 Dry Fit Greebs50.jpg1.2 MB · Views: 310
 -
 Dry Fit Greebs51.jpg1.2 MB · Views: 266
 -
 Dry Fit Greebs52.jpg1.3 MB · Views: 250
 -
 Dry Fit Greebs53.jpg1.4 MB · Views: 226
 -
 Dry Fit Greebs54.jpg1.6 MB · Views: 234
 -
 Dry Fit Greebs56.jpg1.3 MB · Views: 262
 -
 Dry Fit Greebs57.jpg1.4 MB · Views: 244
 -
 Dry Fit Greebs55.jpg1.5 MB · Views: 255
 -
 Dry Fit Greebs58.jpg1.2 MB · Views: 225
 -
 Dry Fit Greebs59.jpg1,017.2 KB · Views: 243
INVAR
Sr Member
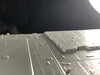
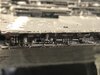
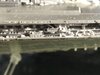
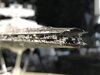
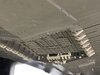
Starboard Trench details
Attachments
-
 Dry Fit Greebs60.jpg1.3 MB · Views: 244
 -
 Dry Fit Greebs61.jpg1.3 MB · Views: 250
 -
 Dry Fit Greebs62.jpg1.3 MB · Views: 247
 -
 Dry Fit Greebs63.jpg1.3 MB · Views: 224
 -
 Dry Fit Greebs64.jpg1.2 MB · Views: 255
 -
 Dry Fit Greebs65.jpg1.2 MB · Views: 250
 -
 Dry Fit Greebs66.jpg1.2 MB · Views: 252
 -
 Dry Fit Greebs67.jpg1.2 MB · Views: 251
 -
 Dry Fit Greebs68.jpg1.1 MB · Views: 265
 -
 Dry Fit Greebs69.jpg1.2 MB · Views: 237
 -
 Dry Fit Greebs70.jpg1.2 MB · Views: 254
 -
 Dry Fit Greebs71.jpg1.2 MB · Views: 221
 -
 Dry Fit Greebs72.jpg1.1 MB · Views: 226


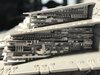
Wow! This is incredible! If you don't mind me asking, where did you get that stand? That looks way better than the two X's that come with the kit.
SB
SB
INVAR
Sr Member
Wow! This is incredible! If you don't mind me asking, where did you get that stand? That looks way better than the two X's that come with the kit.
Flight Pose:
FlightPose
Cool. And that holds the ISD weight alright?
SB
SB
INVAR
Sr Member
Cool. And that holds the ISD weight alright?
SB
So far. But the battery pack, all the fiber and LEDs/tubing/tape and magnets have not been put in yet. Ultimately the Star Destroyer will hang from a cradle of spider wire from the ceiling so I can be in flight mode and be turned to view at any angle.
Similar threads
- Replies
- 16
- Views
- 636
- Replies
- 10
- Views
- 591