Zeiram & Zeiram 2 - What do we Know?

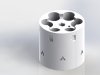
The front end is basically done, all the parts are hollowed out and ready for printing. I uploaded the front end base and the barrel to Shapeways, but they're still chewing on them...

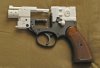
I still have to build the entire back end, though. And that has to be carefully constructed so it will slip over the back end of the gun, without impairing the function of the top-break release latch or the hammer. I'll put in some work on it this weekend.

Thanks for the interest.
 
My parts are ready and I just ordered them! They'll be here the first week of June. Don't let me forget to order the bottom barrel, too....
 
Finished the back end, revised the circular greeblie, and tweaked the 'safety'.

Uploaded and ordered the new parts. In terms of cost, so far 'my' conversion kit is cheaper than the bootleg resin kit. That doesn't count the cylinder or the other various greeblies I haven't got around to molding yet. And obviously 'my' kit is going to require more work than a good scrubbing in detergent...

Attached are some pics.
 

Attachments

  • Rear 2.JPG
    Rear 2.JPG
    415.6 KB · Views: 144
  • Rear 1.JPG
    Rear 1.JPG
    432.7 KB · Views: 143
Waiting In anticipation. when you get the part's from shapeway's. will they look that crisp and clean? never seen there print's before.
 
Sean, I've chosen White, Strong and Flexible as my material for these version 1s. It's nylon, kinda gritty and porous. It's also their cheapest. If I get a part that's perfect and needs no tweaking, maybe I'll spring for metal, but that is substantially more expensive.

Here's a brief rundown on their materials: 3D Printing Materials: Plastic, Metal, Ceramics and More - Shapeways

Birdie, I know how to do the cylinder in theory, I have yet to try it seriously... That may be my next project. The problem with the cylinder is that the bullets, the notches in the outside of the cylinder and the teeth on the ejector all have to line up for it to work properly. I don't want to sacrifice that functionality, which means I'll probably have to do it more than once. We'll see.


-MJ
 
If I could render things like you do. I would be living In a tent for giving my money to shapeway's. thank's for the link. that's cool.
 
Here's tonight's progress on the cylinder.

Making the repeating "Y" pattern around the cylinder is proving to be difficult. I'll put more time into it later.


-MJ
 

Attachments

  • Cylinder Prototype.JPG
    Cylinder Prototype.JPG
    99.9 KB · Views: 214
Cylinder's finished - not perfect, but close. It'll need a little work with an X-acto knife to clean up the Y shapes - I couldn't get them to overlap exactly. The printing & finishing process may take care of them itself... This was my most expensive part so far, at just under thirty bucks. Even though it's hollow, it has a lot of internal walls. The first of my parts should be arriving this Monday. I should expect some changes that need to be made...
 

Attachments

  • Finished Cylinder 1.JPG
    Finished Cylinder 1.JPG
    447.9 KB · Views: 140
Got my first parts in the mail today. They're small parts, so not much to look at. By Wednesday I should have most of the front end. Pictures then.

I'm planning to give my parts a coat of Future, to try to smooth them out. Not terribly concerned about these parts, but the front end base I want smooth... May involve some amount of sanding & priming...


-MJ
 
And the verdict is: close but no cigar.

The front end I'm going to have to rebuild. I think it's too short for the cylinder ... watchacallit to fit all the way forward like it should. Additionally, part of the way I built an internal guide means it won't fit snugly over the barrel hinge. I may be able to simply extend it back a few millimeters, but I doubt it. What I plan to do first is build a dummy cylinder axle and hinge and then test-fit my front end prototype around them. Also, the holes in the barrel came out a little wonky. That may be salvageable. The bottom barrel (not shown) turned out alright.

The rear end is short by a few millimeters. This is quite obviously due to shrinkage from casting and recasting. My width seems good, however. Some of the holes are oddly out of round, probably due to the printing orientation... The hole in the 'rear sight' closed up for some reason. The 'safety switch' printed well enough, but the walls are very thin and it feels flimsy. May have to go with metal next time around. I am however, very pleased with the way the circular greeblie on the side turned out. I built that as a separate piece, and had it printed like everything else, but then polished. It looks quite nice and I think it's a keeper.

Picture (as promised) attached.


-MJ
 

Attachments

  • IMG_9076.JPG
    IMG_9076.JPG
    155.1 KB · Views: 177
dang! sorry your going to have to do all that reworking. but I'm sure It will get to were you want It eventually. I think It looks great so far. I'm learning It's not easy getting something just right. but I know you will.
 
I remember seeing a trailer for this movie ages ago thinking that looked awesome.
Being reminded of it now and realizing there are TWO movies is just gobsmackingly awesome. Thank you rpf.
So much cool stuff to look at in this thread!!

I can only find it on amazon on dvd,. anyone know if there is a blu-ray release?
(subscribing to this thread, and enjoy reading through it later :) )
 
hey mj....ok, it may need some tweeking but it looks AWESOME! great job, man!!! the finished piece is gonna be mind-blowing! :thumbsup
 
Back
Top