You are using an out of date browser. It may not display this or other websites correctly.
You should upgrade or use an alternative browser.
You should upgrade or use an alternative browser.
Zeiram & Zeiram 2 - What do we Know?
- Thread starter Mike J.
- Start date
Mike J.
Master Member

Mike J.
Master Member
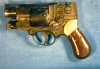
Another argument for them being replicas, besides the questionable paint scheme, is the 'safety' dot. In that one photo of all the revolvers, it's painted red, if it's present. In my photos it's unpainted.
Still, it's nice to have some clean, straight-on shots. Easier to overlay photos to compare.
Still, it's nice to have some clean, straight-on shots. Easier to overlay photos to compare.
Mike J.
Master Member
Thanks for the support! ")
I'm afraid I may have run out of easy things to model, though I wouldn't call any of this easy...
I'm limited in my abilities to design in the computer without my Enfield to measure. I don't want to make a part once, then have to go back and revise it because my dimensions were off. Revising a part can get complicated, depending on how it was built.
Last edited:
Mike J.
Master Member
The bottom 'barrel' does seem to have a slightly domed end, but I'm not sure how to add that without rebuilding my model from scratch.
But I've been busy today!
Behold! The entire front half is DONE.
But I've been busy today!
Behold! The entire front half is DONE.
Attachments
Mike J.
Master Member
Thanks. Not sure how much farther I want to go without an Enfield to measure. The rear structure covers the hammer area, and looks to be (according to my casting) exactly as wide as the Enfield. I think it's designed to simply slip over it. A couple plant-on greeblies cover most of the seam on each side. It also interfaces with the recoil plate, which I think has been cut down. Until I get my calipers on a Marushin Enfield, I'm reluctant to go much further. May have to content myself with modeling the greeblies on the sides.
Let me know if anybody wants a front end to slap on a cheap revolver - I think I can hollow it out and put it on Shapeways, assuming they don't yank it.
That's what I'm going to be doing eventually, anyway. Getting my parts 3D printed. In plastic first, to test them. Maybe metal later, though that would cost a lot...
Thanks for the support!
-MJ
Similar threads
- Replies
- 48
- Views
- 5,828
- Replies
- 7
- Views
- 694
- Replies
- 13
- Views
- 12,462