Zap's Fallout Radiation King Radio

Render, Radiation King, Game Accurate.jpg


Render, Radiation King, Game Accurate, Back.jpg


How about a new rendering.

-----------------------


Radiation King CAD, Front Comparison.jpg


I may not end up modifying the original Philco radio. The front of it is curved in such a away that getting the faceplate to fit perfectly will be very difficult. I would also have to color match the insert panel and I am not confident that I can do that to my satisfaction.

So I have updated my CAD design to be a game-accurate shape. The in-game design has the darn knobs pushed way towards the sides, when I would rather have them centered inside their cutouts. Fortunately the insert panel can be swapped out if I decide to deviate on that detail.

/Update: I can push the knobs to the nicer centered position. My friend pointed out they are centered in Fallout 3.

-----------------------

IMG_9978.JPG


The construction will be built the same as the Philco radio with a plywood base, and wooden sides, top and back. I have not yet decided if I will make it from real wood, or try to do a water transfer print over MDF.

The Philco radio has a "Photo finish", and I can't find any documentation on how they actually applied it. The finish wraps around the entire radio, it is possible they used a water transfer method.

It seems obvious to just use real wood, however the end-grain may cause issues due to the curved edges. I have found a water transfer sheet which is a near perfect match for the grain and tone of the in-game radio.

Regardless of which method I do, I have to decide between trying to CNC carve the wood, or use a tall bandsaw to try to get close to the required curves. I know I don't want to sand the whole thing down to shape.

-----------------------
Radiation King CAD, Guts.jpg


The back panel will have an On/Off switch, a special spiral power cord grip I designed, USB-Micro jack, and a composite video output.

The USB and Composite video will allow me to debug the Pi Zero without having to take everything apart. With some code changes the USB could also be used to expand the Pi storage using an external disk. The composite video could perhaps do some karaoke video feature. I figured having analog composite video out instead of HDMI would be more in the Fallout style.

-----------------------

Radiation King CAD, Faceplate.jpg


All the parts except for the power supply will mount to a single PCB. The Pi Zero and Pi Pico both will be mounted on headers to allow swapping them out if needed. The air core motor sits in the middle, and the buttons, motor driver and i2s speaker amps will all be housed on the PCB.

Everything then mounts to the faceplate.

-----------------------

IMG_0411.JPG


I have already 3D printed a prototype of the faceplate. It is printed on a Form Labs Fuse 1. The Fuse 1 is an SLS 3D printer which means it can print almost any geometry without worrying about overhangs. The parts are ready to use once you clean off the powder.

-----------------------

IMG_0419.jpg


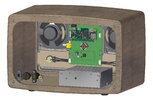
Here it is mounted to my test mock-up. The Radiation King logo was printed a while ago, and was colored with a Molotow Chrome pen. The gauge face is currently just a laser etched black acrylic panel with the paper layer left in place. It will be a acid etched brass plate in the final form.

-----------------------

I also received my Ultrasonic microphone PCB design. It works! Except that CircuitPython's PDM in code has a bug. The bug makes the sample rate fixed at 22.1KHz per channel instead of being variable. I will still go ahead and put the microphone into the design and hope that the software can be updated later to make the mechanical remote work.

-----------------------

Code wise: I have done lots of updates. I now have the Pi Pico connected to the Pi Zero using a single USB connection, with no secondary UART needed. With the Pico connected to the Zero, you only have to load code onto the Zero. The zero then mounts and copies the required code over to the Pi Pico. This makes updating both sets of code much easier. The only catch is they way Linux handles a USB interruption, which means if the Pico is reset you have to reboot the whole thing. I have tried a bunch of re-mounting code, but it never restores the USB storage, and USB UART consistently.

The Zero and Pico also now talk to each other and each has a heartbeat signal to ensure that if one crashes, the other code goes into standby.
 

Attachments

  • Radiation King CAD, Guts.jpg
    Radiation King CAD, Guts.jpg
    284.8 KB · Views: 119
Last edited:
Wow, this is looking great! The Radiation King is on my dream project list.

The lit frequency and needle display looks especially great. Are you just using a standard LED for that, or have you made a diffuser/reflector setup? I am currently making a lighting design for a replica WW2 compass and want to achieve a similar look.
 
I am using a strip of 8 neopixels. You can see them in this image from earlier in the thread.
They are positioned just between the gauge plate and the glass. I was afraid they would be too close to the plate, but they light up the whole area quite well, in fact I run them at about 70% brightness most of the time.

They are also cheap and only take 1 wire to drive. My only gripe with them is that they don't have enough level settings to have them fade on/off without a bit of stepping near the lower levels. These days you can get all sorts of sizes, but I have been just using the pre-made PCB mounted ones. In the Pip-Boy I will probably use smaller LEDs, either tiny Neopixels or regular LEDs with a driver IC.
Ah very good. Thank you for providing such detail and the link to the specific LED, I appreciate that :)
 
Fallout3.png

So here is an image of the radio as it was in Fallout 3. Note the more central position of the knobs. The only other difference is that the Fallout 3 version has silver trim around the center "skull" shape and the bezel. I don't know yet if I will try to replicate this.

------------------

Render, Radiation King, Game Accurate, Fallout 3.jpg


I made a new rendering with the knobs closer to the center. Since the pots are just on wires in theory the panel could be swapped out to put them in either spot.
 
Render, Radiation King, Game Accurate, Fallout 3, buttons.jpg

One more rendering. This time with the silver accents from Fallout 3, and button label inserts.
I like the silver trim, and to re-designed the center "skull" piece to be separate so it will be easier to paint.
I am testing a few different silver paints on prototype parts currently, but so far none look correct, I may need to get a airbrush setup to do it right.
 
51563109745_8f322e856a_k-jpg.jpg


It works! I believe I am the first person to make one of these 1950's remote work with all buttons detected.

There were two bugs in CircuitPython that needed to be fixed. Thanks to the fine folks at Adafruit and the CircuitPython Discord who fixed them. I can now capture PDM audio at 80KHz using my SPH0641LU4H-1 Mems Microphone board.

I was amazed how fast it can capture the samples, and perform an FFT on them. I had to slow down the sampling as it would catch the button ringing and trigger four or five times. Even with the Pi Pico running a few other tasks.

For some reason each button on the remote seems to have three different peak frequencies . I am sure with some windowing and other filtering I could clean up the signal, but for now I am happy the remote works most of the time.

I have the four buttons setup for "Previous Station", "Volume Down / Off", "Volume Up / On", and "Next Station".

To prevent the control knobs on the front of the radio over-riding the signal, when you press a button on the remote, it increases the dead-zone for the potentiometer. If you move a front knob enough, it resets the dead-zone. Thus allowing for dynamic controls without having to put the radio into a special remote control mode.
 
I finally put some time into this project. I have a first draft of the PCB done.
After trying a half dozen PCB programs I settled on using CircuitMaker. It has a great 3D viewer and STEP exporting, so I was able to ensure everything matched up between the PCB model and the 3D CAD model.

I need to add connector labels, and in general, clean up the PCB a bit. It is a 4 layer board. The Pi Zero and Pi Pico connect to each other over a USB connection. I managed to find a stack-up of a header an pogo pin set that lets me contact the bottom side of the USB contacts on each board.

The PCB has connectors for the speakers and potentiometers obviously. There is also a Soft_Off button, NeoPixel, and an optional Microphone board connectors. The yellow connector is CVDS video from the Pi Zero just for debugging or possibly karaoke if someone wants to code that.

Radiation King, PCB Draft 1.png
 
IMG_20220818_101901.jpg


My circuit boards have arrived!

I have to give a special thinks to PCBWay for these. They gave me a good discount on getting these boards made, and they even sourced and populated the SMT parts for me. They even were able to get the motor driver IC that is out of stock at all the US suppliers.
All I need to do is add the though-hole components. They were so far, I am actually still waiting on some of the parts to arrive before I build up the board.

The board itself is four layers, with more time and a less symmetrical layout I could probably get it down to two layers. I designed it in CircuitMaker. You can get the design file here.

--------------------------------------

Exploded Layers.jpg


So I decided on a method for my enclosure construction. I wanted something that didn't require me to sand the whole curve into the enclosure, and I wanted something that folks to reproduce. I debated trying to use a wood CNC, but most of the software I could find did inaccurate 2 .5D etching, or charge huge amounts for true 3D sculpting.

What I ended up settling on was to use lots of layers of laser-cut plywood with dowels to make the main structure. This section will be covered with a thin real wood veneer.

The front will be made from 1/2" of maple, and the back will be a 1/4" piece of maple., both with rounded edges.

-----------------------

IMG_1074.jpg


It took a few hours to glue up the 45+ layers together. If I were to do it again I would use 6mm (1/4") plywood to save on the total number of layers.


-------------------

IMG_1097.jpg


I then waited 24 hours to the glue to fully cure. I used a belt sander to remove all the glue and the laser burnt edges. I then slathered the surface in wood filler (I smoothed and removed most of it after taking this photo)

Once that fully sets I will sand and paint the surface with a filler primer. This will then become the base that gets wrapped with the veneer.
 
zapwizard Awesome work as always, might I suggest a different chrome finish for your radiation king badge? I have used Mirror from culture hustle and can say it is the absolute best chrome paint applicant I've ever used.

MIRROR - the world’s mirroriest mirror chrome paint

The problem I always ran into with Molotow was the finish was so darn fragile. You could never really touch it or make any kind of contact without dulling the finish and ruining the effect. Forget about clear coating either, all the mirror effect goes away. With Mirror none of that is an issue, I've been able to handle props, clear coat, and even apply tints over it to get awesome chromed effects. I highly recommend for any parts needing a chromed finish. Good luck wrapping this one up !
 
I haven't tried liquid mirror yet. The Molotow pens work okay, but I really need to prime, and sand the 3d printed plastic to a shine before applying any finish. I have also debated using heat transfer film since the surface I need mirrored is flat.

Project update:
Lots of stuff on hand... no time.

Hardware:
I have a new PCB design that uses only two layers. Thanks to PCBway for providing a discount on their fully assembled PCBs. All I had to do was solder the though-hole and special part and it works great.

I have new parts from SendCutSend to remake the body using MDF and real wood veneer, I just haven't had a block of time large enough to get that portion done.

Software:
I have been working on the software. Lots of little tweaks and features with the goal of making the radio simple and intuitive to use.

I was looking for more old timey music I ran into "A Complete Broadcast Day". It is a unique recording of a full day on the radio in 1939. Including the ads. I then found a few others on Archive.org, but they are more broken up.

That triggered me to add a new feature to the software: Virtual real-time playback. I already support random and ordered playback, but the position in the playlist depended on when you first booted up the radio.

Now, I use midnight on the current day as the reference point. Each radio station can have an offset set: For example a Complete Broadcast day starts at 6 am.

Now you can turn my radio on to A Complete Broadcast day and it is accurate enough that the time callouts are within a minute or two of real time. In theory you could record any real radio station for a day, and then have it played back in real-time. I still need to add a reset feature, as currently the code only works in real time on the day you booted the radio, but that is a simple time check script.

A few other features I want to add at some point:
-Virtual Advertisements. I already have a folder full of old school ads, it would be cool to optionally add an old add or two between songs.
-Virtual DJ callouts. Currently when you randomly play Diamond City Radio the DJ callouts play just as random as the songs, it would be good to be able to tag file and have it play next to the appropriate song.

I also plan on reengineering the PCB at some point to make the whole thing more generic. Such that others can integrate the board into a different radio housing. I had one person email me as they wanted to modify an old car radio to act like it was set to the 1950's only, so the radio matched their vintage car. The only issue is that I use a Pi Zero, and those are just out of stock everywhere.
 
So many props in Fallout (and other games) are kit bashed from real-world items. For example, in Metro Exodus, I recognized that one of the parts on the upgraded pneumatic gun was the aftermarket fuel pump on a 1939 Ford Tudor. I only noticed because I had just recently helped my Dad fix that exact item on his friend's old car.
A small clarification on a topic that is not the main topic, I apologize.

I'm afraid it's not easy to find a fuel pump from a 1939 Ford Tudor in the area where the events take place.
Rather, a localized version of the Fiat 124 fuel pump was used, which was installed on VAZ cars, specifically models 2101-2106.

Fiat 124 Coupe/Spider AC/AS 1966-67 until engine no. 3932

0005252_benzinpumpe-original-bcd.jpg
 
So its been a while and I need to post and update. This will be an explanation of the software functions:

First off, the code is done! (Until I find some other thing to add)

The software on this radio is actually quite complex and does some cool stuff.

Here is the feature set from my Git hub listing:
  • Simulated live radio station playback
  • Time synchronized playback of real world stations
  • Multiple virtual radio frequency bands
  • Noise, fuzz and other tuning sounds effects
  • Automatic parsing of folders and audio files
  • Automatic distribution of radio stations across an analog dial
  • Cached song metadata for faster handling of large libraries
  • Analog Air Core Motor control
  • Switched potentiometer based volume and tuning inputs
  • Manual button activated tuning
  • Manual song skipping
  • Fast-forward, rewind and pause (including time shifting)
  • Playback ordered or randomized stations
  • Ultrasonic Remote Control Support (Disabled by default)
  • Standby mode
  • Neopixel light control with warm start/shutdown effect
  • Stereo playback
My goal is to make it so that loading new music and stations onto the radio is easy.

The first layer of folders become a "radio band". For example you can make a folder that simulates all the radio stations in Fallout 4 only, or Fallout New Vegas only, or Christmas stations, anything you want.

Inside the band folders you put in a station folder containing songs. For example Diamond City radio with just those songs.
The stations can be played either randomly or in-order. The in-order listing can also be time synced to your actual local time. That means if you have a 24 hour recording (Such as D-Day) then you can listen to the radio as if it were that actual day.

At power up the system will check the folders and cache all the metadata for the songs.

The system spreads the stations evenly across the radio band. If your radio dial has 120 degrees of movement, and you have 10 radio stations on that band then you get a radio station every 12 degrees of movement. As you tune the radio off of a station the volume of the station drops out, and randomized fuzz replaces it. The effect in person is really quite convincing.

The live playback is the more unique feature and something I haven't found in any other radio software.
 

Your message may be considered spam for the following reasons:

If you wish to reply despite these issues, check the box below before replying.
Be aware that malicious compliance may result in more severe penalties.
Back
Top