Zapped! Falconprise

battlestar99

New Member
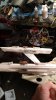
A lurker here on the forums, I have always wanted to build the spaceship (Falconprise) from the movie Zapped! Knew exactly what is was when i saw it many years ago. The build was always on the back burner, collected the kits throughout the years but never could get clear shots to I'D the parts on the nacelles till a fellow modeler show me the scene from the Blu-Ray off i went and decided to do it.

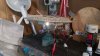
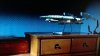
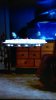
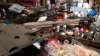
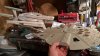
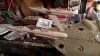
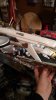
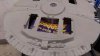
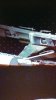
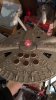
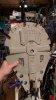
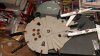
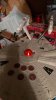
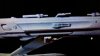
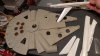
Since the movie came out in 82 just two kits are needed the MPC Millennium Falcon (or AMT/Ertl rebox) and the AMT 1/537 Smoothie Enteprise. A quick basic go through of the kitbash parts are the Falcon landing gear and pads are glued on the Nacellels, clear red and blue domes on the main body and some number markings on the nacelles.
 

Attachments

  • 16864572_1455092837842814_4823490254379896786_n.jpg
    16864572_1455092837842814_4823490254379896786_n.jpg
    38.4 KB · Views: 416
  • 16996250_1457671940918237_8026392935227574274_n.jpg
    16996250_1457671940918237_8026392935227574274_n.jpg
    45.2 KB · Views: 430
  • 16864877_1457658940919537_1276932752282148894_n.jpg
    16864877_1457658940919537_1276932752282148894_n.jpg
    60.3 KB · Views: 551
In between commission builds I notched out the area where the pylons fit on the Falconprise. Going to forgo a brass tube armature (I would normally do it on any Studio scale build) and just use a styrene brace for the nacelle pylons.
 

Attachments

  • 16832298_1458584500826981_3445544236974499326_n.jpg
    16832298_1458584500826981_3445544236974499326_n.jpg
    76.1 KB · Views: 202
To make the frame to support the pylons I laminated some scrap styrene into a "V" which will give greater support for the nacelles. I will fill the cavity with 5 minute epoxy and cover it with the falcon plate.
 

Attachments

  • 16939345_1458783677473730_1306696833163765837_n.jpg
    16939345_1458783677473730_1306696833163765837_n.jpg
    67.3 KB · Views: 145
  • 16997971_1458783684140396_5421872252805442969_n.jpg
    16997971_1458783684140396_5421872252805442969_n.jpg
    79.4 KB · Views: 182
On this previously built MPC faclon (which I acquired in a lot of models many moons ago) I had to clean up the edges from parts being glued and cut off all the locator pins as both the top and bottom hulls will be flush. While I work on that I decided to add the lights that are on it, six total on the front (which I will call them the headlights) marked them and drilling out the holes to accommodate 3mm white leds.
 

Attachments

  • 17021571_1459477474071017_3711123233470404183_n.jpg
    17021571_1459477474071017_3711123233470404183_n.jpg
    25.6 KB · Views: 256
  • 16865070_1457671934251571_1879289484420923283_n.jpg
    16865070_1457671934251571_1879289484420923283_n.jpg
    52.5 KB · Views: 300
  • 16864821_1457671990918232_44729248303919009_n.jpg
    16864821_1457671990918232_44729248303919009_n.jpg
    42.4 KB · Views: 306
Having a conversation with the owner of fedoratron.com he came up with a new name for the spaceship the "Zapperprise". I may have to steal that name for the ship as I think it fits better than the falconprise.

Got one nacelle on and got it seam mostly sanded, didn't spend a lot of time sanding it as I assume the prop/model builder didn't either. Next I started the fun process adding the greebles that go on the nacelle which they used the MPC Falcon's landing gear struts, pads and turret guns.
 

Attachments

  • 16864736_1460227320662699_715597956453785017_n.jpg
    16864736_1460227320662699_715597956453785017_n.jpg
    89.4 KB · Views: 184
Hahah! Goofy idea, I like it. :) Looks like AMT/ERTL Slave-I guns glued on the nacelles in your first post.

Strangely enough, looks to me like this was the REAL inspiration for the NX-01. ;)
 
Got the other nacelle on and I will mirror greeble it with the Falcon landing gear and turret parts.
 

Attachments

  • 16998155_1461257090559722_6630528731362797769_n.jpg
    16998155_1461257090559722_6630528731362797769_n.jpg
    73.4 KB · Views: 336
Adding the rest of the Falcon landing gear/pads to the nacells and they even glued pads on the pylons.
 

Attachments

  • 17098709_1462140913804673_2715041049226075063_n.jpg
    17098709_1462140913804673_2715041049226075063_n.jpg
    71.6 KB · Views: 221
  • 16998209_1462140910471340_3421909427746148550_n.jpg
    16998209_1462140910471340_3421909427746148550_n.jpg
    57.4 KB · Views: 166
Got the headlights drilled out to accommodate 3mm white leds, for the bottom of the ship and inside pylons I will have to compromise a little as there is not a good shot of those areas (even on the Blu-Ray) but I will keepthe detail in spirit with. the rest of the ship
 

Attachments

  • 17098306_1463265580358873_113599735314656558_n.jpg
    17098306_1463265580358873_113599735314656558_n.jpg
    19.7 KB · Views: 154
  • 17098545_1463154820369949_8754207952054748557_n.jpg
    17098545_1463154820369949_8754207952054748557_n.jpg
    83.1 KB · Views: 277
3mm white leds mounted for the ship's headlights and one blue led for the bottom dome and I will get one slow flash red led for the top red dome before I close it up.
 

Attachments

  • 16996035_1463916973627067_3464678425643857083_n.jpg
    16996035_1463916973627067_3464678425643857083_n.jpg
    85.1 KB · Views: 185
  • 16996052_1463916970293734_5573553483760398045_n.jpg
    16996052_1463916970293734_5573553483760398045_n.jpg
    68.9 KB · Views: 151
With what I could see and make out this is as close I can get to the inner nacelle detail.
 

Attachments

  • 17021370_1464983840187047_6533273454428150741_n.jpg
    17021370_1464983840187047_6533273454428150741_n.jpg
    63.4 KB · Views: 101
Got all the lights wired up including the flashing red led on top. Since I can not figure what type of dome was used on the top and bottom I vacuformed some generic domes to fit on top and bottom and I will tint them with Tamiya clear red and blue.
 

Attachments

  • 17021955_1465911260094305_6857394623593246091_n.jpg
    17021955_1465911260094305_6857394623593246091_n.jpg
    60.9 KB · Views: 581
After everything wires and secured I added the Falcon landing bay doors on the on the bottom, since there is no reference on the bottom I assume this is probably what the model/prop maker did. I did have ti shave off some raised edges on the sides of the kit and started clamp duty to get the Zapperprise to mate flush.
 

Attachments

  • 17103339_1467505103268254_5238641929910577015_n.jpg
    17103339_1467505103268254_5238641929910577015_n.jpg
    80.7 KB · Views: 99
  • 17155987_1467505109934920_2161625841598417776_n.jpg
    17155987_1467505109934920_2161625841598417776_n.jpg
    74.8 KB · Views: 156
To tint the red upper dome I use a Future/Tamiya clear red mix and dipped the dome, if you don't have a tinted paint food coloring and Future will works just as well and I will repeat the process on the bottom blue dome.
 

Attachments

  • 17190630_1468405689844862_6783376063750914808_n.jpg
    17190630_1468405689844862_6783376063750914808_n.jpg
    54.1 KB · Views: 84
This thread is more than 7 years old.

Your message may be considered spam for the following reasons:

  1. This thread hasn't been active in some time. A new post in this thread might not contribute constructively to this discussion after so long.
If you wish to reply despite these issues, check the box below before replying.
Be aware that malicious compliance may result in more severe penalties.
Back
Top