**COMPLETED** Y-Wing 1/48 resin model

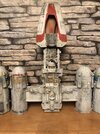
Haha, I was kinda worrying about getting the angles right with all the pipes and then last night I had a look through all the reference I could find for the studio models...turns out they weren’t bothered about making it look neat when they made the originals! So the more wonky mine is the better I think!
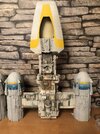
For the vanes I think I combined the two pieces that form a cross shape when viewed from the rear in tinkercad and printed them as one piece for each side, and they came out pretty good with no real warping. I oriented the parts as shown on the screenshot, straight up and down with the most fragile looking bit furthest from the build plate. View attachment 1413120

I always fight with that also! ILM put these together as fast as they could, they had weeks in some cases a d not years to male them. I normally make my models look 'right' to me and I am often less concerned about the exactness as even on film the same ship can change from scene to scene :)

For me, once I get past 100% accuracy, I find it's a lot more fun! Although I recognize there is a lot of joy in truly replicating something also.
 
Last edited:
Okay, a little update for today. As I said earlier, I roughed up the edges of the slot in the engines where I had to insert the wing. Next time I will scale the wing part down by one or two percent so that it fits together more easily. So here's the gnarly edge that my dremel created:

IMG_5634.jpg


I used some Apoxie Sculpt to help reinforce and fill that joint a bit:

IMG_5635.jpg


And here it is after some sanding and a bit of primer. There's nothing like primer to let you know that your putty job is crap! :lol:

IMG_5656.jpg


I have begun assembling the little control vanes that are at the back of the T-tracks. Those parts are pretty delicate, and I'm lucky that nothing has broken yet! In order to make painting easier, I'm going to paint the L'eggs first, then the blue on the Saturn V cans, and THEN put the T-tracks over that. Unless anyone has any better ideas...?

That's about where I am right now with this. Not really much of an update, but it's coming along slowly. Thanks for watching.

SB
 
Little update for today. I glued the rest of the greeblies onto the body and hit it with some primer. It really makes the details pop! I'm very happy with how the body is coming out.

IMG_5690.jpg


Then I did some masking and painting on the engines. Feels good to get some color down, finally. The blue is waaaay too blue. I'll knock that back with some thinned base color eventually. Hopefully lessen the contrast there.

IMG_5682.jpg


IMG_5693.jpg


That's all for now. Next step is to paint the clamps and T-track, and stick 'em on.

SB
 
Coming on well StevenBills, I’m working on 3 commissions of the Chris Bibby Y-Wing, 2 of them as Gold Leader (One as the early paint job & the other as the heavier repaint)...& the third as Red Jammer...these are industrial printed at studio scale

John
 

Attachments

  • 9AE94A36-8EA4-4EEE-8AA3-4D618A318526.jpeg
    9AE94A36-8EA4-4EEE-8AA3-4D618A318526.jpeg
    3.6 MB · Views: 134
  • 4D4FBF93-E77F-4247-82E9-44FCF68B4D6C.jpeg
    4D4FBF93-E77F-4247-82E9-44FCF68B4D6C.jpeg
    1.9 MB · Views: 125
  • 80416D4F-018E-48B8-AB7F-FDE6962CAE2B.jpeg
    80416D4F-018E-48B8-AB7F-FDE6962CAE2B.jpeg
    1.8 MB · Views: 120
  • 65D4ACBA-1001-48F7-BFE0-407FC819E0D7.jpeg
    65D4ACBA-1001-48F7-BFE0-407FC819E0D7.jpeg
    1.9 MB · Views: 129
Jaitea those are looking awesome! This is a great 3D model for sure. Did you print the pipes as well? Or did you make those out of brass/styrene tubing? My pipes journey is going to begin soon, and I'm not sure really where to begin... As far as the paint job goes, I think I'm going for just a standard gold squadron look. Mix of Gold Leader as well as a few others. Nothing specific, though.

SB
 
Pipes! So I guess I lied about finishing the engine nacelles and then moving on to the body. I figured it'd be easier to do all of the piping without the brittle t-tracks and engine vane thing on the back. I mixed up some baby powder and some CA glue and made a CA paste. I inserted the paste into the fuselage and stuck the wings in. Then onto the plumbing. I'm using the Bandai Y-Wing instruction manual to see where all of the pipes need to go. I'm using 3/64 brass rod for the main pipes, and 1/16 for the larger stuff. There's a few smaller pipes around the back that I need to figure out, but this is where I am at as of this evening:

IMG_5875.jpg


IMG_5876.jpg


This definitely isn't perfect, and there's a few areas I'm not too happy with, but I think it's alright for my first go at it. Maybe I should have attached the cockpit head before fitting the neck pipes? I'm figuring this out as I go along here.

Thanks for looking!

SB
 
How does it feel to finally have a 1/48 Y-wing?
"finally" is the key word here! It's really cool to have glued the wings/engines onto the main body and see it come together, and then hold it in my hands and heft it's weight. Then set it next to the Bandai 1/72 Y and realize how small that one is! :lol:

In all seriousness though, it's really cool to see this come together. Again, it's not perfect, and it's miles away from being done, but it's getting there. Slowly.

SB
 
To paraphrase a comment from latest Fine Scale Modeler: Now that you have gone down this road to make a Y-Wing, a major manufacturer will issue a mass produced kit. This is the way.
Gotta love it. Also, your model is so nice! Thank you for causing the mainstream kit to be made...

Regards, Robert
 
To paraphrase a comment from latest Fine Scale Modeler: Now that you have gone down this road to make a Y-Wing, a major manufacturer will issue a mass produced kit. This is the way.
Gotta love it. Also, your model is so nice! Thank you for causing the mainstream kit to be made...

Regards, Robert

Hey if this is what it takes for Bandai to get their rear in gear, then it'll have been well worth it!

SB
 
Looking great! I had a bit of a disaster with mine...I tried using a button cell to light up mine but it didn’t put out enough current, so I went back to using a LiPo, and then accidentally connected the LEDs to the 5v output on the lipo charger and burned out the engine LEDs. Oh well. They say necessity is the mother of invention, so I am now printing the entire Y-wing chassis with wings and engines attached, in one piece, on my Saturn. We’ll see how that goes!

Edit: I must say I’m impressed with the Saturn this time around. This only took 9 hours:
D42D0A46-0144-4103-8C57-1A8E826C24E8.jpeg
 
Last edited:
Jimw100 ahh shoot! That's too bad about your LEDs. And I guess there is no way to take apart the pieces without breaking them, right? This stuff is pretty brittle. And isn't the Saturn great?!? Was that part oriented straight up and down? That's pretty crazy you got all of that in one print!

I finally got the extra brass rods in the mail, so now I can make some more headway on mine. Stay tuned.

SB
Yeah, I oriented it straight up and down to minimise the support marks.
Having printed all of the parts for a new Y wing I actually remembered that I hadn’t glued the engine “cores” in on the previous one, so theoretically I could (if I manage some tricky soldering in tight confines) replace the engine LEDs...so looks like I’ll end up with a wingman!
 

Your message may be considered spam for the following reasons:

If you wish to reply despite these issues, check the box below before replying.
Be aware that malicious compliance may result in more severe penalties.
Back
Top