You are using an out of date browser. It may not display this or other websites correctly.
You should upgrade or use an alternative browser.
You should upgrade or use an alternative browser.
**COMPLETED** Y-Wing 1/48 resin model
- Thread starter StevenBills
- Start date
In theory, yes, you could putty the gap or something similar. But the way that Bandai have engineered this kit is that they made the cake section removable to access the switch for the lighting, which I just went along with. I have an IR remote powering the engines, but the main LED strip is still accessed by removing the cake section. I'm still trying to think of a workaround there.
SB
SB
moonbus
Well-Known Member
Well if it comes off can you glue a second piece of styrene inside the "cake" section that would block the lights?
. l-------cake wall
. l
ll
ll
l---styrene
______________________________________-----------top of main body
Or place a sheet of polyethylene (cut open Zip lock bag) on the main body and then put some putty on the underside of the cake and place it on the polyethylene sheet, squeeze, and let dry. the putty will not stick to the sheet and should fill the gap exactly once the sheet it removed. It just will be a simple mater of shaping the outside of the cake and touch up paint.
Or just enjoy the ship as it is, a gorgeous piece of work.
Take care, Tim
StevenBills "Yours is looking great though! Have you had any trouble with parts fitting together at all?"
Answer .. no i dont had any problems .. everything fit perfect.
the second prototype is ready now .. will show you some pictures later .. the main body is full printed in one piece.
related to your ISD the light leakage this can be fix much easier .. i use a remote controll to reduce the light intensity this was fixing my problem.
I’ve finished printing out all of the bits for my Y-wing now. I wish I had made a bit more room in the body for electronics as it’s going to be a squeeze. Plus getting the fibre optics done in the cockpit will be difficult since I went back and printed the top and bottom sections in one piece.
I also built new main guns out of aluminum and brass tube so I can light them up, but fitting the LEDs and wires in there may be a bit of a challenge.
But overall looking good, can’t wait to start putting it together
I also built new main guns out of aluminum and brass tube so I can light them up, but fitting the LEDs and wires in there may be a bit of a challenge.
But overall looking good, can’t wait to start putting it together
Last edited:
Here's an image I made with my SD:

Now it's time to get back to the Y-Wing!
SB
Now it's time to get back to the Y-Wing!
SB
Got the lighting for the cockpit and guns done. The picture is not great - difficult to get good photos of the lights. This was actually much easier to do than I expected. Usually I get carried away and try to put 10 different leds in, but I kept it simple with 5 for the cockpit and one for the guns. I actually forgot to light one of the fibre optics, but the light leak is bad enough that it does show up anyway. Win for shoddy workmanship!
Attachments
I've started gathering materials for the various pipes that run along the chassis. I've ordered a few different diameters of brass tube (1mm, 1/16" and 1.5mm) which I think should be in scale. Does anyone have any tips (or tools) for making precise and sharp bends in these? In the past when I was making my hasbro Falcon I used a couple pairs of small pliers but I could never get the bends as "sharp" as I wanted.
I've started gathering materials for the various pipes that run along the chassis. I've ordered a few different diameters of brass tube (1mm, 1/16" and 1.5mm) which I think should be in scale. Does anyone have any tips (or tools) for making precise and sharp bends in these? In the past when I was making my hasbro Falcon I used a couple pairs of small pliers but I could never get the bends as "sharp" as I wanted.
If you have your heart set on using metal tubing, you might need to invest in a special tool, or two. Here is a video showing how to do it:
Ah great, thanks! Sorry, I meant to say metal rod instead of tube, which I think makes things easier. I didn't so much have my heart set on using metal as I thought it would be easiest. If I can find a hand bender like that which will cope with smaller diameters that would be perfect. I'll have a look
I couldn't resist. Here's another image I made:

All Bandai kits. 1/72 for the X-Wings and TIE's. And of course the 1/5000 SD.
SB
All Bandai kits. 1/72 for the X-Wings and TIE's. And of course the 1/5000 SD.
SB
Made another image with my SD. I titled this one: The Might of the Empire.

(Y-Wing updates coming soon!") )
)
SB
(Y-Wing updates coming soon!
)SB
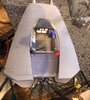
I printed off the whole main piece of the chassis in one go, as a lot of the small greeblie-covered panels were getting distorted during the printing or curing process, so they weren’t fitting well. And I wanted to make a few more mm space inside for the electronics.
The print turned out pretty good, I was expecting it to be problematic due to all the supports all over it but the only problem was that the bottom of it had been incorporated into the skate that the supports come out of. I’ll need to do some filling and sanding to sort that out, but should work out okay.


The print turned out pretty good, I was expecting it to be problematic due to all the supports all over it but the only problem was that the bottom of it had been incorporated into the skate that the supports come out of. I’ll need to do some filling and sanding to sort that out, but should work out okay.
I printed off the whole main piece of the chassis in one go, as a lot of the small greeblie-covered panels were getting distorted during the printing or curing process, so they weren’t fitting well. And I wanted to make a few more mm space inside for the electronics.
The print turned out pretty good, I was expecting it to be problematic due to all the supports all over it but the only problem was that the bottom of it had been incorporated into the skate that the supports come out of. I’ll need to do some filling and sanding to sort that out, but should work out okay.
View attachment 1329650View attachment 1329651View attachment 1329652
Wow, that's brave! And you can fix most things on resin with a bit of elbow grease and sandpaper.
SB
As they say, sometimes the only difference between bravery and stupidity is success.Wow, that's brave!
Made another image with my SD. I titled this one: The Might of the Empire.
View attachment 1329579
(Y-Wing updates coming soon!
SB
That is sweeeeeeeeeeeeeeeeeeeet.
Similar threads
- Replies
- 12
- Views
- 883
- Replies
- 8
- Views
- 1,014