t2sides
Master Member
Here's a fun new project, utilizing the wonderful and amazing DaveG Open Source Y wing files for the main body/structure (THANK YOU DaveG!)
It all started when my good friend Ryan (Belleauwood) did a test print of the head on a Saturn Resin printer. It was intended as a proof of concept to just get an idea of just how huge this thing is when upscaled 2x from the Studio Model in 1/24th scale. I quickly asked Ryan if I could keep the print, clean it up and maybe just go for trying to build the entire thing. He gratefully agreed, and the project took off. I went out and got a Creality CR-10S printer to print all the fuselage/core parts, and Ryan just took off printing all the detail parts in Resin for me! Thanks Ryan!!
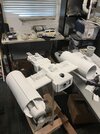
So this is what it initially looked like:


We expected the 'gaps' and imperfections - but hey, that's what makes these projects fun, a bit of 'hands-on' time!
So the putty comes out...

Little bit of primer...

Slap on some paint, add some scratch built guns, and compare it to a Studio Scale casting...


I then decided it would be fun to scratch build (old school, hand built style) a cockpit and all the details behind his seat (Hyperdrive Motivator?)


I then decided this was going to be called - "GOLD JAMMER" - basically, I'm basing the build up on Red Jammer, but as it existed as the full-size set piece. So I painstakingly detailed/painted the head section as close as I could to the full size set, but leveraging details of the Red Jammer studio model.


And mocked up a pilot in there...


Then, started building the cockpit out of styrene, masking panels...


Throw in some Fiber optics

Add some details and the classic white/blue squares, and we have a cockpit!


I felt like the canopy window openings were a little too big, so with the help of my friend Jim, we resized the window openings smaller to make it feel a bit more compressed and similar to the full scale canopy. (Original canopy in White, new in Grey)


Next posting will be the body!
Thanks for looking!
-Sean
It all started when my good friend Ryan (Belleauwood) did a test print of the head on a Saturn Resin printer. It was intended as a proof of concept to just get an idea of just how huge this thing is when upscaled 2x from the Studio Model in 1/24th scale. I quickly asked Ryan if I could keep the print, clean it up and maybe just go for trying to build the entire thing. He gratefully agreed, and the project took off. I went out and got a Creality CR-10S printer to print all the fuselage/core parts, and Ryan just took off printing all the detail parts in Resin for me! Thanks Ryan!!
So this is what it initially looked like:
We expected the 'gaps' and imperfections - but hey, that's what makes these projects fun, a bit of 'hands-on' time!
So the putty comes out...
Little bit of primer...
Slap on some paint, add some scratch built guns, and compare it to a Studio Scale casting...
I then decided it would be fun to scratch build (old school, hand built style) a cockpit and all the details behind his seat (Hyperdrive Motivator?)
I then decided this was going to be called - "GOLD JAMMER" - basically, I'm basing the build up on Red Jammer, but as it existed as the full-size set piece. So I painstakingly detailed/painted the head section as close as I could to the full size set, but leveraging details of the Red Jammer studio model.
And mocked up a pilot in there...
Then, started building the cockpit out of styrene, masking panels...
Throw in some Fiber optics
Add some details and the classic white/blue squares, and we have a cockpit!
I felt like the canopy window openings were a little too big, so with the help of my friend Jim, we resized the window openings smaller to make it feel a bit more compressed and similar to the full scale canopy. (Original canopy in White, new in Grey)
Next posting will be the body!
Thanks for looking!
-Sean
")