You are using an out of date browser. It may not display this or other websites correctly.
You should upgrade or use an alternative browser.
You should upgrade or use an alternative browser.
Would a Calvin and Hobbes model be welcome here?
- Thread starter Mysta2
- Start date
I talked about making up a diagram that calls out all of the panels in the beginning of this thread.
Well I finally got that done this morning.

Feel free to point out anything that I might want to take a second look at or edit. I know that my pluralization is not consistent.
Well I finally got that done this morning.
Feel free to point out anything that I might want to take a second look at or edit. I know that my pluralization is not consistent.
PartyPyrate
Active Member
Dear God! This is so great. I sooooooooo want one!
Hagoth
Sr Member
It's weird to think about where his feet would actually be. I thought about putting in a footwell and maybe even foot controls, but if I were to make it proportional to Calvin the foot controls would be right at the base of the seat.
http://www.dropbars.com/spiff/shortpants.jpg
Good point and fitting example. Maybe they stretch a little like the human slinky going down the stairs just before his ship impacts.
 Still looks really good. Maybe that's another positive for leaving out a figure. Leaves more to the imagination. The next logical step is imagining myself in one of these. My shorts don't touch my feet.
Last edited:
Made a seatbelt for him, seems like he needs one

heavy paper/card stock, brown sharpie, some copper tape (that we literally found under a workbench) X-acto knife, round needle nose pliers and some superglue is all you need.
you can see I got a little loose with the superglue. It's real tough to get up under the belt with the glue without making a mess. It helps to glue it down as you go. Wrinkle it up a bit first, then I glued the ends to the bottom side of the seat, and worked forward basically one wrinkle at a time. They were long at first, cut them off only when I got to the end and knew exactly where I wanted that end to be. I might be able to do a three stage pic tomorrow, but I only brought one seat home tonight.
Please do Robert, it's perfect for that.
Look at all that beautiful junk

there are an unlimited number of spiff goggles in there, I just need to get them out.
Found them

The layout is not accidental. I knew that I would need to mask them all and that the mask would be largely uniform.

Things that are this small are really hard to lay tape on and keep straight so it really helps to have a bunch of them lined up like this. Mostly I use this trick to line up graphics when I have a bunch to cut out, works here for this too.

Then I can use a straight edge to trim them all at once.
A little black back painting...

...and I've got a big ol' pile of goggles

I debated for quite a while what to do with the white eye part, paint it white, or leave it clear. Painting it white would be a lot more comic-ish. I really didn't take that lean for any of the other parts of the ship and thought that might be out of place. Plus, I can still back paint them white if I desire.
As you can see, there are a bunch of extras. I'll be throwing a random couple of the emotional ones in with each kit. Kind of a grab bag bonus. All of the kits are spoken for at the moment, but I haven't asked for any commitment yet, if you think you might be interested in one message me and you'll be on the list for first come first served if anyone backs out.
Look at all that beautiful junk
there are an unlimited number of spiff goggles in there, I just need to get them out.
Found them
The layout is not accidental. I knew that I would need to mask them all and that the mask would be largely uniform.
Things that are this small are really hard to lay tape on and keep straight so it really helps to have a bunch of them lined up like this. Mostly I use this trick to line up graphics when I have a bunch to cut out, works here for this too.
Then I can use a straight edge to trim them all at once.
A little black back painting...
...and I've got a big ol' pile of goggles
I debated for quite a while what to do with the white eye part, paint it white, or leave it clear. Painting it white would be a lot more comic-ish. I really didn't take that lean for any of the other parts of the ship and thought that might be out of place. Plus, I can still back paint them white if I desire.
As you can see, there are a bunch of extras. I'll be throwing a random couple of the emotional ones in with each kit. Kind of a grab bag bonus. All of the kits are spoken for at the moment, but I haven't asked for any commitment yet, if you think you might be interested in one message me and you'll be on the list for first come first served if anyone backs out.
Last edited:
Those seat belts and goggles came out great looking! Do you have a trick to hide the extra superglue? Such awesome tips here with this project. This is great.
Not much of a tip, but what I did was to scrape/cut the glue off the seat which as you know is black underneath and reapplied the pastels to bring the color back. I'll talk about that more a little later when I go over the other seat belts. Possibly later tonight.
Here's everything you might need to make some awesome tiny seatbelts

I've zoomed in here so that you can see the texture that I was able to put into the strips of cardstock (mohawk Chromecoat C1S) with the round pliers.

A wrinkled and worn leather kind of thing.
I tried a different color for the middle one, this kind of khaki color is what I had first had in mind when I made these, I thought it would differentiate from the seat better. For the last one though, I decided I liked the darker better.

If you look close at the one on the left you can still see a bit of the residual marking of the extra super glue under the belt. As I said before, I scraped the glue off and re applied the pastel. Were this a really high focus area, and the seat wasn't supposed to look a little worn and stained, I would have worried about it more. You can also see I added a little seat slider adjustment lever.
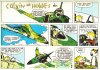
This next step is thanks to Ultramans' post in the last page. I was looking to add a little more detail to the seat and help populate the space beside and behind it, and his little comic that he posted provided the perfect catalyst. In the cell, there's a grey "shift knob" on Calvins left and a red one on his right along with a tall yellow lever. I decided to add those.

I've laid out all of the steps to the bending along with the tools used to bend and paint the tip. On the left you can see the little guide I made up by tracing the seat frame sides to a piece of paper, and on the right is a finished lever glued in place.
A finished seat

Oh, the yellow handle is actually a yellow paperclip from Staples. I cut most of the yellow coating off of it and cut and bent the body and glued it to essentially the back of the seat, I'll try to get some better pics of how everything's glued on the underside when I finish the other two. Again I used the drop of 1Shot lettering enamel trick that I talked about earlier to seal up the top.
...and a finished cockpit:

On to the stand. This may take me a while...
I've zoomed in here so that you can see the texture that I was able to put into the strips of cardstock (mohawk Chromecoat C1S) with the round pliers.
A wrinkled and worn leather kind of thing.
I tried a different color for the middle one, this kind of khaki color is what I had first had in mind when I made these, I thought it would differentiate from the seat better. For the last one though, I decided I liked the darker better.
If you look close at the one on the left you can still see a bit of the residual marking of the extra super glue under the belt. As I said before, I scraped the glue off and re applied the pastel. Were this a really high focus area, and the seat wasn't supposed to look a little worn and stained, I would have worried about it more. You can also see I added a little seat slider adjustment lever.
This next step is thanks to Ultramans' post in the last page. I was looking to add a little more detail to the seat and help populate the space beside and behind it, and his little comic that he posted provided the perfect catalyst. In the cell, there's a grey "shift knob" on Calvins left and a red one on his right along with a tall yellow lever. I decided to add those.
I've laid out all of the steps to the bending along with the tools used to bend and paint the tip. On the left you can see the little guide I made up by tracing the seat frame sides to a piece of paper, and on the right is a finished lever glued in place.
A finished seat
Oh, the yellow handle is actually a yellow paperclip from Staples. I cut most of the yellow coating off of it and cut and bent the body and glued it to essentially the back of the seat, I'll try to get some better pics of how everything's glued on the underside when I finish the other two. Again I used the drop of 1Shot lettering enamel trick that I talked about earlier to seal up the top.
...and a finished cockpit:
On to the stand. This may take me a while...
Last edited:
I can't wait to watch a few of you guys build them.
Doing this cockpit really makes me want to do another Spiff saucer that's just a little bit bigger, but in the body shop with all the panels open... but at the same time, I've got an R6 to build and the weather's perfect for riding
Doing this cockpit really makes me want to do another Spiff saucer that's just a little bit bigger, but in the body shop with all the panels open... but at the same time, I've got an R6 to build and the weather's perfect for riding
Last edited:
TheCaptain
New Member
Pm sent and fingers crossed
Sent from my iPhone using Tapatalk
Sent from my iPhone using Tapatalk
Similar threads
- Replies
- 2
- Views
- 342