[Work in Progress] Space:1999 stun gun

Think Jedi

Sr Member
RPF PREMIUM MEMBER
After a bit of a hiatus, I have started work on some new resin 3D-printed props. I had previously produced the agonizer and dagger from TOS's "Mirror, Mirror" episode, as well as working Singlepoint scope. About a year and a half ago, I started work on this stun gun from Space:1999. Using measurements I found in diagrams, as well as all of the pictures I could find of the props, I drew this up in Solidworks. I drew up the main body of the stun gun with most of the side greeblies (buttons and such) on the body, but drew up the side knobs, trigger, slider switch, and nozzles separately. Here are some pics:
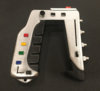
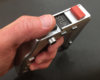
The main body

stungun2.jpg


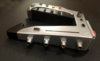
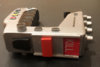
Top of main body - I built in the facility to install a slider switch (STUN/KILL) and a spot to add a spring for the top trigger. Unfortunately, I ran out of resin right at the end of the print. This resulted in voids at the top of the stun gun body. Fortunately, this is easily preventable, and this particular one can be used since the slider greeblie will cover this area.

stungun3.jpg


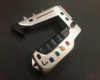
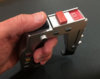
Main body with greeblies - I've removed the supports from the main body, but you can still see remnants of the supports. They will be sanded off. The supports I used were extra thick, so I plan on trying daintier ones on my next print. Hopefully that will prevent the sides of the supports from attaching themselves to the main body, which will result in a much cleaner print. Not pictured in the greeblies is the second knob that mounts on the rear top of each side of the stun gun.

stungun1.jpg


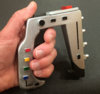
Let me know what you guys think. I plan on producing them as kits once I get everything dialed in. More to come soon!

tJ
 
The grip (silver part) is not flat like yours appears to be, it has a curve to it. Difficult to say for sure from the pic, looks like the 'lanyard attachment' on the bottom is undersized.
 
The grip (silver part) is not flat like yours appears to be, it has a curve to it. Difficult to say for sure from the pic, looks like the 'lanyard attachment' on the bottom is undersized.

Thanks for the feedback. Yes, the lanyard is undersized, something I will fix. I see what you mean about the silver part of the handle/grip. I will revisit the grip. I'll finish the prototype as is, to make sure the greeblies fit and see how the thing will look.

tJ
 
I find this site to be the best collection for reference material on space 1999 stuff Stun Guns - Space: 1999 Continuity Guide

Thanks...yes, I used that site for reference pics. They have some really good ones. I'll be posting pics of the stun gun prepped for painting. The supports looked like a pig to get off (and they were), but they sanded down easily enough. I had to do a little filling due to the lanyard attachment getting partially obliterated by the supports as well as some of the support removal on the sides removing little bits of resin. Again, rethinking the supports should take care of a lot of that issue. This is the first resin print I've had any trouble at all getting supports off.

Will post pics soon.

tJ
 
Supports removed and everything sanded. I puttied bits where the support removal was difficult. I also manually radiused the handle, but that's something that can be taken care of in the CAD model later.

tJ

stungun7.jpg

stungun6.jpg

stungun5.jpg

stungun8.jpg

stungun9.jpg

stungun10.jpg
 
OK, I've painted and assembled the greeblies on the stun gun. Overall I'm pleased with the outcome. I'm posting pics as well as a video. Some features you'll notice in the video:

- "working" trigger (I've added a spring that causes the trigger to spring back nicely when pressed)
- sliding STUN/KILL switch

There are some minor things I will be changing:

- making all of the rectangular buttons separate greeblies, which remove a lot of supports, making the stun gun a lot easier to finish. This also allows me to keep the detail on the buttons, which tend to get obliterated in the body sanding process. Doing this will ensure that I will likely not need to use any putty to finish this.
- move the rectangular buttons on the handle closer together
- increase the size of the round knobs on either side of the prop
- cap the end of the channel that houses the STUN/KILL slider switch so that it doesn't come out accidentally if you slide it forward too far.
- radius the body edges a bit more to more closely match the screen prop
- round the bottom of the handle/grip a bit more
- enlarge the hole in the lanyard

tJ

Check the video of the stun gun here:


stungun1.jpg

stungun8.jpg

stungun6.jpg

stungun5.jpg

stungun4.jpg

stungun3.jpg
 

Attachments

  • stungun9.jpg
    stungun9.jpg
    729.1 KB · Views: 90
  • stungun8.jpg
    stungun8.jpg
    462.8 KB · Views: 95
  • stungun7.jpg
    stungun7.jpg
    625.5 KB · Views: 93
  • stungun6.jpg
    stungun6.jpg
    2.9 MB · Views: 93
  • stungun5.jpg
    stungun5.jpg
    525.9 KB · Views: 86
  • stungun4.jpg
    stungun4.jpg
    517.2 KB · Views: 99
  • stungun3.jpg
    stungun3.jpg
    458.1 KB · Views: 103
I like it, especially as it’s all your own work.

I reworked one of the models on thingiverse to turn it into a laser tag version for a birthday present for a friend so I know how much work has gone into it.

53B29985-566C-4F8E-8ABF-BECCD6C1154B.jpeg79950EFE-352F-46E6-85BB-D192D76F80DF.jpeg
 
This thread is more than 4 years old.

Your message may be considered spam for the following reasons:

  1. This thread hasn't been active in some time. A new post in this thread might not contribute constructively to this discussion after so long.
If you wish to reply despite these issues, check the box below before replying.
Be aware that malicious compliance may result in more severe penalties.
Back
Top