You are using an out of date browser. It may not display this or other websites correctly.
You should upgrade or use an alternative browser.
You should upgrade or use an alternative browser.
WIP - 1:1 Stan Winston Style Velociraptor Head Sculpt
- Thread starter Buffbeefbro
- Start date
Vmasterbuilder
Active Member
Hi.
There are many Different ways to make an under skull.
One is using a vacuum forming machine which allot of us Don't have..
But,, there is another way to make one.
When you cast the GEL-10 into your mould, Get the Right thickness of layers you want & Let it cure Completely.
Then you can use Easy-Flo 120 Directly into the mould Behind the GEL-10 Skin, make sure it does not get on the Ultracal mould.
you need to Slosh it around the back of the Silicone you want to
Make an under-skull For, until it Go's Solid White..(5-10mins)
I would apply 1-3 coats until you have a strong thickness..
When it's Fully Cured (30-60mins) you will have A Solid under-skull.
when you remove the Two half's of your stone mould,
you can pull the whole Cast out together and Pull the GEL-10 off the under-skull Like A glove mould.
This will also keep the GEL-10 in its Original Sculpted Form when fitted to the Under-Skull..
Now You can start to figure out which parts of the Raptor you want to move with Servos or Pull cables..
you can use more GEL-10 to bond the cables & Resin as GEL-10 Will stick to GEL-10 Very Well.
I would look at Buying A Good R/C Transmitter which has 6-8 channels if you plan on building An Animatronic Head..
I would suggest Looking at Many you tube clips on Different ways to get the Movement you want.
Many Animatronic Experts Do Not show you any of there Tricks on building there Creations as they have spent many Hours
Finding there own ways to Get them Right.
The best one available is At SWSCA And its a Puma Tutorial 6 hours long.:eek
Hope this Helps. :thumbsup
Alpha Proto
Sr Member
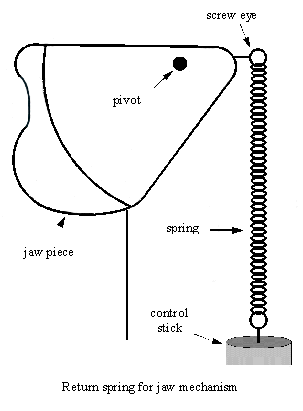
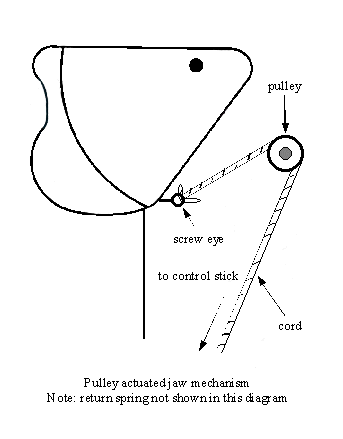
This is how a jaw mech could work from inside the raptor body.


Buffbeefbro
New Member
Thanks for the info guys. I'll definitely have to get some of that Easy-Flo, and I'll keep that diagram in mind when I get to the head mechanics. I was thinking or attaching a hinge with a swivel base to the rear of the skull and attaching a control rod to that so I can control head movement (the entire head will be held mostly in place by the rubber neck mechanism but will be able to move around whenever I swing the rod). The mouth opening system will likely be attached to that rod and be controlled though some sort of trigger. One thing I'm aware of is that I'm not going to have much room at all to navigate so the simpler I can make things the better.
Right now I'm just waiting on some materials, including the monster makers texture stamp kit, to ship before I finish the sculpt and start molding with the Ultracal.
Right now I'm just waiting on some materials, including the monster makers texture stamp kit, to ship before I finish the sculpt and start molding with the Ultracal.
Buffbeefbro
New Member
Thanks for the compliments, I do hope to sell some heads to help fund the rest of the suit.
I've decided that since I keep going back and forth on the little details I'm going to just mold it now. Here's a video of it in it's finished state (Just put on the clear coat).
I've decided that since I keep going back and forth on the little details I'm going to just mold it now. Here's a video of it in it's finished state (Just put on the clear coat).
Last edited by a moderator:
Buffbeefbro
New Member
Goodbye dinosaur.

Hello Mold.

Anyone have advice on how to fill in air pockets? I have a few on the lower jaw of the side I had to paint the ultracal 30 on upright.
Hello Mold.
Anyone have advice on how to fill in air pockets? I have a few on the lower jaw of the side I had to paint the ultracal 30 on upright.
Topgun
New Member
You should mess with the neighbors when your done =p
I wish they were my neighbors - Imgur
I wish they were my neighbors - Imgur
BladeoftheMoon
Well-Known Member
Awesome ! Feel free to contact me when your done..I'd like a copy myself. ")
Buffbeefbro
New Member
Well I've had some setbacks. I tried to do a test cast filled with soft foam, but I didn't use nearly enough silicone and the skin just ripped apart. On top of that the foam ended up being way more rigid than it was supposed to be, I don't know if that's my fault or if it's something monster makers messed up on. It ended up taking me like a day and a half to pry the damn thing apart because of the foam.
However, the texture that did survive looked pretty good. Overall I'm impressed with the silicone. I'm excited to make one that actually works.
Next time I'm making sure to demold the skin before pouring in any sort of core.

However, the texture that did survive looked pretty good. Overall I'm impressed with the silicone. I'm excited to make one that actually works.
Next time I'm making sure to demold the skin before pouring in any sort of core.
Last edited:
Kohrsfilms
Member
I'm surprised by how quickly you've completed things on this project. I started sculpting a raptor and did pretty much exactly the same things as you have done, even down to molding and casting materials. Only difference is mine took 5 months maybe more. I lost track ha ha ha.
But maybe that's just an issue with me and my ability to work quickly.
Looking forward to seeing more updates!!!
But maybe that's just an issue with me and my ability to work quickly.
Looking forward to seeing more updates!!!
Buffbeefbro
New Member
I actually looked through your thread using your materials as a guide. I'm pretty happy with the results.I'm surprised by how quickly you've completed things on this project. I started sculpting a raptor and did pretty much exactly the same things as you have done, even down to molding and casting materials. Only difference is mine took 5 months maybe more. I lost track ha ha ha.
But maybe that's just an issue with me and my ability to work quickly.
Looking forward to seeing more updates!!!
But yeah, once I get a project going it gets stuck in my mind until I finish it. It can be both a bad thing and a good thing.
SqueekinOrka
Well-Known Member
That is amazing,I love the detail. Truly an amazing sculpt....Just love it! Plus Raptors...I love them from JP they're my favorite. Great work
Buffbeefbro
New Member
I did my second pull today, and it turned out much better than the first one. It's not perfect though, there are some thin spots and some tearing along the seam. Still, I think it's usable.
I'm thinking of ordering more silicone along with some thickener to brush onto the cracks from the inside. Is this how I should go about repairing it?
Anyway, here is a picture and a video.

I'm thinking of ordering more silicone along with some thickener to brush onto the cracks from the inside. Is this how I should go about repairing it?
Anyway, here is a picture and a video.
Last edited by a moderator:
Vmasterbuilder
Active Member
Hi.
You can embed fabric into the silicone Join's to increase the tear strength, but you will need a decent thickness to do this.
Have you tried the resin udder skull.? as the foam looks abit to soft.
Good Work :thumbsup
You can embed fabric into the silicone Join's to increase the tear strength, but you will need a decent thickness to do this.
Have you tried the resin udder skull.? as the foam looks abit to soft.
Good Work :thumbsup
Buffbeefbro
New Member
Would burlap work as a fabric?Hi.
You can embed fabric into the silicone Join's to increase the tear strength, but you will need a decent thickness to do this.
Have you tried the resin udder skull.? as the foam looks abit to soft.
Good Work :thumbsup
Right now it's just filled with towels and what I had laying around. I want to make the resin skull, but I don't have enough money so I'm waiting on that.
Vmasterbuilder
Active Member
Burlap is abit thick for silicone.. if your on a budget just use some old bed sheet fabric & cut them into small strips overlapping each join
and embed them completely into the Silicone joint.
all it needs to do is make a mechanical lock and it will increase the tear strength on that joint.
Try and do this when the Silicone surface is not fully Cured as you will get a stronger bond.
I would suggest making a foam filled head next!! so you have a Master copy for safe keeping, just in case your mould get's Damaged.
Have Fun.:cheers
Buffbeefbro
New Member
Yeah, I was originally going to do a foam filled head first, but the foam collapsed and hardened and gave me a ton of trouble pulling the mold apart, so I opted out of using it this time. I suppose I'll try it again next pull.
Similar threads
- Replies
- 1
- Views
- 394
- Replies
- 3
- Views
- 676
- Replies
- 5
- Views
- 1,536
- Replies
- 9
- Views
- 2,164