This will be my first build on therpf that is threaded from the beginning. Please help with opinions, knowledge and resources when you can. This particular character seems to have no front to back build info even though there are some pretty amazing costumes existing in photos. If you will be using this as a walkthrough be aware that many errors were corrected and much research done while this thread was being created. Reading to the end may save you from some mistakes I corrected later.
________________________________
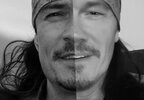
Update added 1/13/23: Current progress on makeup: (split face - I am on the right side)

_______________________________
(continue original post)
Orlando Bloom's, Will Turner Jr., character from Pirates of the Caribbean 3, or best as I can place this inspiration shot that I am using for the build (pictured here)(correction, this has elements of the older costume but is from the reunion scene in Dead men tell no tales):

Somewhere in the years since this movie, it seems that the following Simplicity 4923 costume sewing pattern was created with POTC in mind. This looks like a lock match for the pants, shirt and coat (upper right of picture below) with adding the coat collar:

So now for materials. In other very sunlit photos the coat is slightly lighter than charcoal gray but as gray goes there are numerous shades with exotic names. The shirt looks maroon but not wine. The pants an even lighter gray than the coat. I would certainly invite discussion on all points in this build.
So the parts list for me is cloth type and color specifics, possibly swatch matches, button source or mold for coat, bandana true color and material (maxcady.com claims a screen match version) but it seems too olive?, facial hair patterns and length with color swatch, skin tone color swatch, eye color contact match, buckles pattern and true color (aged brass, aged copper, or pewter), belt widths-materials-color swatches, earring type and loop size. I have seen some offerings for baldric and buckle but am looking for patterns to complete a true a-z build thread. I apologize that I do not offer speed, as most of my builds take a minimum of months. Any and all links and resources requested please.
________________________________
Update added 1/13/23: Current progress on makeup: (split face - I am on the right side)
_______________________________
(continue original post)
Orlando Bloom's, Will Turner Jr., character from Pirates of the Caribbean 3, or best as I can place this inspiration shot that I am using for the build (pictured here)(correction, this has elements of the older costume but is from the reunion scene in Dead men tell no tales):
Somewhere in the years since this movie, it seems that the following Simplicity 4923 costume sewing pattern was created with POTC in mind. This looks like a lock match for the pants, shirt and coat (upper right of picture below) with adding the coat collar:
So now for materials. In other very sunlit photos the coat is slightly lighter than charcoal gray but as gray goes there are numerous shades with exotic names. The shirt looks maroon but not wine. The pants an even lighter gray than the coat. I would certainly invite discussion on all points in this build.
So the parts list for me is cloth type and color specifics, possibly swatch matches, button source or mold for coat, bandana true color and material (maxcady.com claims a screen match version) but it seems too olive?, facial hair patterns and length with color swatch, skin tone color swatch, eye color contact match, buckles pattern and true color (aged brass, aged copper, or pewter), belt widths-materials-color swatches, earring type and loop size. I have seen some offerings for baldric and buckle but am looking for patterns to complete a true a-z build thread. I apologize that I do not offer speed, as most of my builds take a minimum of months. Any and all links and resources requested please.
Attachments
Last edited:


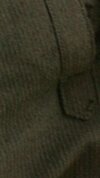
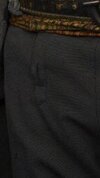
") The woven curtain fabric is a bit too open. Should be tighter for the pants. Eager to see your next update.
The woven curtain fabric is a bit too open. Should be tighter for the pants. Eager to see your next update.