What’s on Your Workbench? (Star Wars items only)

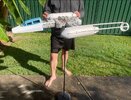
OK…I finished my last “X-Wing Dashboard Graflex”…

This one is painted up in The Empire Strikes Back colors…a slight blue grey (seen in the production photo below) base color and “crooked” in the clamps (the button is at the 2:00 position vs 12:00 position):

IMG_0111.jpeg


My build:

IMG_0364.jpeg
IMG_0363.jpeg
IMG_0366.jpeg

IMG_0367.jpeg


With its A New Hope counterpart:

IMG_0368.jpeg
IMG_0369.jpeg
 
Last edited:
As XENO said inserting a metal rod, when you come to splicing your STL files is the perfect option and there should be a drop down option in your settings to add voids/spru holes which you can tinker with pre print.
I have been playing around with this option set all week since the topic came up. There is sooooo much in the slicers that I need to just find a full on class to utilize it all.
 
Last edited:
A couple 7 hour prints and a 28 hour print!!!! Man I hold my breath in the second half of those long prints. About 7 more parts to print all significantly shorter prints, but I am having major first layer adhesion issues that I just cannot figure out. Tried so much over 2 days. Just bought a cryo grip glacier plate and I hope this works as I have all my eggs in this basket....
1750688620824.jpeg
 
A couple 7 hour prints and a 28 hour print!!!! Man I hold my breath in the second half of those long prints. About 7 more parts to print all significantly shorter prints, but I am having major first layer adhesion issues that I just cannot figure out. Tried so much over 2 days. Just bought a cryo grip glacier plate and I hope this works as I have all my eggs in this basket....View attachment 1943778
My printshop buddy told me about gluing the plate. Amazing adhesion and easy removal. Instructions:

1 buy elmers purple stick glue as it changes to white when ready

2 one thin layer, if lumps or lines, spatula it flat

3 clean after each run and reapply......ya, I don't do that hahaha

If this does not immediately solve your issue, you need to be doing a) table leveling (as though new, out of the box....again), b) level mapping (the stupid button that says 'leveling' but really just maps the curved surface, and 3) zheight adjustment in the tuning menu. Holler if you need deeper instructions on any of that. We covered it pretty siginificantly in another thread so ask if you need the link.

HA!! Sorry, I think you are already in that other thread.... leaving it here for anyone else.
So I did the out of box, bed calibration. Scrubbed the plate with IPA instead of soap and water. Increased the initial line width and height a smidgen........problem solved. You are the best Greenmachine!
 
Wip Scratch-built cal kestis. Afaik no one made one that can extend like the cross guard version in Jedi survivor.
Was always a bit bummed out that I didn't have a straight knurling tool for the grip.
Got to finish it some day.
1000000490.jpg
 
Back
Top