Eric Ardros
Sr Member
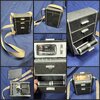
A little while ago I bought on eBay a prop lot of spare 23C and DST/AA Tricorder parts:
Spare Parts -- Pic 01
Spare Parts -- Pic 02
IIRC I got them cheap for like $5.00 plus shipping, so I figured why not? One can always use spare prop parts anyway, right?")
Anyway, after receiving the package in the mail, I got to looking at everything I got, and wondered just what I could actually use the spare Tricorder parts for. I mean, I didn't have any TOS kits lying around to use them for or anything.
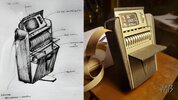
That's when I got this idea --> Wah Chang Tricorder Sketch I got to thinking, having never really seen anyone make that version before, it would make for a kewl little scratch-build project.
With what I bought, really all I'll have to make is the skeletal frame and the flip top, so it shouldn't be too difficult to do.
Then I remembered that I had drawn up a rough 1:1 sketch, based on the Horch Tricorder I own, and rummaged through my grandiose pile of self-drawn blueprints for as-yet-unbuilt projects. I found it, cleaned it up a bit and decided to draft three slightly different variants.
The Wah Chang Concept Ver. 01 Tricorder is designed on the premise that the bottom compartment can hold two Communicators, as shown in his concept sketch. Only problem is that it ends up being excessively wider than the standard TOS Tricorder, the viewscreen is clearly much wider than on the sketch, and the number of data discs and indicator lights don't match up with what's on the sketch.
The Wah Chang Concept Ver. 02 Tricorder is designed on the premise that the bottom compartment can hold one Communicator, retaining 50% of Chang's original idea, but the rest of the Tricorder is basically the standard dimensions, with the exception the bottom compartment is a little taller than usual. On this and the next design, the correct number of data discs (16) and indicator lights (13) are shown.
The Wah Chang Concept Ver. 03 Tricorder is designed to keep all the standard dimensions consistent, while incorporating the differently detailed viewscreen and data disc sections. At most, it may be possible to store a P1 in the bottom compartment, but nothing more (certainly not a Communicator).
The following Wah Chang Concept Comparison pic simply shows all three variants side by side to give one an idea of the differences in size and proportions.
I guess I got a little carried with all the brainstorming :rolleyes lol
Anyway, after posting this on a couple other forums and getting some folks' opinions, I decided to go with the Wah Chang Concept Ver. 03 sketch I did. Haven't been able to do much with it yet, but here's a few pics showing what I've got so far:
Wah Chang Build -- Pic 01 (decided to tackle the biggest challenge; altering the shoulder strap cut-outs)
Wah Chang Build -- Pic 02 (also decided to start working on the top cross bar; the lower, thicker cross bar will be built from scratch)
Wah Chang Build -- Pic 03 (wasn't able to find square styrene tubing the correct size, so I got the closest I could find and then added a layer of styrene all around to give it the proper thickness)
Wah Chang Build -- Pic 04
Wah Chang Build -- Pic 05 (I've also got the basic shape of the side panels cut out, working on smoothing out the contours, and have a template ready for cutting out the majority of the remaining pieces needed for this build)
After looking at how this will build up, I realized I should have enough clearance on the bottom to include the little pull-out support tab as shown in Chang's original sketch. I think that'll add an extra wow factor to it. More pics to follow
Spare Parts -- Pic 01
Spare Parts -- Pic 02
IIRC I got them cheap for like $5.00 plus shipping, so I figured why not? One can always use spare prop parts anyway, right?
Anyway, after receiving the package in the mail, I got to looking at everything I got, and wondered just what I could actually use the spare Tricorder parts for. I mean, I didn't have any TOS kits lying around to use them for or anything.
That's when I got this idea --> Wah Chang Tricorder Sketch I got to thinking, having never really seen anyone make that version before, it would make for a kewl little scratch-build project.
With what I bought, really all I'll have to make is the skeletal frame and the flip top, so it shouldn't be too difficult to do.
Then I remembered that I had drawn up a rough 1:1 sketch, based on the Horch Tricorder I own, and rummaged through my grandiose pile of self-drawn blueprints for as-yet-unbuilt projects. I found it, cleaned it up a bit and decided to draft three slightly different variants.
The Wah Chang Concept Ver. 01 Tricorder is designed on the premise that the bottom compartment can hold two Communicators, as shown in his concept sketch. Only problem is that it ends up being excessively wider than the standard TOS Tricorder, the viewscreen is clearly much wider than on the sketch, and the number of data discs and indicator lights don't match up with what's on the sketch.
The Wah Chang Concept Ver. 02 Tricorder is designed on the premise that the bottom compartment can hold one Communicator, retaining 50% of Chang's original idea, but the rest of the Tricorder is basically the standard dimensions, with the exception the bottom compartment is a little taller than usual. On this and the next design, the correct number of data discs (16) and indicator lights (13) are shown.
The Wah Chang Concept Ver. 03 Tricorder is designed to keep all the standard dimensions consistent, while incorporating the differently detailed viewscreen and data disc sections. At most, it may be possible to store a P1 in the bottom compartment, but nothing more (certainly not a Communicator).
The following Wah Chang Concept Comparison pic simply shows all three variants side by side to give one an idea of the differences in size and proportions.
I guess I got a little carried with all the brainstorming :rolleyes lol
Anyway, after posting this on a couple other forums and getting some folks' opinions, I decided to go with the Wah Chang Concept Ver. 03 sketch I did. Haven't been able to do much with it yet, but here's a few pics showing what I've got so far:
Wah Chang Build -- Pic 01 (decided to tackle the biggest challenge; altering the shoulder strap cut-outs)
Wah Chang Build -- Pic 02 (also decided to start working on the top cross bar; the lower, thicker cross bar will be built from scratch)
Wah Chang Build -- Pic 03 (wasn't able to find square styrene tubing the correct size, so I got the closest I could find and then added a layer of styrene all around to give it the proper thickness)
Wah Chang Build -- Pic 04
Wah Chang Build -- Pic 05 (I've also got the basic shape of the side panels cut out, working on smoothing out the contours, and have a template ready for cutting out the majority of the remaining pieces needed for this build)
After looking at how this will build up, I realized I should have enough clearance on the bottom to include the little pull-out support tab as shown in Chang's original sketch. I think that'll add an extra wow factor to it. More pics to follow