Vader's severed hand-REVISITED

Darthmagpie

Well-Known Member
I posted a couple pics of a Vader's severed hand I had put together with one of thoes cheep gloves. I kind of wipped it together with a lot of cut off wires. It was just really fun and a different prop to scratch build. I said that I was kind of going after a feel of what his wrist looked like with all the wires hanging out. While most comments were complementary a few called me out on the carpet(as they should) and said with what we know of Vader's mechanical arm from the prequals I should go for something more accurate.

This weekend being bored and only wanting to take on a small project, I went for a more accurate look. While the accuracy still leaves a lot to be desired, I think it has a better feel. Please let me know what you think. Thanks.

Before:
handpalm.JPG

handwires.JPG


After/NOW:
newhandtop-3.JPG

Newhandwires.JPG

newhandtop.JPG

newhandtop-2.JPG

Thanks Wackychinp.
 
Last edited by a moderator:
It looks great, much cleaner then the real one.

Let me know if you want some pics of the screen used one, I've got some.
 
Might I humbly throw in...

[but with first saying, I think it looks really cool. A definite improvement since your first incarnation.]

I think it would look pretty sweet if you were somehow able to make it look like his hand was actually *burned* through with the lightsaber.

Maybe scorch the end?
I'd also say a true-leather glove would be a nice touch over the rubies', but I obviously understand that there is a VERY big cost factor there! (Cutting up a leather vader glove? Yeah.... crazy talk I know)

James Kenobi, I know I think it'd be interesting to see the original anyway :love
 
I was going to add the same comment. Looks great, now scortch it up a little. Not too much, just enough to give the impression that it was cut off with a lightsaber.
 
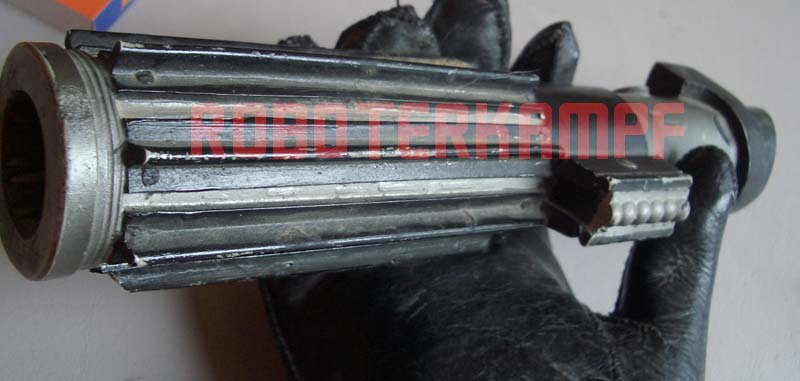
I got these years ago online somewhere, I read it was the screen used hand that Luke cut off for the pyro shot.

Saber is a resin cast of a stunt saber, or possibly a rubber cast.

IMGP9059-vi.jpg


IMGP9058-vi.jpg


IMGP9057-vi.jpg
 
Very nice work! You've inspired me to make my own, I've never thought of making one.

What did you use to "fill" the glove, to make it look like it has a robotic hand in it?
 
I agree, It needs saber burns. Added pics below
I LOVE THE FACT THAT I INSPIRED SOMEONE TO MAKE ONE! Please post pics when you finish it!

How I did it:

I took a half inch by three inch piece of wood and cut it about 3 inches long. I drilled four holes on the top(the half inch side) and one angled hole on the side. I cut apart a wire coat hanger, cutting the wire the length of the fingers and thumb that fit in the glove after you insert the wire into the holes. I glued the wire into the holes. I then used sculpey to make the finger segments. Three segments per finger. The gaps in the segments are where the knuckle bends are. Make sure you make the segments large enough to fill the glove. Make sure you angle the edges of the segments and leave enough gap so the segments don't collide when you close the hand. Take a piece of the coat hanger wire and push it through the bottom two segments and almost all the way through the finger tip section. This way you don't have to drill any holes after baking. After the baking, I assembled the segments gluing them in place. Then I drilled two angular holes in the face opposite the finger holes and put in the aluminum rod and cut at an angle. I put the wood, wire, clay hand in the glove. I filled out the glove with fabric. Then I closed the hand over a lightsaber handle. Next I used braided grounding strap to line the glove at the opening. This gives it shape and support. I then took quik plastic putty and created like a platform base out to the glove and sealing off the inside of the glove about one and a half inches down from the opening. I then glued in the center detail and masked the glove and braid and painted everything inside copper. Then I hot glued the wires, armor, and kit bashed parts to the painted quik plastic base. I then Mixed up a bunch of black appoxy and poured it into the glove about 1/8 inch thick or atleast enough to cover the painted quik plastic. I then scruffed up the outsude of the glove. Then i burnt the wires with a lighter.
Hope that helps, Ben
burnttop.JPG

burnttopangle.JPG

 
Last edited by a moderator:
I got these years ago online somewhere, I read it was the screen used hand that Luke cut off for the pyro shot.

Saber is a resin cast of a stunt saber, or possibly a rubber cast.

IMGP9059-vi.jpg


IMGP9058-vi.jpg


IMGP9057-vi.jpg

Resin cast of stunt saber you say?
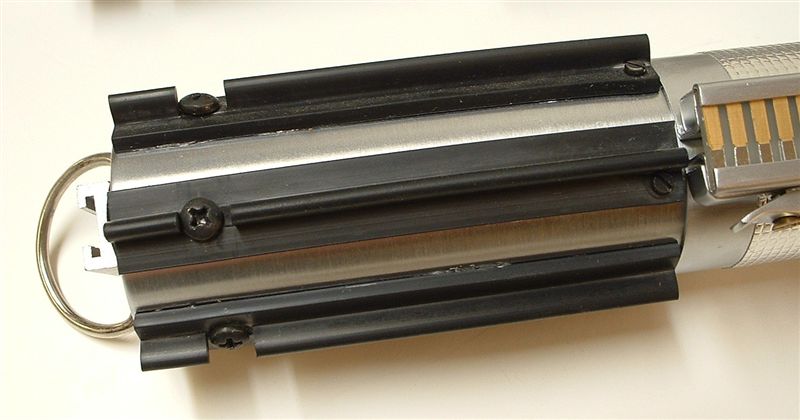
It looks like there are screws holding down the grips, just like that lightsaber that's in the other thread. The ESB lightsaber with the white & blue wires on the left side. The one that has scratch marks that match the ESB version, except for the screws.

What to make of those screws? :confused
 
I'm guessing they were added to some props to stop the grips sliding around or falling off.

Nice work on the severed hand, looks good. If you wanted to go uber-accurate you could replicate the pics of the original, but yours looks cool as is.
 
Resin cast of stunt saber you say?
It looks like there are screws holding down the grips, just like that lightsaber that's in the other thread. The ESB lightsaber with the white & blue wires on the left side. The one that has scratch marks that match the ESB version, except for the screws.

What to make of those screws? :confused

I sold a kit years ago for the Skywalker Ranch Saber with all the screws needed, including those.

Here is a pic of the grips of the SRS from my collection:

NESB008-vi.jpg


The correct answer is 2mm slotted cheese head screw, identified by Chris T and Gavidoc years ago.
 
That hand belongs to Bob Burns and the saber is indeed screen used.Awesome piece.
Along with all the other jaw-dropping,pant-wetting gear Bob has.
 
I agree, It needs saber burns. Added pics below
I LOVE THE FACT THAT I INSPIRED SOMEONE TO MAKE ONE! Please post pics when you finish it!

How I did it:

I took a half inch by three inch piece of wood and cut it about 3 inches long. I drilled four holes on the top(the half inch side) and one angled hole on the side. I cut apart a wire coat hanger, cutting the wire the length of the fingers and thumb that fit in the glove after you insert the wire into the holes. I glued the wire into the holes. I then used sculpey to make the finger segments. Three segments per finger. The gaps in the segments are where the knuckle bends are. Make sure you make the segments large enough to fill the glove. Make sure you angle the edges of the segments and leave enough gap so the segments don't collide when you close the hand. Take a piece of the coat hanger wire and push it through the bottom two segments and almost all the way through the finger tip section. This way you don't have to drill any holes after baking. After the baking, I assembled the segments gluing them in place. Then I drilled two angular holes in the face opposite the finger holes and put in the aluminum rod and cut at an angle. I put the wood, wire, clay hand in the glove. I filled out the glove with fabric. Then I closed the hand over a lightsaber handle. Next I used braided grounding strap to line the glove at the opening. This gives it shape and support. I then took quik plastic putty and created like a platform base out to the glove and sealing off the inside of the glove about one and a half inches down from the opening. I then glued in the center detail and masked the glove and braid and painted everything inside copper. Then I hot glued the wires, armor, and kit bashed parts to the painted quik plastic base. I then Mixed up a bunch of black appoxy and poured it into the glove about 1/8 inch thick or atleast enough to cover the painted quik plastic. I then scruffed up the outsude of the glove. Then i burnt the wires with a lighter.
Hope that helps, Ben

That helps a bunch, cheers bud! I'll post pictures of mine when I'm done, just have to purchase a vader glove first. :lol

Also, just one more question; where did you get the armor for the glove?

Oh, and the saber burns look good. :thumbsup
 
Last edited by a moderator:
The armor is the hood(heated up and re-shaped) from the Peterbuilt 359 model, the same one you get the rims from for the jedi training remote. the thumb armor is half a gas tank from the same model and the center copper piece is from the same kit.

Also I have a left hand glove if you are interested:lol
 
Back
Top