V for Vendetta Dagger - WIP pics and questions...

ewigestuden

Member
Hello!

I realize more and more that it's quite a challenge to put together an accurate V costume so many years after the movie. Especially nice con-safe daggers are really hard to come across, so I decided to take matters in my own (most incapable, noobish) hands :D

After having read and watched tons of Smooth-On tutorials and specs, I decided to use OOMOO for the 2-part mold and Smooth-Cast ONYX for the replica.

Here are some pics:

IMG_3243.jpg


IMG_3245.jpg


Doesn't look too bad for the first try, BUT.

I've encountered some problems and I would really appreciate an advice :(

Firstly, my original dagger demolded when I was removing clay from the first half of the mold. I will be making another mold because the present one is not so nice on one side due to that demolding. How do I do it better next time? Is it about having the simplest rectangular box to minimize shifting the half-mold around while repositioning and removing clay? And there I thought I was being smart saving the silicone with that tailored mold box :facepalm

Then the main problem: the blade thickness of the original is 2 mm and one of my replica might be even less over the length of 30 cm. I took the resin with the Shore Hardness 80 in hopes to achieve stability despite that thin blade. Well, I was wrong. The blade of the replica is disapointingly flexible. Is there a different resin with a much higher hardness and still low viscosity that would fit better for this project?

And last but not least - I placed the replica into the oven as suggested in the product sheet, in hopes of achieving a better hardness. The picture above shows clearly that warming the replica up resulted only in bubbles - they were not visible after demolding! I know that I have to pour the resin into the mold slower to prevent bubbles from building, but it's sort of disappointing to see more bubbles appear while post curing. Is anybody here doing post curing at all? Does it do anything apart from bringing up bubbles?

Many thanks in advance for any and each advice! I will be ordering more silicone tomorrow and I would be really happy to add to my order if anybody has an idea for different resins to use here.

cheers
e.

Edit:
Am I wrong looking for a resin with a higher hardness to get a less flexible blade? Maybe it's the tensile strength that matters in this case? :confused
 
Last edited:
Making a customed shaped box shouldnt be the reason the piece demoulded, what are you making the walls from? if you make a good solid wall out of mdf for example you could make a fixture that would suspend the blade, holding it in place whilst you remove the clay to do the second half? a pin or dowel at the end of the butt would be suitable plus it would make a suitable pour hole.

if you want i can draw up a tutorial how i'd possibly do it?

As for the resin im not really sure, i tend to use polyurethane resin known as "fast cast" ive done sharp shapes and had no issue, but might be partially fragile. Also pouring slowly can be a good thing but depending on the resin and how big the object is it could begin to cure before you've finished pouring. A good way to avoid air bubbles would be to pour from a high height as the thin stream of the resin with prevents folds of the fluid producing bubbles :).


Hope this is helpful!

- FlyingSheep
 
Hi Flying Sheep,

thanks a lot for your help!

Mdf sounds like a good idea, I will try it when making the next mold box!
I am not sure a fixture would help to hold the original in place tho... it was the blade that demolded really quickly, maybe because silicone simply doesn't stick to steel really well.

I keep thinking about making a one-piece mold for the blade next time but I am not sure whether it's such a nice idea. How do you cast your sharp shapes? I am asking also because the edges of the blade turned out slightly irregular and I can think only of a one-piece mold to avoid that.

My replica is actually not too flexible anymore after post curing. I just have to keep in mind supporting the blade better next time so that it doesn't go S-shaped rigor mortis on me! :lol

And thanks for the advice to pour from a higher height next time! I will try that :) This time, the cup was getting really hot already and I was sort of in hurry :$

cheers
e.
 
No worries :)

Did you use a release agent on the blade before pouring? with a two part mould its not always necessary and can cause it to demould? you could trying keying the surface of the blade, with about 500+ grade W&D sandpaper? that will give something for the silicon to bite onto for when you remove the clay/plasticine.

The reason i suggested pinning it because you can make a freestanding wall with no base and top and when you go to remove the clay you can flip the mould "box" and remove the clay without disturbing the silicon or removing the blade as it would be secure within the wall?

An elaborate way to make a mould box is the actually cut the wall in half (works really well with acrylic), with pins through it to locate them back together. have the silicon mould's seem follow this line, that way your two part mould will keep its rigid form with no flex to the silicon when you go to pour.
Ahh this is really hard to explain, ill have to draw when i get back home as i cant upload the photo of how i did a said mould as it was for a job with a company :/.

And one piece moulds are good but if you don't cut it out carefully you could get a horrible seem and can often cause more hassle then its worse. In my experience Its always better to take the time to make a two part mould.

-FlyingSheep
 
Hi again!

To sandpaper my boootiful dagger is not really an option :$ I rather try with that flip box you describe. Could you please make a sketch for me? when you have time to make one, of course...

I didn't use the release agent when making the first half of the mold, only later for the second half...

G'night
e
 
Alrighty then :)

Ill try and knock up a detailed step by step tomorrow :)

Using a release on the second half if the right thing, so it might be the steel xD im not too sure.

- FlyingSheep
 
I also found that the "Brik in the Yard" channel on youtube has some great casting tips and tricks as well. You kind of need to sift through some of the make up stuff (unless that is something you're interested in as well of course.) but they are all well done videos. The pre-painting techniques they use I found particularly neat.

BITY Mold Supply - YouTube

They also have one video using alginate for the bottom layer instead of clay on a two part mold. I had never thought to use it like that but it seemed to work pretty well and alginate is super cheap. They also use a casting resin to make a hard backing for the mold which is a technique I hadn't seen before either.

Mold Making with Silicone: 2 piece mold with alginate parting line - YouTube

Mild disclaimer : They sell the stuff they use in the videos so you may not see your particular product but they techniques should transfer fairly well.

Keep up the good work!
 
Last edited:
Thank you Flying Sheep!
I think maybe I should let the first half of the mold cover slightly more than just the bottom half of the blade so that the silicone traps the steel while prepping for the second half. That would solve the issue with the irregular edges too, but I'm afraid a tiny hairline egde will show somewhere on one side of the blade then... :unsure

Darksyde13,
thank you for the tutorial rec! I will check them out later today (once my easter bunny duties have been fulfilled :cool )
 
Must keep an eye on this post ;)


Sent from my iPhone 5 using Tapatalk
So no pressure then, huh? :lol

Alrighty, new silicone is underway, as is ONYX Slow (which has a higher tensile strength than ONYX fast, let's see whether it changes anything).

I would really love this second try to be successful.

I am going to build such a box that I won't need to open its walls to remove the clay - I will use my ONYX fast for the supporting layer over the first half of the mold (as shown in the link Darksyde13 kindly provided). This way I will be able to flip the box to remove the clay... hopefully that will be gentle enough for the silicone to remain sticking to the blade :wacko

Upon a careful inspection of the pecks on the blade's edges, and the corresponding parts of the mold, I have arrived at the conclusion that the silver powder I'd been using tends to collect in the narrow corners of the mold thus creating ragged edges... I will have to take a harder brush next time and pay extra attention to all those sensitive spots. If the problem persists, I will have to keep the replica solid black and paint it with acrylics after it cures.


May I ask something about post curing?

I figure that I have to cure the replica before taking it out of the mold so that the blade remains nice and straight. For that, my mold has to be heat resistant enough so it has to be cured first - with the original inside, before parting the halves of opening the box. Is that correct?

Thanks in advance for your help!

cheers
e.
 
I only have experiance with polyester resin which I have never had to cure any other way than wait. I also haven't run across any other information about heating anything post-cure unless your in a cold climate. Work in a space at about 72 degrees and give your part some extra time to cure.

For gentle heat you could always try a heated blanket as well. You can set it to 80ish and cover the mold with it.

If it is a full 2 part mold then you can probably get away with opening up after the stated de-mold time in the data sheet and if it still a bit 'green' and floppy then gently set it back into the bottom mold to hold its shape till it hardens fully.
 
Thank you for your reply!

The product sheets state specifically the temperature and the duration of post curing. I think it's 65°C for 4 hours for the mold and 120°C for 4 hours for the resin.

I also seem to dimly remember reading about leaving the original/replica inside while post curing the mold/ the replica. It sort of makes sense. I just don't know whether I am supposed to release the pieces first or after the post curing. I am a little bit afraid that they will stick together forever in my oven o_O lol
 
I haven't given up on this project :)

Here's the sum total of my activities over the last three weeks:

1. I made a better box and the new mold came out really well:


2. I spent quite a while practicing :p
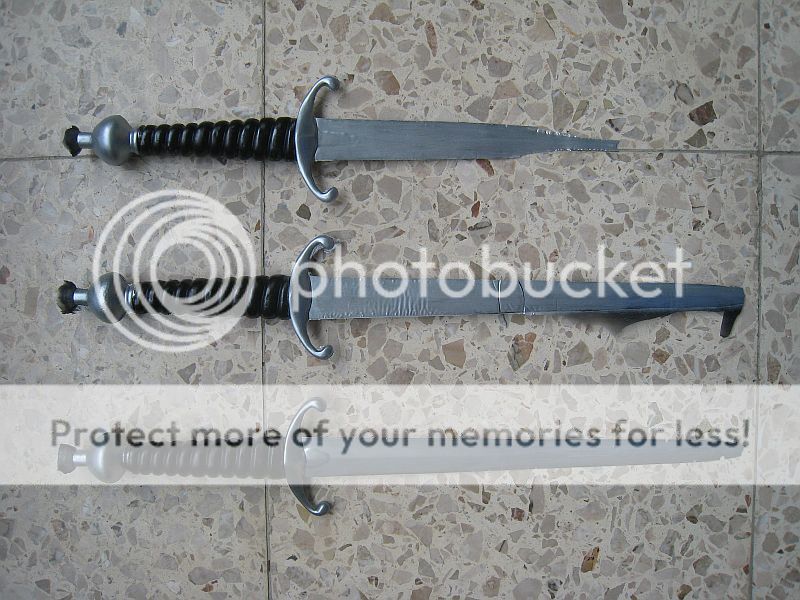
Here's my gallery of shame, so to speak:


The one at the bottom was my last attempt to cast the dagger with fast-curing rubber. Onyx Fast gets considerably thicker already on its way down the mold and is aparenty too thick to fill in the edges of the blade, hence the bubble-shaped cut outs on the edges.
So I took Onyx Slow.
The middle dagger almost landed on my floor because the rubber leaked. I didn't think that my mold would shrink a bit while post-curing the previous dagger, but it did. So the rubber moved down while curing even in its semi-thickened state, producing ripples on the blade's surface (and a black pool on my table).
The uppermost dagger is my favorite. I really laughed out loud when I demolded it. Now I have V's knife, lol. See what happened? I pressed my mold too tightly to prevent it from leaking, and apparently cut off the lower part of the blade in the process! The rubber never got there. Ah well.

3. Below you can see two of my latest attmepts. Both are flawed but still considerably better than any of the previous lot:


I have come to the realization that there is no way to pour the daggers bubble free, because I can't really pour at the lowest point of the mold. No matter how slowly I pour the rubber, no matter how I hold the mold or shake it to let the rubber settle before pouring more, some air always remains trapped :(

It's also quite unreliable a process to close the mold and press the box together in the same way every time, so that the rubber doesn't leak but I also don't cut off half of the blade. Due to the air bubbles, I can't post cure the daggers. Good that they come out thicker now and considerably more stable. I have noticed, however, that the blade tends to get curved a little if the dagger is stored horizontally. I guess this was the problem with NECA replicas.

Had I known that there was no way to get them perfect, I would have cut mine out of a thin wooden sheet and be done with it.
Maybe I will still do that for the blades and glue them to the handles (that come out really nicely every time)...

I still have half of my rubber left tho... So if anybody has an advice on how to improve the process, I'm all ears :)
 
Iv'e never cast anything but Iv'e been looking at all the work here.don't some people use a release Chanel or whatever at the bottom of the box to get a better pour... and please don't take any thing I say to heart. because i don't know
 
I have considered making a channel at the very tip of the blade but I honestly don't know whether it woud help any in my case. The rubber is very thin when I pour it and I don't think it would press the air out. All the instances when my mold leaked didn't help the bubble problem, at least...

But I thank you for bringing it up. Maybe somebody could tell from experience whether an air channel would help the matters?
 
I have actually figured out how to make the blade look neat. I let the rubber leak into the mold seam a little and then trim the blade. Works best for me.

The whole process is quite tiring tho and I am glad I have enough rubber for only one more dagger. *phew* I will post pictures when I am done with everything.

Meanwhile, some neat screen-accurate belt buckles were made in collaboration with another rpf member, but there will be a separate thread for them.
 
I have literally no experience in casting but just a thought that might help something that I have learned from my lab research. try using a syringe or like a calking tube with a tube attached. This will allow you to purge the system of air, so you have no bubbles, and it will let you pour from the bottom of the mold upward.

Again I have no experience in casting but it may be helpful
 
I think it's a really good advise, thank you!
Too bad I have used up all of my rubber now and have not enough patience or determination to start one more batch.
I really should post pics of the final 6 daggers I got from the second batch...

The belt buckles have been finished too:

IMG_3503.JPG

The polished ones look really great, I am very happy with the outcome! :cool
 
This thread is more than 7 years old.

Your message may be considered spam for the following reasons:

  1. This thread hasn't been active in some time. A new post in this thread might not contribute constructively to this discussion after so long.
If you wish to reply despite these issues, check the box below before replying.
Be aware that malicious compliance may result in more severe penalties.
Back
Top