As a lifelong fan of comic book legend John Byrne, I was delighted when, a few years back, he was given the opportunity to produce TOS-era STAR TREK stories for IDW Comics, which I can't recommend highly enough.
Byrne is a hardcore TOS fan, and, on his forum, I've had many friendly and enjoyable discussion about TREK (among other topics, not the least of which are Marvel and DC Comics) with the man.
Byrne Robotics: Star Trek
I particularly enjoyed his CREW miniseries, which depicted the early career of Number One, years before "The Cage".
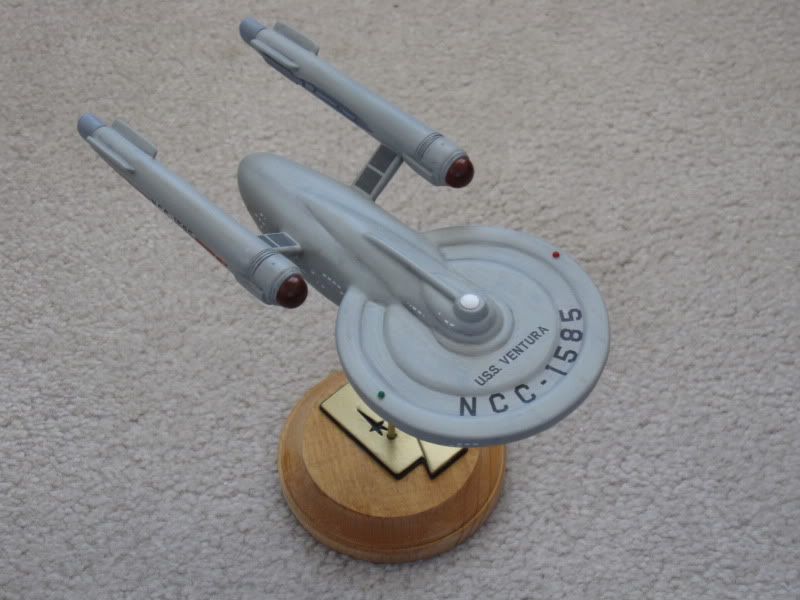
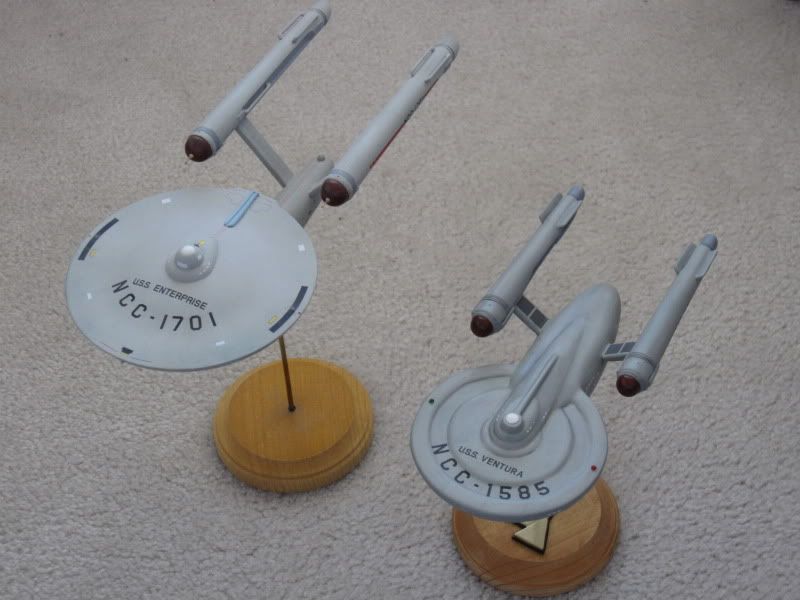
Issue # 3 of that series featured the U.S.S. Ventura, an original design of Byrne's, which was intended as a smaller, clunkier ship when compared to the sleek and huge Constitution-class ships.
Star Trek: Crew: John Byrne: Amazon.com: Books
I really fell for the design, and decided that it would be the subject of my very first scratchbuild--in 1/1000 scale, to match my ever-growing fleet!
There aren't a lot of TOS-style fan designs I've liked. Most tend to fall into the Franz Joseph cut-'n-paste camp, with rearranged Enterprise parts.
For his comics, Mr. Byrne used a 3-D modeler to create ship designs, which he could then trace with pencil and ink from a variety of angles. I approached Byrne to see if his 3-D TREK models were available for reference (orthographic views, etc.). It pains me to say that he accidentially trashed them, some time back.
Undaunted, I went to work collecting images from CREW for reference.
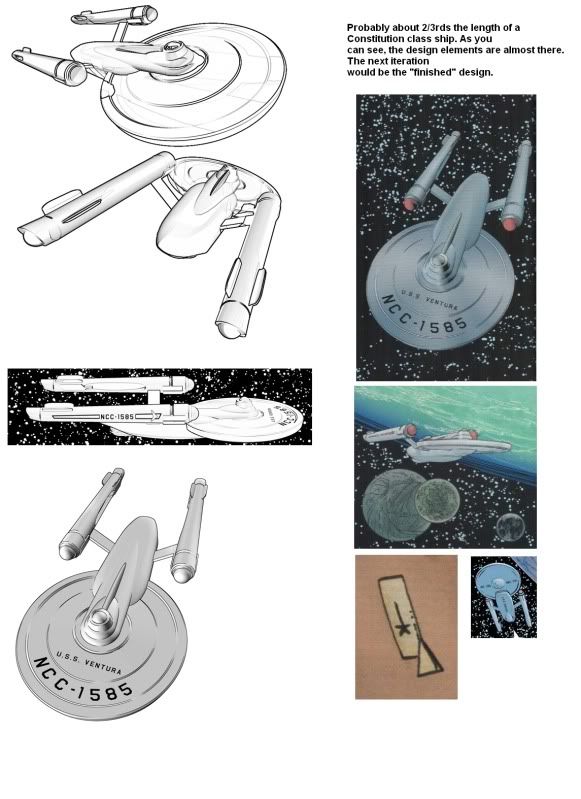
Byrne was helpful in providing feedback and scaling ideas. The design is supposed to be about 2/3 the length of a Constitution-class ship. Working with that, I carefully used key reference points from the artwork (the Bridge, the nacelle pylons and pennants, the saucer registries, etc.) which I assumed would be the same size as those same parts on the Enterprise, and went on from there.

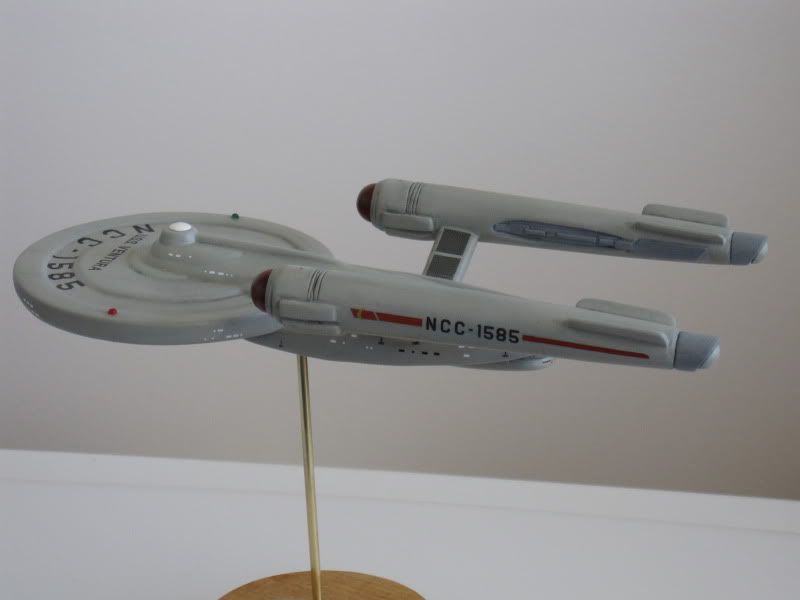
The build came togethely slowly, over these last five months. The main saucer structure was constructed from layers of sheet styrene. Brass tubing formed the "spine". The nacelles and pylons came from Modular Models, and were heavily modified. The secondary hull and Bridge/B-C Deck structures were made from lots and lots of Aves Epoxie Sculpt. The front nacelle domes were made from clear acrylic half-spheres which were just the right size.
A few parts are heavily-modified 1/1000 Enterprise bits--the Bridge and lower saucer sensor domes, an expanded set of hangar doors, the intercoolers, etc.
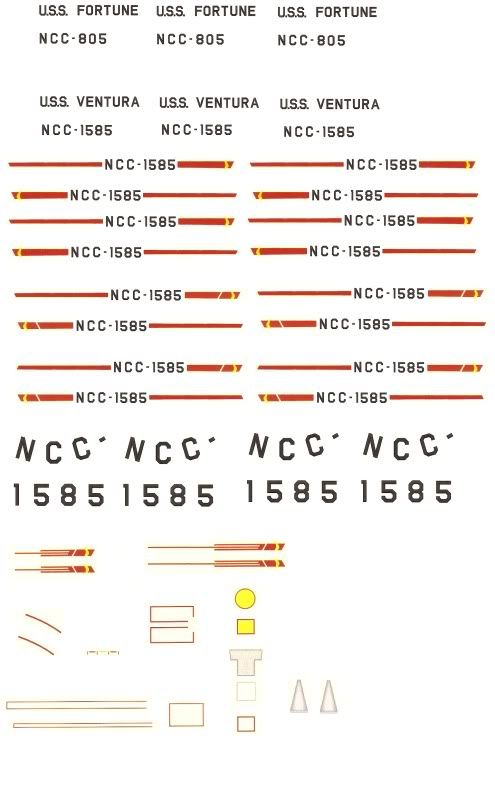
The homemade decals were modified Enterprise (and TOS Alpha-generic) markings, tinkered with heavily in Paint. I even created the teensy frame numbers for the secondary hull (227, 895, and 1421, in case you were wondering), as well as various teensy technical hatch markings ("Radio Compass Sense Antenna", "Tail Light & Electrical Equipment Access", etc.).
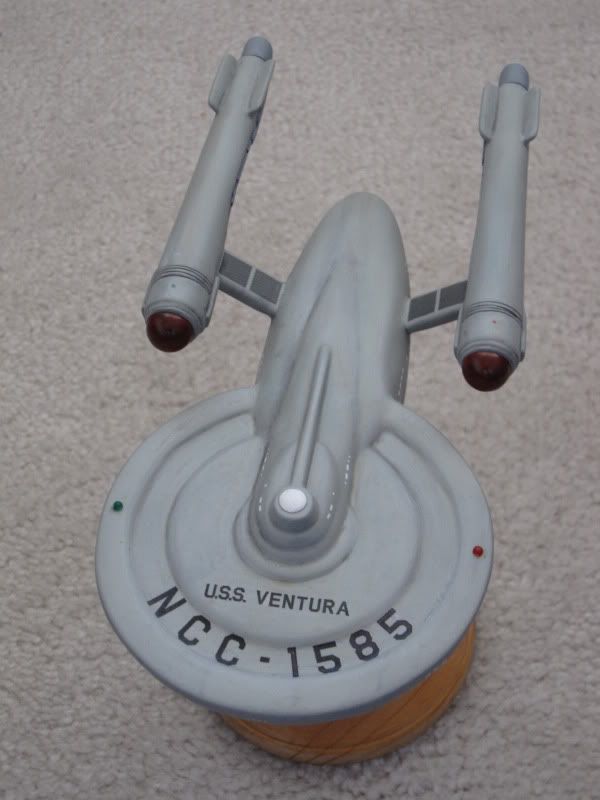
For final detailing, I could have gone in any number of directions, but I finally settled on a mix of pilot- and production-style details, as on the original comic version. The colors used were the same colors I use on my 1/1000 TOS models--Light Gull Gray for the main hull, Dark Ghost Gray for the detailing. Pastel chalks were used for some light weathering.
Byrne decided to leave windows off of his model, but, as a real object, my model didn't look quite right without 'em. So, I added windows, marker lights, and technical markings.
The finishing touch was one of my standard wooden plaque bases, with the Ventura's insignia as decoration--created using layers of sheet styrene.
http://i57.photobucket.com/albums/g212/GregKirkman/Misc053_zps8a4eba62.jpg
http://i57.photobucket.com/albums/g212/GregKirkman/Misc051_zpsb0a8862e.jpg
http://i57.photobucket.com/albums/g212/GregKirkman/Misc050_zps1fff1ddd.jpg
http://i57.photobucket.com/albums/g212/GregKirkman/Misc049_zps4e41148c.jpg
http://i57.photobucket.com/albums/g212/GregKirkman/Misc047_zps31f3163c.jpg
http://i57.photobucket.com/albums/g212/GregKirkman/Misc046_zps7897572f.jpg
http://i57.photobucket.com/albums/g212/GregKirkman/Misc045_zps468cfa02.jpg
http://i57.photobucket.com/albums/g212/GregKirkman/Misc044_zps980b1cd1.jpg
http://i57.photobucket.com/albums/g212/GregKirkman/Misc042_zpsf6e0e270.jpg
http://i57.photobucket.com/albums/g212/GregKirkman/Misc041_zpsbec1ed8a.jpg
http://i57.photobucket.com/albums/g212/GregKirkman/Misc038_zps7e430c34.jpg
http://i57.photobucket.com/albums/g212/GregKirkman/Misc054_zpsb47914ce.jpg
Looking at this thing, I keep asking --"I made this? From scratch!" It's rough and wonky in places, but I'm pleased, overall.
Kinda hard to believe it's actually finished!
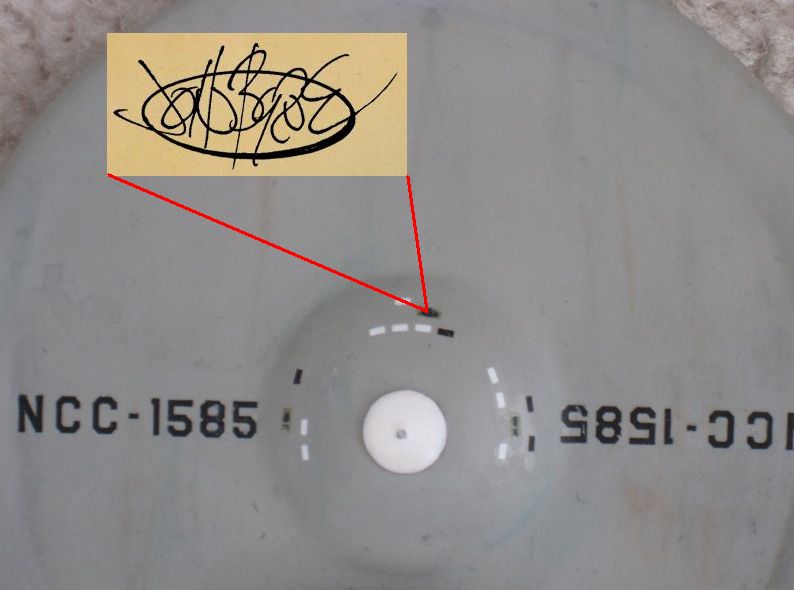
Oh, and I added one last, teensy detail--Mr. Byrne was kind enough to "sign" the model for me, by providing a "Tail Pipe Socket Adjustment Access"-style marking that I could shrink down and print out as a custom decal. It may not be legible, but I know it's there. Way cool!
Byrne is a hardcore TOS fan, and, on his forum, I've had many friendly and enjoyable discussion about TREK (among other topics, not the least of which are Marvel and DC Comics) with the man.
Byrne Robotics: Star Trek
I particularly enjoyed his CREW miniseries, which depicted the early career of Number One, years before "The Cage".
Issue # 3 of that series featured the U.S.S. Ventura, an original design of Byrne's, which was intended as a smaller, clunkier ship when compared to the sleek and huge Constitution-class ships.
Star Trek: Crew: John Byrne: Amazon.com: Books
I really fell for the design, and decided that it would be the subject of my very first scratchbuild--in 1/1000 scale, to match my ever-growing fleet!
There aren't a lot of TOS-style fan designs I've liked. Most tend to fall into the Franz Joseph cut-'n-paste camp, with rearranged Enterprise parts.
For his comics, Mr. Byrne used a 3-D modeler to create ship designs, which he could then trace with pencil and ink from a variety of angles. I approached Byrne to see if his 3-D TREK models were available for reference (orthographic views, etc.). It pains me to say that he accidentially trashed them, some time back.
Undaunted, I went to work collecting images from CREW for reference.
Byrne was helpful in providing feedback and scaling ideas. The design is supposed to be about 2/3 the length of a Constitution-class ship. Working with that, I carefully used key reference points from the artwork (the Bridge, the nacelle pylons and pennants, the saucer registries, etc.) which I assumed would be the same size as those same parts on the Enterprise, and went on from there.
The build came togethely slowly, over these last five months. The main saucer structure was constructed from layers of sheet styrene. Brass tubing formed the "spine". The nacelles and pylons came from Modular Models, and were heavily modified. The secondary hull and Bridge/B-C Deck structures were made from lots and lots of Aves Epoxie Sculpt. The front nacelle domes were made from clear acrylic half-spheres which were just the right size.
A few parts are heavily-modified 1/1000 Enterprise bits--the Bridge and lower saucer sensor domes, an expanded set of hangar doors, the intercoolers, etc.
The homemade decals were modified Enterprise (and TOS Alpha-generic) markings, tinkered with heavily in Paint. I even created the teensy frame numbers for the secondary hull (227, 895, and 1421, in case you were wondering), as well as various teensy technical hatch markings ("Radio Compass Sense Antenna", "Tail Light & Electrical Equipment Access", etc.).
For final detailing, I could have gone in any number of directions, but I finally settled on a mix of pilot- and production-style details, as on the original comic version. The colors used were the same colors I use on my 1/1000 TOS models--Light Gull Gray for the main hull, Dark Ghost Gray for the detailing. Pastel chalks were used for some light weathering.
Byrne decided to leave windows off of his model, but, as a real object, my model didn't look quite right without 'em. So, I added windows, marker lights, and technical markings.
The finishing touch was one of my standard wooden plaque bases, with the Ventura's insignia as decoration--created using layers of sheet styrene.
http://i57.photobucket.com/albums/g212/GregKirkman/Misc053_zps8a4eba62.jpg
http://i57.photobucket.com/albums/g212/GregKirkman/Misc051_zpsb0a8862e.jpg
http://i57.photobucket.com/albums/g212/GregKirkman/Misc050_zps1fff1ddd.jpg
http://i57.photobucket.com/albums/g212/GregKirkman/Misc049_zps4e41148c.jpg
http://i57.photobucket.com/albums/g212/GregKirkman/Misc047_zps31f3163c.jpg
http://i57.photobucket.com/albums/g212/GregKirkman/Misc046_zps7897572f.jpg
http://i57.photobucket.com/albums/g212/GregKirkman/Misc045_zps468cfa02.jpg
http://i57.photobucket.com/albums/g212/GregKirkman/Misc044_zps980b1cd1.jpg
http://i57.photobucket.com/albums/g212/GregKirkman/Misc042_zpsf6e0e270.jpg
http://i57.photobucket.com/albums/g212/GregKirkman/Misc041_zpsbec1ed8a.jpg
http://i57.photobucket.com/albums/g212/GregKirkman/Misc038_zps7e430c34.jpg
http://i57.photobucket.com/albums/g212/GregKirkman/Misc054_zpsb47914ce.jpg
Looking at this thing, I keep asking --"I made this? From scratch!" It's rough and wonky in places, but I'm pleased, overall.
Kinda hard to believe it's actually finished!
Oh, and I added one last, teensy detail--Mr. Byrne was kind enough to "sign" the model for me, by providing a "Tail Pipe Socket Adjustment Access"-style marking that I could shrink down and print out as a custom decal. It may not be legible, but I know it's there. Way cool!