TR-595E Custom Tricorder

Arky

Active Member
I'm moving this to a new thread, as the project has moved somewhat out of the scope of the original. In the process of modeling my DS9/Voyager Mk X Tricorder I started feeling a bit creative and decided to instead build my own version of a tricorder. After building most of the model in Fusion 360 I sketched out a rough idea of what I want the interface panel to look like:

4.png


I think I'm sort of aiming for a hybrid of the Mark X and the Endgame tricorders. I also want to incorporate some of the ribbed panels from MangyDog's concept tricorder. I'm planning on adding electronics, including an LCD screen with simulated readouts. Once it's done, I'll release the project files to whoever wants them.

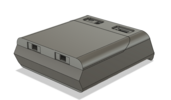
Here's the latest progress. I'll have to rework the door, but here it is anyway:

1.png

2.png
3.png
 
I like that you moved things around to fit a bigger screen. If the Tricorder was real that is a logical, practical thing users would ask for. Doing you're own design will give you the freedom to adjust the design to fit the electronics/functionality you want. It can be a struggle to put advanced features in without changing the look. This is a great idea.
 
Had a fairly sizeable setback last night while looking into possible setups for the display. Looking into available screens, I noticed that at the tricorder's current scale most any screen would either be too big or too small. I've decided to scale up the model- not by much, I only needed to gain about 10mm or so in length, which should give me enough clearance to use something like this:


Long story short, due to how I first constructed the model (poorly) I ended up having to scrap the whole thing and start over. I made heavy use of parameters this time though, so making major changes to the model should be much easier now.

parameters.PNG
 
Finally found some time to work on this again. As I mentioned before, I started over from scratch, but I made some improvements over the original, particularly on the cutouts for the lights on the front- I mostly freehanded it last time, haha. Also, I can't for the life of me seem to get the corners of the sensor bar lip to round out properly. I may just leave it as is and fix it with putty after it's printed.

I'm going to hold off on making the cutouts for the screen/button panels until I have a solution for the LCD screen. That's next up. I've only really dabbled in electronics and I'm so-so at programming so this is somewhat ambitious for me, but I'll muddle through it, lol.

6.PNG
1.PNG
2.PNG
3.PNG
5.PNG
4.PNG
 

Attachments

  • 5.PNG
    5.PNG
    95.3 KB · Views: 141
  • 3.PNG
    3.PNG
    132.7 KB · Views: 140
Took a break from Fusion to start working on the electronics for the project. I did a bunch of research (Thanks for the advice MangyDog!) and settled on a Pi Pico to run the display using TFT_eSPI. Here's a demo file I got working tonight:


My camera doesn't really show it, but the animation is very smooth. It also boots up VERY quickly. Now that I have my dev board up and running, I'm going to sketch out some displays and try to build them on the Pico. I was originally going to go with a single animation, but now that I have an idea of what I'm doing I don't think it'll be a big deal to add extra scanning modes to it.
 
Five hours in inkscape later...

display.png


Still very much WIP. I haven't uploaded it to the Pico yet, so it'll probably need a lot of adjustment. I'm going to use this as a static background, and then code in the animated bits. Right now I'm thinking this will be some sort of bargraph readout, but we'll see.
 
Looking good so far :D Cant wait to see this finished :)

The thing about LCD screens is....... Theyre a pain in the arse :D

Im using a 2.8 inch screen in my build. But ive actually cropped the UI a little, the LCD itself extends about 7mm further up from where it appears to end on the prop.

Also work with a raw LCD rather than one that had a built on PCB that extends the size out.

I get my raw displays from Buydisplay.com. Try and go for an IPS if you can.

Also remember the LCD has a chin, so you wont get it perfectly centred, somewhere in your design you'll have to have some space for that chin to fit in.

Id say, model a dummy of the lcd options you have into fusion, include a shape to show the active area of the lcd. And just move it around your tricorder model to see where it best fits. Then build it and scale around that.

But its a good start so far :)
 
It also boots up VERY quickly.

How quickly exactly? Can you be more specific? Longer than it takes to complete the opening of the door?

I was working on a tric with an animated display driven by Arduino a few years ago but the frame rate was too low even on the higher end controllers at the time. The only way to drive them near fast enough to not see the stuttering refreshing of the image was through low-level hardware hacks that were too far beyond my ability. A raspberry pi was the next obvious choice but the pi zeroes at the time still took a good 20 seconds to boot at best.
 
Looking good so far :D Cant wait to see this finished :)

The thing about LCD screens is....... Theyre a pain in the arse :D

Im using a 2.8 inch screen in my build. But ive actually cropped the UI a little, the LCD itself extends about 7mm further up from where it appears to end on the prop.

Also work with a raw LCD rather than one that had a built on PCB that extends the size out.

I get my raw displays from Buydisplay.com. Try and go for an IPS if you can.

Also remember the LCD has a chin, so you wont get it perfectly centred, somewhere in your design you'll have to have some space for that chin to fit in.

Id say, model a dummy of the lcd options you have into fusion, include a shape to show the active area of the lcd. And just move it around your tricorder model to see where it best fits. Then build it and scale around that.

But its a good start so far :)

Thanks for the info- I did end up making a mockup display in Fusion to get a sense of scale. I think I've got enough room for the whole assembly, but I'm going to print out a partial tricorder chassis and interface panel to check the fit.
 

Animation!

It took me most of the night, but I think I've got things set up so I can add animation elements fairly quickly. It's all non-blocking code too, so adding a new element shouldn't interfere with the timing of existing animations. It's also set up to allow me to (relatively) easily add in new scan modes.

Next up I'll need to finalize the background image and start adding in the rest of the animations.
 
Well, here it is!


I'll still probably end up making minor adjustments, but the display is basically done. All of the animated components are in place. I've also made it fairly easy to add in additional screens or "scan modes" or whatever later on should I choose to.

I'm going to finish building the chassis in Fusion and print out a prototype. Then it's on to the rest of the electronics. I'll need to design the circuit to drive the LEDs, etch the boards, and then assemble them.
 
Rebuilt the case from the ground up (again), this time scaled back down to the approximate size of the Mark X. I've got the main features in place, sans a frame to hold the LCD in place. I'm done for tonight though!

1.PNG


2.PNG


4.PNG
 

Your message may be considered spam for the following reasons:

If you wish to reply despite these issues, check the box below before replying.
Be aware that malicious compliance may result in more severe penalties.
Back
Top