Tom's PCubed saber projects

Okay, the rock salt did not work. The saber is too small a diameter for salt to stick all the way around. Best for larger surfaces or flat surfaces. Tamiya Black, Gun Metal and Red Brown Lacquers....

I screwed up the first paint layer, black, so I sanded it off and did another. This was a few days ago. I was worried, because the lacquer is a different animal, but it worked out. Today I just flicked away some bad areas with a toothpick and dusted black to patch it and even out other surfaces.

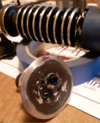
I also decided to dust the emitter with gun metal lacquer. It looked the part but needed a dusting of black to darken it. I went a little too far, the emitter sides are very black, so I'm thinking of maybe dry brushing some gray back on top? Let me know what you think!
fullsizeoutput_2466.jpeg

The reason I won't just dust the whole thing again is because I used painters tape to mask off some general shapes for weathering. (Since SO MUCH is missing from the V2 emitter) and used the back of an X-acto knife to chip away sections of paint. Worked much better than expected, I was looking for unpredictable shapes but only around the size of the knife blade so I could control it. I did the same thing on the black body.
fullsizeoutput_2464.jpegfullsizeoutput_2471.jpegfullsizeoutput_2461.jpegfullsizeoutput_2462.jpeg

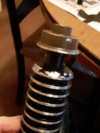
The neck.. I decided to go with what people have said here on the forums, simple over complicated. I dusted the closest Tamiya lacquer I could find, Red Brown, and the mist is SO FINE that I was able to control the color. Once I got the lower neck where I wanted it... I held it like this with a glove and dusted the windvane lighter. I'm thinking I may dry brush dark brown enamel over it, wat do y'all think?
fullsizeoutput_245f.jpegfullsizeoutput_2467.jpeg

Slothfurnace card.. I trimmed it with a dremel and a cloth mask and I'm not sure what was enough. I went quick, I have a steadier hand now. Did both sides after measuring with a sharpie, and went a little shy. It fits tightly and the wanna wannga lever pokes out the block! (It's a real Graflex block ;) )
fullsizeoutput_2465.jpegfullsizeoutput_2463.jpeg

Not off to a bad start!
fullsizeoutput_246e.jpeg
fullsizeoutput_246f.jpeg
fullsizeoutput_2470.jpeg
fullsizeoutput_2469.jpeg
fullsizeoutput_246a.jpeg
 
Okay, I wasn't happy with how that had turned out so I sat down and got creative.

First I used 1/4 20 threaded rod and T nuts to lock the emitter into a drill press. The sleeve of the T nut is roughly the same size as the bore, so it centered the emitter properly and I used 800 grit sandpaper and steel wool to strip and smooth out the first finish.
Screen Shot 2021-02-02 at 6.36.49 PM.png

Also, got steel wool caught in the drill press and had to back away as it twirled and flapped at me!
Screen Shot 2021-02-02 at 6.35.26 PM.png

So I decided to go back to basics, and get the shade I wanted. That meant a coat of gunmetal gray and then a dusting of black. Dust, a few minutes in between, and get heavier with your coats with this stuff.. seems to work well.
Screen Shot 2021-02-02 at 6.36.29 PM.png
Screen Shot 2021-02-02 at 6.36.38 PM.png

Now, how to weather it... the scratching and chipping left micro scratches in the metal and didn't take off enough at a time. I decided to use inspiration from ALLEY and use... drumroll....

GAFF TAPE!
Screen Shot 2021-02-02 at 6.36.22 PM.png

Screen Shot 2021-02-02 at 6.35.53 PM.png

Screen Shot 2021-02-02 at 6.36.06 PM.png

I actually put it BACK in the drill press after the tape ripping, which added the spiral patterns, stripped the big areas and smoothed out the paint.

I re painted the booster.. I didn't strip it, just sprayed more black over it, and went at each of the 3 or 4 places on the body with weathering. I left the neck alone color-wise... it was already dark brown... with the more gunmetal color of the emitter, I realized the straight black emitter was what didn't look right.
Screen Shot 2021-02-02 at 6.35.35 PM.pngScreen Shot 2021-02-02 at 6.36.15 PM.png

I'll upload some pics of it put back together... looking very cool now
 

Attachments

  • Screen Shot 2021-02-02 at 6.35.35 PM.png
    Screen Shot 2021-02-02 at 6.35.35 PM.png
    1.2 MB · Views: 101
  • Screen Shot 2021-02-02 at 6.35.53 PM.png
    Screen Shot 2021-02-02 at 6.35.53 PM.png
    2.1 MB · Views: 93
  • Screen Shot 2021-02-02 at 6.36.06 PM.png
    Screen Shot 2021-02-02 at 6.36.06 PM.png
    1.9 MB · Views: 91
  • Screen Shot 2021-02-02 at 6.36.15 PM.png
    Screen Shot 2021-02-02 at 6.36.15 PM.png
    1.2 MB · Views: 84
I have some more color and weathering I'd like to do. This IS NOT the V2 (I know I labeled the file as such) but the color scheme matches the color scheme of the V2, I'm assuming they were all done the same. I want to darken my emitter paint a little.
Click for larger

1ANHV2.jpg1ANHV21.jpg1ANHV22.jpg
 
What makes you think it's not the V2?

So, this is hard to explain. This is actually built on some stuff I've seen and your results from your projects. The V2 profile has been thinned so much that the first ring has a thin bevel, compared to the original cast or any other casts that are barely cleaned up.

This is the blurry version of the book picture, next to Vadermania's blank

Screen Shot 2021-02-10 at 11.50.40 PM.png
Screen Shot 2021-02-10 at 11.54.52 PM.png

Screen Shot 2021-02-11 at 12.01.14 AM.png


the V2 has a much thinner shoulder
Screen Shot 2021-02-10 at 11.47.29 PM.png


There are a couple other things, but basically there are a couple shots where I see a less-machined cast that may have wires. I've kind of accepted this as part of the chaos of not knowing everything, trying to at least pin point best guess facts, some of these really don't look like the V2
 
This is the final finishing of my V2. I re-did the emitter AGAIN. This time, I laid down TS gunmetal and then TS black enough to almost look black from far away. the brown is the closest, basic Tamiya TS brown laid over a TS black layer. I was able to do a TS Semi-Gloss layer over it all! Click for larger photos!
fullsizeoutput_251f.jpegfullsizeoutput_251d.jpegfullsizeoutput_2515.jpegfullsizeoutput_250a.jpeg

and some of the great machining marks from these projects. The paint got caught in the grooves and I absolutely love it.
fullsizeoutput_2520.jpegfullsizeoutput_2510.jpegfullsizeoutput_250d.jpegfullsizeoutput_250e.jpegfullsizeoutput_2516.jpeg
some beauty shots.
fullsizeoutput_2512.jpegfullsizeoutput_251c.jpeg

Oh! I also dusted the graflex bar block with TS Black to mimic the rust/darkening, don't know if I've mentioned that. That's how fine the mist is from those aerosol cans!
fullsizeoutput_2521.jpeg
 
Last edited:
I have a day off of work today and sitting around the house, I wanted to share what my saber looks like in natural light, without a camera flash. This neck color is WEIRD. It looks almost black sitting next to my TV and by a window..

fullsizeoutput_2536.jpegfullsizeoutput_2535.jpeg

fullsizeoutput_2534.jpeg
fullsizeoutput_2533.jpeg


but with an incandescent flash....
fullsizeoutput_2538.jpegfullsizeoutput_2537.jpeg

interesting right? I think I'm lacking some of the complexity of the real prop's neck... maybe because the neck has been beat up and may have a different type of brown layer. This was quick and dirty, 3 cans of paint, brown over the black like the Hoth Flash hider, so artistically i'm happy with it :D
 
I have a day off of work today and sitting around the house, I wanted to share what my saber looks like in natural light, without a camera flash. This neck color is WEIRD. It looks almost black sitting next to my TV and by a window..

View attachment 1429036View attachment 1429037

View attachment 1429038View attachment 1429039

but with an incandescent flash....
View attachment 1429041View attachment 1429042

interesting right? I think I'm lacking some of the complexity of the real prop's neck... maybe because the neck has been beat up and may have a different type of brown layer. This was quick and dirty, 3 cans of paint, brown over the black like the Hoth Flash hider, so artistically i'm happy with it :D

That means you got the right color combo going ;)
 
pic dump for the next project
fullsizeoutput_26c7.jpegfullsizeoutput_26c8.jpegfullsizeoutput_26c9.jpegfullsizeoutput_26cb.jpegfullsizeoutput_26cc.jpegfullsizeoutput_26cd.jpegfullsizeoutput_26ce.jpeg

with my first fx blade (they happen to be the same tang size) and some Gaff Tape stuffed in the other end to anchor the tang. Gaff tape on the neck of course!
184762430_10159199976944784_6244747540055918035_n.jpeg184829996_10159199976949784_2668546959892773534_n.jpeg184868806_10159199976934784_356029547952595755_n.jpeg185135899_10159199976939784_2165265332478753982_n.jpeg
 
I did 2 things today.

I wanted my V2 emitter a little smaller, I get these weird creative urges... so I threw the emitter in a drill press and carved the emitter plate a little smaller

Also, I made a shaft collar from scratch. In the mechanics of machining these, the drive shaft hole is a different size down below, inside
fullsizeoutput_273e.jpegfullsizeoutput_273f.jpeg
I was planning on making this into something that could be swung around. Gaff tape on the neck helped keep things secure, so I see why they did that. The tang itself needed something more secure at the other end.

1) Gaff tape wrapped in the body
2) a bit of metal to fill the space around the rod.
fullsizeoutput_273d.jpeg
fullsizeoutput_2740.jpeg


The big shaft collar just keeps the rod from falling out the emitter. The one I made is to fill the space at the end of the hole, but I put a set screw in it just so I can sleep at night
 
Pic dump, will post some deeper explanation in a bit.

I made a tapered inner spacer and collar and installed them in a new blade. I have a glomex in the works, this is a valor 8 footer and I cant decide which I like better
20210602_142303.jpg
I bought some random taps on ebay and they are bigger than my matching set screws (all metric) ... my m4 screws fell through after tapping so the M5 is closer, only .05 mm bigger so these are tapped for M5!

Still some rattle in the blade, the tang and spacer are the same height, and this is locked on pretty good. could be the loose emitter

Either way, for swinging at home, its locked on great!!! Wish I had a lathe so I could make longer tangs/inner spacers, but this went very well
20210603_114917.jpg20210603_114941.jpg20210603_115010.jpg20210603_115027.jpg20210602_143028.jpg20210602_143558.jpg20210603_115043.jpg20210603_115104.jpg20210603_114614.jpg20210603_114712.jpg20210603_114818.jpg20210603_114848.jpg
 
It just hit me today that some of the rattle might literally be because there is no grub screw/clamping screw in the hilt. Maybe the windvane screw was always there?
 
thank you!

Vadermania did a really great job on painting his motorized hilt. The neck color is a weird bronze nail polish, and my girlfriend actually liked the color enough to dig around for it herself

I may have plans to re-paint in the future... only because more reference is coming out that the V2 was brown, the one with Alec holding it is light brown/brassy and the warehouse hilt is a type of gold... and I have no clue what reference he used though, and wanted to state I've left it because of how great it is in general. until the accuracy ingredients come our way!
 

Your message may be considered spam for the following reasons:

If you wish to reply despite these issues, check the box below before replying.
Be aware that malicious compliance may result in more severe penalties.
Back
Top