Tom's Bapty Stunt E-11

thd9791

Master Member
RPF PREMIUM MEMBER
So everyone's seen Field Marshall's E-11 right?

This project will take a Static FM blaster and convert it to a Bapty stunt. I was lucky enough to grab these in a trade.
20191220_194213.jpg

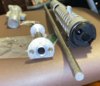
Now to disassemble a FM Static E-11 for my needs. Looks like the Grip slides into place and can be tightened, very cool system. The bolt has cut outs to make room for the Button head bolts for the magazine slot and grip. I may throw a steel rod down the barrel to counterbalance the rear cast parts.
20191220_193700.jpg

I also plan to test this rivet thing on some scrap metal. The most reasonable idea is to use button head screws for the solid casts but I see rivets on the Bapty guns. Maybe drilling a hole behind the rivet location would do it...
20191220_193738.jpg
 
Thank you so much! Honestly, you're the only reason I can do this. I'm thinking of extending the rear into the reciever a bit by fitting some more pipe onto the end, trimming the rear by the wall thickness of the pipe, etc. And running an attachment through all 3 (including the reciever)

Heres the set up for the base gun!
20191220_203027.jpg
 
What I was planning on doing (after trimming and cleaning the cast) was to drill and tap the cast as well as the muzzle and run a threaded rod through the whole thing with a piece of aluminum tube in it thats the same diameter of the ID of the receiver and a small diameter to mimic the wood barrel that was used in the original. This was the plan for a real deac sterling anyway...
 
Fieldmarahall’s kit is the perfect fit for those cast parts! Will be following, I know this will be a great build.
 
So, I need to take more pictures, but I took a couple during my first session on this.

I used the FM pin and trigger guard, drilling two different holes to set the pin and the loop in the handle. Didnt have a small and strong enough bit to do the back.. so I have to hammer some more scrap aluminum in there, maybe drill out the area and make a slotted round piece to blank a hole, leaving a gap for the steel?
20191223_144303.jpg

20191223_144253.jpg

I drilled and tapped for the two screws that lock the handle to the body...
20191223_111837.jpg

20191223_183353.jpg

And I tried to stuff the bolt and take up the rest of the space... I may swap that out with one piece of pipe

I tried riveting into solid metal and its stuck but can freely rotate. Not enough for me to rely on, no idea how they did that..
20191223_111041.jpg
 
I will say that there were weird error holes on the rear of the gun, at the end of the tube, and the stock holes are really rough on the tube. There was an extra hole underneath the rear sight and the handle plates were rattly - I did ask FM about extra screws or something but havent heard anything back, so I didnt bug him about the rough/error holes. I can tell it was a huge undertaking making all these parts. Most everything is locked together with Allen socket screws, so get a full Allen wrench set for this!
 
okay, so here is where I've ended up.

I've ground/filed/dremeled the rear cast to slide into the receiver. This cast is basically the length of the prop, and instead of tapping an extension of solid metal, I chose to cut the receiver longer. It all ends up on the same plane anyway. I decided to use black button head screws, since the rivet experiment really didn't work reliably enough for me.

IMG_0519.jpeg
IMG_0524.jpeg


This is the space between the bolt and rear cast. Thinking of filling it with pipe?


Here is the handle and how it locks into the gun. I can't really tighten the rear bolt, because of how deep in the body it goes, but the front one I can do.
IMG_0527.jpeg
IMG_0525.jpeg
IMG_0526.jpeg

FM handle has two tapped holes, so I just copied the footprint with a sharpie, measured a few times, and drilled and tapped.

However, the smallest dremel bit I had that would bite into solid aluminum is twice the size of the FM steel trigger guard. What can I plug this hole with? The guard is bent a little sideways too, so it has to hold the steel down in the hole, as well as plug it. Maybe blank the hole with some metal?

IMG_0528.jpeg

I'm thinking about getting some weight to the front, the casts leave this very back heavy. Maybe I can slide in some steel round bar and set screw it into the barrel...
IMG_0522.jpeg

Also thinking about using an original stock. I have one, from that older E-11 project that I may take down from the junkyard. For some reason I hollowed out the rivet area, I think to use the airsoft mounting system. I would need specific washers.
IMG_0520.jpeg
IMG_0521.jpeg

But it's also bent, so it's stressing the FM sock attachment. Maybe I'll get a surplus stock?


IMG_0529.jpeg
 

Attachments

  • IMG_0523.jpeg
    IMG_0523.jpeg
    1.1 MB · Views: 110
Wait, I don't need to use the bolt! .... Whatever you use, you HAVE to cut a slice in the bottom for the handle button head screws to clear, AND space on the side for the Magazine button head bolt to clear! This is why the bolt is shaped like a J in the FM kit.
 
Looks like my gun is too long, and i will be cutting it down as well. I think I'll have to custom shape the rear cast and the steel pipe to fit around the fm internals.

Here are the reference pics i have - are there any more out there? I need to decide where to put my fasteners. It looks like there's a gun that only has a fastener for the rear on one side. Another has 2 random ones further up the receiver... because the real cast is super long, nearly forgot!
bapty-stormtrooper-blaster-restoration-comparison.jpgBaptyE-11.jpgPropStoreE11.jpgScreen Shot 2019-12-30 at 10.57.36 AM.pngScreen Shot 2019-12-30 at 10.56.58 AM.pngstar-wars-blaster-compare-sterling-03.jpg
 
What "internals" are getting in the way of the cast? I believe the blaster should be the same length as a stock Sterling.
 
What "internals" are getting in the way of the cast? I believe the blaster should be the same length as a stock Sterling.
you HAVE to cut a slice in the bottom for the handle button head screws to clear, AND space on the side for the Magazine button head bolt to clear! This is why the bolt is shaped like a J in the FM kit.

The cast might bump into the Stock screws, not sure yet. The pipe I put inside (to replicate the long original cast) has to pass by the 1 Magazine screw head and the 2 Handle screw heads. FM made a slot for the handle screws because you slide the bolt in from the back, so the screw heads need a clear path for something to slide over them. The J shaped cut-out clears the magazine screw by a wide berth too.
 
Today I "blanked" the hole around the back of the trigger guard! Sliced a measured rectangle of 1/16 aluminum, ran it on a metal file, and hammered it into place. I... think it will stay? I sanded and ground it pretty flush
IMG_0546 2.jpeg
IMG_0547 2.jpeg
IMG_0548 2.jpeg
 
Okay folks - the handle has stayed put

I first chopped the reciever down to a more accurate length. Honestly the handle bottom points to the endcap, so I generally measured that way. Seems much better now!
20200103_113442.jpg

I successfully put a steel rod through the barrel for weight. Sand paper and a flap bit in a drill press got it to a slip fit. These are 4-40 set screws left over from my MoM Vader saber
20200103_113749.jpg
20200103_113733.jpg
20200103_113711.jpg

I found a thick 1/8" pipe for the center, its steel and I'm hesitant to use it for the weight..
20200103_113603.jpg

Because now I have a new stock! kurtyboy how much does your blaster weigh?
20200103_113638.jpg

I carefully sliced the rivet heads and drilled out the stem, and it was able to pop open!
20200103_113621.jpg

Now, it fits (with some filing and these two little steel spacers or bushings I made) however it has nothing to lock to. FM receiver has a hole that is longer than the length of the original, so it slides forward but into more empty space
20200103_113532.jpg

I tried making an insert quickly, didnt really work.
20200103_113507.jpg

Maybe put a screw in front of it and let the screw head hang over the hole? Make a rectangular fitting that hangs over the hole?

What are your ideas?
 
Thank you!

Best solution I have now is to make a metal rectangle that will be screwed down in front of the hole. It will have a thick end that protrudes over and into the hole, sitting flush with the inner wall.
 
Okay so I have a long list of problems I have to solve and only 1-2 got done today, but they got done well.

First I leveled off some of the rear cast, so I had a flat surface to measure against. I was thinking of the pipe that would go inside, and how long it would be.
20200113_184537.jpg
20200113_184405.jpg

Then I had to shape the 1/8 steel pipe to be able to slide in from the back and pass by all the Button Head screws inside. I started dremelling... but really you need an angle grinder for this I think so I drilled large holes and sliced the rest out. 1 channel lengthwise for the handle bolts. 1 side channel for the magazine bolt. 2 sloppy holes for the stock screws to pass through. Most of this was by eye, because I was working inside out, and there are not very tight tolerances here, I'm better with aluminum.
20200113_133738.jpg
20200113_184426.jpg
20200113_184505.jpg

I then tapped a screw for the rear cast and trimmed it some.more to fit snug. One screw still left it rattly so I put a second one in, albeit not accurate, this isnt a 7 inch deep cast, it's like 4.
20200113_184341.jpg
20200113_184305.jpg
20200113_184243.jpg
20200113_184211.jpg
20200113_184146.jpg

Pretty solid now! Stock is still held on with some wire... no idea, but that's for another day
 
This thread is more than 3 years old.

Your message may be considered spam for the following reasons:

  1. This thread hasn't been active in some time. A new post in this thread might not contribute constructively to this discussion after so long.
If you wish to reply despite these issues, check the box below before replying.
Be aware that malicious compliance may result in more severe penalties.
Back
Top