Titanfall Militia Pilot full costume

Knox

New Member
Hey guys,
This is my first post of all time so please correct any mistakes I make. I have been all over this forum for a while and I've finally decided to post!!

What I want to create is a full militia pilot costume from Titanfall. However the helmet is the IMC one as seen in the trailer.
(This one)
militia pilot.jpg

My final goal is to create it out of bondo, resin etc and make a final mold for slush casting. I want to take it so far because I just want to get a load of new skills and I thought rather than read about it wishing I could do it I should just give it a go.

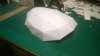
I have finished the pepakura for the helmet to an extent but I have a problem. If I finish the back I wont be able to put it on.

2.jpg1.jpg3.jpg

I would love some help to fix my problem, I was thinking finishing with foam or rubber so that it's stretchy.

One final note, this is only my second pepakura so I would love some of you pros to lend a critical eye :)

Thanks for reading, I hope you guys enjoy.
 
Last edited:
Hard to tell without seeing the missing part that's causing the problem, but if I understand the issue correctly, you could try a hinged section that can be pulled back to put it on and fixed in place on the back of your neck when the helmet is on your head, using elastic strapping and magnets.
It could be done a lot tidier I'm sure, but here's my Ironman helmet from my display to show what I mean:
IM Helmet Hinged Section.JPGIM Helmet Magnets.JPGIM Helmet Strap.JPG
 
Wow I never even thought about that and it might just be the perfect solution, thanks a lot! :)

I have another question for all you pros out there. What would be the best way to strengthen my helmet before bondo. Now I know the popular method is fiberglass but there is alot of detail at the front of my helmet which may be tricky to fiberglass. (See images)

WP_20140720_013.jpgWP_20140720_012.jpg

If you think I'm just worrying over nothing then please tell me and if you know any other methods I would love to hear them. :)
 
Last edited:
That pep looks great.

Mmm, maybe a few thin slushes of resin mixed with Bondo (whatever brand auto body filler you have in the UK) ?
 
That's the method I was thinking of but I forgot that you can add bondo. It's called unofficially called rondo I think. Thanks for the advice!! :)
 
OK! Finally finished the pepakura! I need to make some slight fixes but all the pieces are in.

I made a really dodgy setup out of a turntable for this little video.

Next onto rondo and bondo testing!!
 
Last edited by a moderator:
Ok so as this is my first time using bondo/rondo/resin I have decided to create a knee pad to do a bunch of testing on before moving on to the helmet. As it's the militia knee pad if it turns out ok then I can use it, if not I only lost 1 sheet of paper and some fairly cheap materials.

kneepad.jpgWP_20140724_001.jpg

Now all I have to do is wait for everything to arrive. If anyone has any tips before I start I'd love to hear them.
 

Attachments

  • WP_20140724_001.jpg
    WP_20140724_001.jpg
    2.1 MB · Views: 355
Try Smooth-Cast 300 or 320 (www.smooth-on.com). Fast curing is better. I brush it with all my pepakura crafts (not costume though). It hardens the surface so that it won't collapse when putting resin on top. I hate bondo (and I don't use it), so this is how I do it. Btw, I have made a smart pistol and a CAR SMR with cheap toy guns.
 
I was going to use rondo for the strengthening and bondo too smooth it out and make it look nice. However, I do want to slush cast my finished helmet. Do you know what the best resin and silicon would be for that?

I love you smart pistol and CAR SMR btw I want to do a smart pistol of my own I just need to narrow down the base pistol shape. :)
 
OK! Update time. Like an idiot I forgot to order some stuff for the next step (tools for hardening the pep) however I have now ordered everything and it should be arriving tomorrow or the next day. So stay tuned for that!

In the mean time I decided to do a little side project and made Salem's mask from Army of Two, take a look:

WP_20140728_030.jpg

If you don't know what the mask from the game looks like then here's an image, consider it a gift :)

wickedArmorAoT.JPG

In the future I might finish it but right now the Titanfall costume is top priority.
 
Alrighty, more updates! My flight suit has finally arrived (I will post pics soon!).

My plan for the body armor is to buy a tactical vest and use the back for the costume and make a custom front for all of the canisters.
armor.jpg

Ok so I have a question for you all, what would be the best way to make a custom front plate for the body armor?

I'm thinking along the lines of EVA foam and covering it with something but I'm undecided, I would love some feedback from all you pros out their :)
 
Thanks bro, your costume totally awesome, I've seen you around the place on RPF and your thread was actually one of the first Titanfall related threads I looked at. I have a question for you, where did you get that huge scarf? I've been looking around and a lot of them seem a but small to go with a helmet. Oh and another thing, how did you support it, so that it stays in place around the helmet?
 
Thanks for the kind words . I got the middle eastern scarf on eBay in tan I bought two of them . I made a Eva foam ring like a big neck brace . Glueing it with hot glue . Then I wrapped it with one scarf glueing it to the foam insert with hot glue . Then I rapped the other scarf strategically around the form to look the game image . Then safety pinned it in place . Very easy but gives the high collar lift that appears in the game imagery . Hope it helps
 
OK, very sorry for the lack of posts but I was on work experience for a week and didn't have the time or energy to continue. However, I'm back now with loads of time to spare.

I have just done my first ever resin test piece (the knee pad in a previous post)

This the the resin and bondo I have.
WP_20140809_008.jpg

As always, safety first!
WP_20140809_009.jpg

I think it went pretty well for a first every attempt.
WP_20140809_006.jpg

I did, however make slightly too much but you live and learn :)
WP_20140809_011.jpg

Ok so I'm going to do the Rondo layer and I'll have pics of that soon, stay tuned :)
 
Better you make too much than not enough. Running out of anything in the middle of application leaves the worst feeling.

The pep work on the helmet is wonderful. Hope the rondo works on the knee pad so you can use it on the more detailed pieces!
 
Hey guys, so sorry I didn't post yesterday like I said but it was chucking it down all day so I couldn't work outside.

Anyway, excuses over. I have finally done the Rondo slush on the inside of the test piece and put Bondo on the outside. It's really strong now and all I have to do is sand it.

WP_20140812_006.jpgWP_20140812_005.jpg

I'll try and get to the sanding asap so stay tuned for that.

Also more of my costume has started to arrive so i'll be posting pics of that as well.
 
Ok guys, I started sanding yesterday, it still needs a lot of work but what do you think? I'd love some feedback as this is my first time working with Bondo.

WP_20140813_001.jpg

I'm using a file, sandpaper and a sanding wheel attached to my drill. Do you guys have any other techniques that might make it easier or faster? Also do you have any tips on making it look really nice and smooth?

Thanks guys!! :)
 
This thread is more than 7 years old.

Your message may be considered spam for the following reasons:

  1. This thread hasn't been active in some time. A new post in this thread might not contribute constructively to this discussion after so long.
If you wish to reply despite these issues, check the box below before replying.
Be aware that malicious compliance may result in more severe penalties.
Back
Top