Thor Stormbreaker - Marvel Endgame (3d print and foam)

TheForgeProps

New Member
Hi everyone!

I've just joined the RPF (after a long time lurking) and have recently finished up a Stormbreaker build during the lockdown. I thought I'd show the photos off and show the build process!

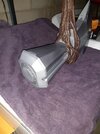
The head is 3d printed, from PLA and resin, and the handle is foam over a metal pipe - I'll show more of the process in later posts. I 3d modelled the head myself, working from screenshots of the movies, and I think it's roughly size accurate.

Hope you enjoy!
20200504_172429.jpg
20200507_162849.jpg
20200508_141926.jpg
 
Thankyou! I'm pretty happy with how it turned out - I haven't ever used foam clay before, so this was a bit of an experiment.

Here is my 3d model of the head - I didn't bother 3d modelling the handle, because I knew I was making it.

3dmodel 1.jpg
3dmodel 2.jpg


And a couple of progress shots of the filling/sanding process - I didn't document this step much (because I feel like it's not that interesting!) but you can see the resin prints in the centre of both the axe/hammer sections, on the most detailed parts. You can also see where my 3d printer decided to throw a tantrum and create more work for me on the axe head.


20200321_130324.jpg
20200326_205715.jpg
 
I finished the head off before I started work on the handle (because it was much easier to paint without the vines wrapped around it!). I basecoated it black, then sprayed it bright silver - it's hard to see the shine in the photo, but it's there!

For the darker metal, I used a mix of silver acrylic paint, with a small bit of black mixed in, and then added aluminium and iron powder until it was gritty and shiny. I masked off the areas I wanted to keep lighter, and painted on the mixture with a large brush, dabbing it with a sponge to remove any brush marks. I painted two coats, until the coat was consistent and the texture was right.

Once this was dry, I removed the masking tape, then buffed the whole piece with a liberal amount of iron paste, giving the silver parts some nice depth and darkening/shining the darker parts.
20200419_154732.jpg
20200420_203531.jpg
20200422_133312.jpg
20200422_183423.jpg
20200422_183431.jpg
 
Next up was the handle. I'm not really a fan of 3d printing wood- for me, it just always keeps a plasticcy finish, and I would rather make it out of actual wood, or if it is more organic, sculpt it from foam or clay. Weight was also a factor - I'm planning on doing the whole Thor build, and making the handle out of foam instead of plastic makes it about a kilo lighter, not to mention less chafey on the old hands, which makes it a big difference when you're lugging it around for a full day, and if I'm holding Mjolnir too, it's nice for both to not be too heavy.

TLDR: I made the handle out of foam!

First I drew a 2d outline of the handle under my existing 3d model,then printed out the template. Then I cut out some (rough) sizes of foam, bigger than the maximum size I needed for it, and with a channel in the middle of two of the pieces for the metal pipe in the head. I glued the foam pieces together with contact adhesive, then copied the template outline onto the foam, and cut it out. Lastly, I used a dremel to shape the handle and put in a few 'guide' lines for the foam clay vines to follow, and little bit of detailing on the end.

I wasn't overly precise with this stage -most of the handle would be getting covered in foam clay and primer, so very little would show.
20200424_170237.jpg
20200424_173152.jpg
20200424_195555.jpg
20200424_195616.jpg
20200424_201006.jpg
20200425_121806.jpg
 
Finally, I glued the metal rod into the head with epoxy, then glued it into the handle with superglue after keying it up.

I used foam clay to do all the vines on the handle - you can use water to make it adhere quite well to other foam, and where it was touching the handle I just used a little dab of superglue to keep it in place until it dried. I basically just worked the foam clay into long strands, then draped them over the hammer where I wanted them to be. After this, I did the same but on the handle, and blended where it joined into the other vines.

I then went over it all with a dremel again, to put some more definition between vines, and then smoothed it all over with sandpaper.

I basecoated the foam with HexFlex from Polyprops, which worked amazingly well; I used a thick brush and painted it on in the same direction, which gave it a bit of a wood grain. Then, I used acrylic paint mixed with a little PVA, and layered on different shades of browns to get the wood effect. Lastly, I gave it a dark wash to give it depth. I didn't document the painting stage, because I'm hopeless.

20200425_211540.jpg

20200428_193802.jpg

20200502_123923.jpg

And that's it! Thanks for looking at my hammer :)
 
That looks amazing! Congrats on a great build.

I’m not a builder, but I’ve always felt I could be if I knew more about the methods and materials you guys use. Home Depot doesn’t offer classes!
 
That looks amazing! Congrats on a great build.

I’m not a builder, but I’ve always felt I could be if I knew more about the methods and materials you guys use. Home Depot doesn’t offer classes!
Thankyou so much! Best way to be a builder is to start building! I'm self taught, and I think most people on here would be too - just pick a project, look at tutorials on youtube, look at what cosplayers are doing on instagram, etc etc - there are insane amounts of tutorials out there these days, so it's a great time to start making stuff!
 
Wow! What was the total build time? I'd love to do something like this myself, however the 3D printer I have has a really small build volume
 
This looks amazing! Great job! I'm looking to repaint my Hasbro Marvel Legends Stormbreaker. It'll be my first time doing something so looking for advice on whether to go metallic paint or graphite powder, color scheme seems everyone I see has a different scheme and it's tough to tell actual scheme from screen shots cause it photos differently depending on lighting, also how best to fill in the seam on the blade. Any help or advice would be greatly appreciated!!!
20210424_114602.jpg
 
Wow! What was the total build time? I'd love to do something like this myself, however the 3D printer I have has a really small build volume
Sorry, missed this post almost a year ago I think the total build time would have been close to a week of solid work- but I was unemployed at the time (2020 amirite) so this was spread out over a few weeks, not including printing.

You could probably split the head up more, and be able to get it on a smaller printer. The hardest part would be the hammer end, because it is so chunky. But my largest printer at home is an ender 3, which isn't especially huge in the scheme of things, and I think this was about 10- 12 prints in total.
 
This looks amazing! Great job! I'm looking to repaint my Hasbro Marvel Legends Stormbreaker. It'll be my first time doing something so looking for advice on whether to go metallic paint or graphite powder, color scheme seems everyone I see has a different scheme and it's tough to tell actual scheme from screen shots cause it photos differently depending on lighting, also how best to fill in the seam on the blade. Any help or advice would be greatly appreciated!!!View attachment 1452344
Thankyou!

I can't quite see the seam on the blade, but if you're repainting the whole head then body filler is your best bet.

In terms of paint- the hardest part with repainting would be the vines. They're wrapped around the head and make it an absolute nightmare to mask anything off. That's why I painted my head before I attached the vines, and then hand painted the vines (rather than use any spraying).

Mine was bright silver paint on the brighter areas, and I mixed iron powder, aluminium powder into silver and black paint for the darker areas. The most important part though is the iron paste- it gets into all the details and gives it all a load more depth. Maybe try just using iron paste and buffing the whole thing up before going for the repaint?
Thank you so much. Lots of great advice. Yeah it's a bad pic I just shot it real quick to show my wife when I got it. I'll take a couple better ones.
As for the handle and vines, being the Hasbro one they were already in place where they'd have to be masked off anyway, but I actually dont mind the look of the so just really wanna redo the axe.
I hadn't heard of iron past. Does it have color to it as well or does it just shine it up. I'll also look into the body filler was prior thinking glue then sand it down but figured there has to be some kind of like putty or something to smear into it.
Also did you do a wash to fill in the runes?
Thanks so much for your time and avice!
 

Attachments

  • 20210502_074134.jpg
    20210502_074134.jpg
    1,011.9 KB · Views: 109
  • 20210502_074031.jpg
    20210502_074031.jpg
    1.3 MB · Views: 175
  • 20210502_074021.jpg
    20210502_074021.jpg
    1.3 MB · Views: 167
Last edited:
Thank you so much. Lots of great advice. Yeah it's a bad pic I just shot it real quick to show my wife when I got it. I'll take a couple better ones.
As for the handle and vines, being the Hasbro one they were already in place where they'd have to be masked off anyway, but I actually dont mind the look of the so just really wanna redo the axe.
I hadn't heard of iron past. Does it have color to it as well or does it just shine it up. I'll also look into the body filler was prior thinking glue then sand it down but figured there has to be some kind of like putty or something to smear into it.
Also did you do a wash to fill in the runes?
Thanks so much for your time and avice!
Yeah that doesn't look too bad - filling that seam nicely may be pretty tricky though!

Iron paste doesn't colour per se, but it will darken up the metals on it. You basically just use a fabric rag to rub the paste on, leave it for about 5 minutes, then buff it off. It will add a dark shine, and will darken in the runes/etch lines etc (that's what I used for the depth). You'll also really notice the texture pop more.
Awwww man really, its gonna be tough to fill it in? What do you think will be the hardest part about it. Oh ok cause I was looking up the iron paste and looked like it colored it, there were 3 colors I saw red brown, gray and glitter what did you use? Any specific brand of paste?
 
Thankyou!

I can't quite see the seam on the blade, but if you're repainting the whole head then body filler is your best bet.

In terms of paint- the hardest part with repainting would be the vines. They're wrapped around the head and make it an absolute nightmare to mask anything off. That's why I painted my head before I attached the vines, and then hand painted the vines (rather than use any spraying).

Mine was bright silver paint on the brighter areas, and I mixed iron powder, aluminium powder into silver and black paint for the darker areas. The most important part though is the iron paste- it gets into all the details and gives it all a load more depth. Maybe try just using iron paste and buffing the whole thing up before going for the repaint?
Hey couple quick questions. Did you seal it with anything? Do you recommend sealing if using iron paste? Your opinion on iron past vs rub and buff? And does the base coat affect the look of the iron past? In researching the iron paste I saw a video where they rubbed on the paste the brushed on a iron paste powder, did you use that at all? Thanks for any help!
 
Hey couple quick questions. Did you seal it with anything? Do you recommend sealing if using iron paste? Your opinion on iron past vs rub and buff? And does the base coat affect the look of the iron past? In researching the iron paste I saw a video where they rubbed on the paste the brushed on a iron paste powder, did you use that at all? Thanks for any help!
Rub n buff is generally used to GIVE a metallic look, whereas iron paste is used to ENHANCE what's already metallic, so they're kind of 2 different things. If you want to get the most authentic look you'd have to spray the weapon silver, then iron paste it. Shouldn't have to seal it.
 

Your message may be considered spam for the following reasons:

If you wish to reply despite these issues, check the box below before replying.
Be aware that malicious compliance may result in more severe penalties.
Back
Top