THOR Avengers Definitive Build

Insomaniac

New Member
I began this project two years ago for Halloween, I wanted a really awesome Thor costume, but didn't realize all the work that goes into making something replica quality. My skills were also lacking and I ended up settling for a very basic Thor build. But now I have an actual work space, extra funds, and much more insight into the process. So let's start it off with what I have already!

runestaright.png

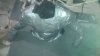
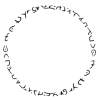
My biggest accomplishment so far is figuring out what I think the chest runes are. I have a bit more work to do but this should be very close to the final inscription. Does anyone know if this is an actual language? It appears different from the runes that are on the top of Thor's hammer. I also have my previous costume that I can salvage maybe a pattern from.

Chestrunecircle.png

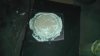
I found some high resolution pictures and have been trying to determine how to find or replicate some of the materials. I plan on doing a foam base for the chest and then wrapping it with blue and black leather. The silver on the chest I will plasti-dip the foam and paint that. The material that is striped and in center and side of the chest has me a little stumped. The stripes are flat like it is glue or puff paint that has been squished flat. The stripes are all blue but there is red fabric and blue underneath them.

stripes.png

The pants are going to be the same blue leather I use for the body, and also contain the same striped material. The pattern is different for the stripes as they are diagonal and not horizontal. The pants should be pretty basic design wise. The boots also contain the striped material with an outer shell design.

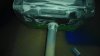
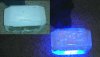
For the hammer I plan on casting it in clear cast resin and add blue lighting in the handle to make it light up. I will then experiment with painting to get a clear silver balance to make the hammer look metal as well as allow the blue to glow through. I will use this same basic process for the chest runes.
 
Last edited:
Im from Sweden and we learn to interpret and translate runes in school, I would say that this is more Hollywood than real ancient scandinavian runes.
A couple of the runes are absolutely real but theres a couple that Ive never seen before and they look pretty "designed".
For example the five thats backwards and the C:s with the dot in them. Theres nothing I know that resembles these in any language
 
most of those runes look made up. I have several books on Norse mythology and Viking culture and most of those don't look anything like the runes I've seen. Maybe highly stylized versions.
 
Thanks for the inputs guys! I figured that these were made up for the most part as something nobody would bother to look into.
 
Well turns out when I made the runes into a circle I accidentally did it upside down, I have now corrected that mistake as well as rotate the image so that the runes should match in that respect as well.
 

Attachments

  • Chestrune.png
    Chestrune.png
    121.6 KB · Views: 106
Well for anyone that is interested, I've got the chest rune carved into clay and I think it looks pretty close. I'm going to wait for it to dry some more and then make a mold.

My question is what would be the easiest way to shrink the mold down two notches? Because each set of runes is smaller than the last and I would rather not have to carve three separate runes.
 

Attachments

  • IMAG0484.jpg
    IMAG0484.jpg
    600.2 KB · Views: 117
To answer your question about sizing it down each time.

This might be a pain, but still easier than any other method.

You don't wanna mold it for urethane or resin casts, as those don't shrink.

Instead. You could take your largest medallion.

Then...

1) Mold it in ultra cal

2) Cast a copy in latex, this will shrink up to about 10-15%

3) Take that medallion, mold it again in Ultracal, cast one again, this will have shrunk another 10-15%

4) Repeat, you now have 3 medallion sizes.

Then take all 3 of these, mold these in silicone rubber this time, and cast your final runes/medallions in resin, tinted with metal powders. ;)

Hope this helps.
Jordan
 
Thanks for the input guys!

I found the one you posted before Gladius in my search but don't like using proprietary directions if I don't plan on using those same exact materials, even though it probably would work.

So my guess is that it's the latex that essentially does the shrinking when it dries? Also I have your average liquid latex you can get at a craft store I would assume this will work?
 
I did a cast of the rune and it turned out a little wonky, I believe I pulled the molding a bit much. So I am remaking my mold for that, started to mold the hammer and made a duct tape body model. Eventually I will assembly my full body, but for now just the chest.
 

Attachments

  • IMAG0489.jpg
    IMAG0489.jpg
    233.4 KB · Views: 90
  • IMAG0490.jpg
    IMAG0490.jpg
    408.1 KB · Views: 76
  • IMAG0491.jpg
    IMAG0491.jpg
    491.3 KB · Views: 89
When I did my Avengers Thor build i found a belt with that striped texture for the center of the chest, I didn't have enough of it to use anyplace else though, there's something with a similar texture on the Thor: Dark World costume that I've used place mats i bought at walmart for. Im not sure its accurate enough for what you're doing though. Props on finding out what the runes on the chest discs were, I never could find those.
 
It took me awhile and they are not perfect I'm sure but it's close enough for me on the runes. I'm going to do a bit of digging but I think that fabric paint might be the way I go, I did a few little tests and the effect is pretty close. It will just be tedious because there is quite a bit of this pattern on the costume.
 
Well progress certainly has been slow, but I have a small update as I have begun working again on the costume now that classes draw to a close. This was a quick paint test to make sure you could see the light through well enough when it was on, but not through it with light from the outside. This is why it looks bad with the light on because I just quick brushed it instead of getting out my airbrush. The color will definitely change quite a bit for the final product as well as a lot more fixing of details.

I made the hammer mold originally out of a toy hammer I got one year at Halloween, but my mold kind of failed so I have had to do a lot more shaping and rebuilding, which allows me to make improvements on the design. I hope to continue updates on this more regularly.
 

Attachments

  • ThorHammer.jpg
    ThorHammer.jpg
    1.1 MB · Views: 87
This thread is more than 9 years old.

Your message may be considered spam for the following reasons:

  1. This thread hasn't been active in some time. A new post in this thread might not contribute constructively to this discussion after so long.
If you wish to reply despite these issues, check the box below before replying.
Be aware that malicious compliance may result in more severe penalties.
Back
Top