Thin Neck Thanksgiving- Luke Cave Found Parts Revealed!

Hey Dave the image is erroring when opening - can you upload another copy? Seems like a really important observation :)

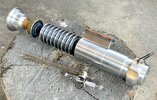
Also I wanted to add - there is something to be said for the distance from the atomizer head to the plate of the matrix. After discussions with Poikilotherm the two of them (Bryan) noticed the tool is sort of loose and swings around, which seems to arc from the vent hole instead of the center. On top of this… you can see the exposed brass and it’s smaller than the flange. This leads us to cut the atomizer higher than you would think.

It is just a tool, neat but non important background prop. If you can get it affixed to the center that will do the job!
 
Actually there may be a means to surmise the correct one:

Check out the alignment of the stamping for this 0•L

View attachment 1642804View attachment 1642803

Close to the right side and low… this follows the arcs seen in the painted symbol…. Creates reasoning for it as well such as the position of the L.
If we follow the dots on the IC to confirm the board, we will be looking for a needle in a haystack.:(

1·E 785 A/1

1·F 785A/3=1·F 785A/3

1·D 785A/2

1·C 785A/2

Except for 1·D 785A/2, all other IC code dots are in this position. 1·I belongs to 785A/3 of DaveP, so it has deviated from the dot position.:(


20221129072334.png
20221129072344.png
20221129072353.png
20221129072733.png
20221129073007.png


DaveP Therefore, I also took apart my 785A/2 for you, so you can see the color of the board. This is the first time for me to see the front, so I frankly tell you that the color of my other 785 boards is light green. And an accompanying video.:D


317178630_1178710833029611_8565759491582948873_n.png
278103520_3198538357056691_9634378568877905309_n.jpg
316881036_871408510525357_3608594396712170117_n.png
6775651441325_44544895445693209270_33039343240233623237818_n.png

 
Last edited:
Why keeping quiet?
Having found the parts, I’d indicated I’d like to keep the parts out of general public view while trying to understand assemblies and make sure replicas had a solid footing from within our community - as opposed to product sniping Chinese vendors.

*edit*

I’ve been surprised because It actually seems more members here had figured out some of these items than I was aware of! So to those of you… thanks for your consideration and discretion!
 
I've only sorta been keeping up with all this progress, because Bryan and I live in the same area, I hear about this awesome detective work, and I'm just BLOWN AWAY by the eyes for detail Bryan has got. It's nuts, y'all. He's a HUGE asset to the hobby!
 
I've only sorta been keeping up with all this progress, because Bryan and I live in the same area, I hear about this awesome detective work, and I'm just BLOWN AWAY by the eyes for detail Bryan has got. It's nuts, y'all. He's a HUGE asset to the hobby!
Agreed... There are many of you including yourself that have taught me loads just from reading your threads. I've only been on here a short while and am astonished as to how intricate the detective work has been throughout...and that's just from the Dan's, Dann and Danny's...lol, heck, at one point i thought if i could just change my name to some form of Dan i would instantly be endowed with skill and dedication without measure in this hobby(all joking aside) lol. I know you're not asking to receive it but many thanks are warranted to so many of you.
 
Wow! Thanks so much for the kind words, that made my week, right there! I’m glad to be any help I can, and flattery will get you everywhere. Haha

I’ve been messing around with my little atomizer and incorrect dental matrix thingy. For now, I haven’t cut the flange off the atomizer head, and I threaded the little hole 2-56 to mount the incorrect matrix part. Hopefully the correct part will get here soon, but for now, I’ll attach a couple pics.
 

Attachments

  • 5ACD7EA3-9E86-42E6-9496-033DCCC31F11.jpeg
    5ACD7EA3-9E86-42E6-9496-033DCCC31F11.jpeg
    1.7 MB · Views: 92
  • 0E9110F0-AAA7-4C63-8D5A-CD103D6B9DE7.jpeg
    0E9110F0-AAA7-4C63-8D5A-CD103D6B9DE7.jpeg
    2.5 MB · Views: 86
  • 97B79B8B-1C8D-4965-B04D-7F600BF03E69.jpeg
    97B79B8B-1C8D-4965-B04D-7F600BF03E69.jpeg
    3.5 MB · Views: 92
  • 1A3C50C6-393A-44C6-968E-5728FB87BCFE.jpeg
    1A3C50C6-393A-44C6-968E-5728FB87BCFE.jpeg
    3.9 MB · Views: 85
Thanks! I took a couple pics on the old infamous “picture-takin’-stump”, along with the hilt!

Since taking these pics, I’ve re-darkened my box rails and done a touch of weathering to the box guts.
 

Attachments

  • 03ED7A17-F181-4F65-B13E-A53F16CE146D.jpeg
    03ED7A17-F181-4F65-B13E-A53F16CE146D.jpeg
    4.6 MB · Views: 110
  • 18167C6D-CD06-41EC-8D8F-5B660E505E23.jpeg
    18167C6D-CD06-41EC-8D8F-5B660E505E23.jpeg
    3.5 MB · Views: 116
  • CB4E8544-F051-473C-B648-A07E5BE16AC9.jpeg
    CB4E8544-F051-473C-B648-A07E5BE16AC9.jpeg
    2.7 MB · Views: 136
  • 23B0C207-D38C-441C-9194-66D90F156B3D.jpeg
    23B0C207-D38C-441C-9194-66D90F156B3D.jpeg
    2.4 MB · Views: 123
  • FE1E88F6-581B-4594-ACA1-AA9184B2888C.jpeg
    FE1E88F6-581B-4594-ACA1-AA9184B2888C.jpeg
    3.3 MB · Views: 128
Last edited:
Yep! There are quite a few close alternatives in the atomizer realm and some close dental thingys.

The atomizers are soldered together, thanks to teecrooz letting me know. I took a hacksaw to an atomizer and sectioned it to pop out the parts. I didn’t need to do this, but now I know the cross section and what’s inside
.
Jennifer Lawrence Oops GIF
I have a cheap modern matrix (surgimax brand) and inaccurate 215/no.15 atomiser on the way,

FB8211FB-E468-4F90-8126-6482060113B5.jpeg


So if you had to take yours apart again how would you do it over? Heat it up with a torch and pull it a part?

I’m thinking of replacing the flat top of the atomiser with an aluminium ball, to be a little closer but still budget friendly.
 
I'm not sure if anyone has mentioned this yet, but I'm wondering if what we're seeing in the IC location are actually the traces INSIDE the IC. Perhaps the IC housing has been modified/disassembled so that the internal structure is visible. That might be what the gold traces are that are located where the IC model number would normally be stamped. I'd be interested to see what the inside of the of of those Toshiba IC's looks like. Just a thought.
 
I have a cheap modern matrix (surgimax brand) and inaccurate 215/no.15 atomiser on the way,

View attachment 1644362

So if you had to take yours apart again how would you do it over? Heat it up with a torch and pull it a part?

I’m thinking of replacing the flat top of the atomiser with an aluminium ball, to be a little closer but still budget friendly.
Yes! Heat of some kind… a torch to gently heat the parts, keep taking it off because heat build up seems exponential to me, my soldering iron doesn’t get hotter than 4 or 500 I don’t think… I’ve had some industrial solder refuse to melt and read that it’s probably a high melt solder
I'm not sure if anyone has mentioned this yet, but I'm wondering if what we're seeing in the IC location are actually the traces INSIDE the IC. Perhaps the IC housing has been modified/disassembled so that the internal structure is visible. That might be what the gold traces are that are located where the IC model number would normally be stamped. I'd be interested to see what the inside of the of of those Toshiba IC's looks like. Just a thought.
I happen to have other calculators from the same era and even a Casio from the early 80s with a similar board, I’ll cut open the top of the IC and report back!
 
I can’t say I agree that’s the cause because paint would be far more simple, given they laid Death Star II brass on top I assume they were still in need of that kind of visual element… but it’s always fun to explore more depth.

I believe these IC’s are typically bonded together, so … ah… good luck!

A basic 4 function chip of a similar size (44 feet) is probably going to look quite a bit different from other ICs so - I guess if you’ve got one of those laying around from 82’ its the best shot to have a similar layout.
 
I'm not sure if anyone has mentioned this yet, but I'm wondering if what we're seeing in the IC location are actually the traces INSIDE the IC. Perhaps the IC housing has been modified/disassembled so that the internal structure is visible. That might be what the gold traces are that are located where the IC model number would normally be stamped. I'd be interested to see what the inside of the of of those Toshiba IC's looks like. Just a thought.
Thank you for your feedback and comments!

I already did an IC blast on the LC-785B board I didn't need a few months ago, and although I can clearly see the damage marks on the upper left corner of the IC on the hero board, I don't think they were successful.

The IC was glued with Death Star brass as an ornament for the visual concept, and the bottom was painted with white paint. The IC on the board is so thin that it will crumble to pieces with the slightest pressure. The upper left corner of the prop board has the solder marks I often see on the 785 board. I believe it's original.

I have taken some images for you so you can see what the inside of the IC looks like after it has been destroyed.

Thanks also to thd9791 for his contribution to the blasting treatment of other similar Casio calculators IC in his possession.(y)

20221205203953.png


As a result, I received a new 785A/3 calculator yesterday to match this anomalously colored 785A/2, and I still believe that the color of the board is the key to matching our Hero board. [I'm still having bad luck:(] Since it's very difficult to get a 785A calculator now, not to mention my desire for A2 board, So now my progress has become very slow.

If I find out later that the colors of A1 and A3 boards are very close to the colors of this A2 calculator, I will take back what I said before.:)

318078891_674274094165268_1606002975474336795_n.png
 
I haven’t found a calculator yet, I was linked one awhile ago but it was located in Spain and the guy didn’t want to ship it

How many of you got lucky and found their calculator in the states? I know Tom got his this way, and I think he’s the only one I know of
 
I haven’t found a calculator yet, I was linked one awhile ago but it was located in Spain and the guy didn’t want to ship it

How many of you got lucky and found their calculator in the states? I know Tom got his this way, and I think he’s the only one I know of
I think the LC-785 calculator in Spain is in Las Palmas and very hard to get! Unless someone has friends or family traveling or living there.

There is still one 785 calculator for sale in Italy. I don't know the specific model, maybe A or B. You can try to contact Tom to get a link and ask the seller. Good luck.

20221205221241.gif
 

Your message may be considered spam for the following reasons:

If you wish to reply despite these issues, check the box below before replying.
Be aware that malicious compliance may result in more severe penalties.
Back
Top