The Wand Company TOS Phaser Upgrades??

Trooper_trent

Master Member
RPF PREMIUM MEMBER
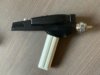
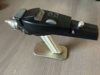
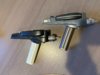
Hey guys. Yes I'm very late to the game, but I finally purchased a phaser from the Wand Company. I got it on ebay new for a really great deal considering it's sold out. While I was searching listings, I came across multiple "upgrade" listings for replacement metal parts or more accurate pieces than what comes standard. I'm not sure what, if anything, I might want to do to it to further improve accuracy, and I'll admit I do not know nearly as much about the details of this prop as I do certain Star Wars props so please forgive the ignorance. I did a search here but didn't see much.
Is there a general consensus on what to do to this thing to make it more accurate? Any threads, tutorials, articles, or forums you could point me to would be truly appreciated.
Phaser-on-stand-LowAngle-1000x650px.jpg
 
Myron Stapleton or SD Studios does replacement handles, those are nice because the original is kind of skinny.


If you can find an SD Studios Overhaul Job or talk him into doing one for you, that has all the best Uber Upgrades of all. He did both versions, I have the season one SD Studios and a stock wand Phaser with a replacement Handle by Stapleton.
 

Attachments

  • IMG_0827.jpg
    IMG_0827.jpg
    736.1 KB · Views: 727
  • IMG_0828.jpg
    IMG_0828.jpg
    589 KB · Views: 756
  • IMG_0829.jpg
    IMG_0829.jpg
    849 KB · Views: 563
Last edited:
I thought they are about as accurate as possible due to being a laser scan of a Hero. But when they came out I did see someone offering a more accurate (?) handle. It is slightly heavier and a tiny bit thicker. Plus it's black

WAND Phaser grips.jpg
 
The Wand Phaser is great out if the box but there are a number of things you can due to improve accuracy.

Here is a list of what I did...
Phaser 1
Replaced the metal side rails and the trigger with aluminum parts.
Painted the body with Zynolyte grey primer.
Replaced the graphic in the meter window.
Added the "crispy" material to the top of the phaser.
Added a red Swarovski crystal between the meter window and the thumb turn.
Dry brushed a little brass on the thumb turn as the original had a brass wheel painted silver. By dry brushing brass it gives the appearance that the paint has worn away exposing brass under the silver.
Painted the sides of the rising site black.
Replaced the brass like front emitter with an actual brass piece.
Drilled an emitter hole in the front of the extending emitter.

Phaser 2
Replaced the handle with a Stapleton handle.
Added a spacer between the handles and the bottom of the P2 body.
Painted the body of the P2.
Replaced the nozzle with an aluminum. Also added new emitter.
Replaced the ten turn.
Made the side hole smaller and replaced the side turn with aluminum piece.
Added a screw to the front bottom.
Kept the back fins but polished a little.
Replaced top metal hood with aluminum part.

Wand-Phaser-1.jpg


Wand-Phaser-2.jpg
 
Last edited:
The Wand Phaser is great out if the box but there are a number of things you can due to improve accuracy.

Here is a list of what I did...
Phaser 1
Replaced the metal side rails and the trigger with aluminum parts.
Painted the body with Zynolyte grey primer.
Replaced the graphic in the meter window.
Added the "crispy" material to the top of the phaser.
Added a red Swarovski crystal between the meter window and the thumb turn.
Dry brushed a little brass on the thumb turn as the original had a brass wheel painted silver. By dry brushing brass it gives the appearance that the paint has worn away exposing brass under the silver.
Painted the sides of the rising site black.
Replaced the brass like front emitter with an actual brass piece.
Drilled an emitter hole in the front of the extending emitter.

Phaser 2
Replaced the handle with a Stapleton handle.
Added a spacer between the handles and the bottom of the P2 body.
Painted the body of the P2.
Replaced the nozzle with an aluminum. Also added new emitter.
Replaced the ten turn.
Made the side hole smaller and replaced the side turn with aluminum piece.
Added a screw to the front bottom.
Kept the back fins but polished a little.
Replaced top metal hood with aluminum part.

View attachment 1281882

View attachment 1281883

That looks great. The only mods I did to mine were to add a blue jewel to the P1 and I have both SD's and Stapleton's handles. I also have a B&W conversion by SD.

What did you use for a spacer between the handle and the body and if not made where would you get it?
 
Thanks so much for the feedback. Can I ask where you guys found out about all these details and upgraded part makers? Is there a ST forum I need to be on? Is there a collection of reference photos or documentation on discoveries about the real prop? As i said, I've always been a star wars guy so I'm very late to the party. Rather than just follow a "do this" list, I'd really like to dig in and understand the why.
Thanks again!
 
The Wand Phaser is great out if the box but there are a number of things you can due to improve accuracy.

Here is a list of what I did...
Phaser 1
Replaced the metal side rails and the trigger with aluminum parts.
Painted the body with Zynolyte grey primer.
Replaced the graphic in the meter window.
Added the "crispy" material to the top of the phaser.
Added a red Swarovski crystal between the meter window and the thumb turn.
Dry brushed a little brass on the thumb turn as the original had a brass wheel painted silver. By dry brushing brass it gives the appearance that the paint has worn away exposing brass under the silver.
Painted the sides of the rising site black.
Replaced the brass like front emitter with an actual brass piece.
Drilled an emitter hole in the front of the extending emitter.

Phaser 2
Replaced the handle with a Stapleton handle.
Added a spacer between the handles and the bottom of the P2 body.
Painted the body of the P2.
Replaced the nozzle with an aluminum. Also added new emitter.
Replaced the ten turn.
Made the side hole smaller and replaced the side turn with aluminum piece.
Added a screw to the front bottom.
Kept the back fins but polished a little.
Replaced top metal hood with aluminum part.

View attachment 1281882

View attachment 1281883
I'm seeing a seller on ebay that is providing a ton of these aluminum upgrade parts. Is that the person I need to be going with?
 
Whoever you get the parts from you need to make sure they are for the Wand Phaser as not all parts will work for it such as most parts made for the Art Asylum Phaser won't work with the Wand Phaser.
 
The Wand Phaser is great out if the box but there are a number of things you can due to improve accuracy.

Here is a list of what I did...
Phaser 1Replaced the metal side rails and the trigger with aluminum parts.
Painted the body with Zynolyte grey primer.
Replaced the graphic in the meter window.
Added the "crispy" material to the top of the phaser.
Added a red Swarovski crystal between the meter window and the thumb turn.
Dry brushed a little brass on the thumb turn as the original had a brass wheel painted silver. By dry brushing brass it gives the appearance that the paint has worn away exposing brass under the silver.
Painted the sides of the rising site black.
Replaced the brass like front emitter with an actual brass piece.
Drilled an emitter hole in the front of the extending emitter.

Phaser 2
Replaced the handle with a Stapleton handle.
Added a spacer between the handles and the bottom of the P2 body.
Painted the body of the P2.
Replaced the nozzle with an aluminum. Also added new emitter.
Replaced the ten turn.
Made the side hole smaller and replaced the side turn with aluminum piece.
Added a screw to the front bottom.
Kept the back fins but polished a little.
Replaced top metal hood with aluminum part.

View attachment 1281882

View attachment 1281883
 
One thing I would like to know is what battery is the correct replacement for these?
my SD seems to have an upgrade battery as it can stay charged on the shelf 2-3 times longer than my stock wand. I think I may need to think about a replacement. Plus the SD has a mod where you dont need to power it up, just pick it up and pull the trigger. I really like that.
 
I did most of the same upgrades as Lost in Trek, to mine. I didn't replace the nozzle or any of the metal parts, I don't think. I just polished what it came with.

The replacement Stapleton grip makes a huge difference, as does the paint. I couldn't find the exact right Zynolyte primer, though, all I could find was a horrible filler primer, and I didn't use that. I think I went with a Duplicolor color, in the end.

And I wanna say I had good luck with "John Paul Trek". I'm pretty sure my crispy is from him, but I honestly can't remember. I had two different kinds at one time, but gave one to the person who bought one of my spare Phasers.

The watch Jewel is vintage, and I found that myself, as well as some TJet hubs and real vintage Swarovski rhinestones for my communicator. Made the aluminum trigger for the P1 myself.

0331201954.jpg
0331201954a.jpg
0331201955.jpg
0401201643_HDR.jpg


And I can't recall the site name, Trek Prop Zone, maybe? And TOS Communicator.com?
 
Last edited:
They changed from the Black and Whites around the 8th or 9th episode of the first season and had the Gray P2, Dark Gray P1 and Bronze Handle for the rest of the series. As for the mids and crapazoids they changed at the same time although I'm not exactly sure if they had black or bronze handles. Many repaints were done over the length of the series and they didn't appear to be too concerned whether the various Phasers matched or even used the same exact colors on the same Phaser.
 
Are we talking about the same paint scheme in post#5? Dann's phaser pics in post#12 look to be more bluish.
 
Are we talking about the same paint scheme in post#5? Dann's phaser pics in post#12 look to be more bluish.
Eh, it's just a different gray than what Lost in Trek used. The lighting is definitely playing a huge role in the way both Phasers look, as well.
 
The most obvious error to me is the 3 rib detail on the side of the P2, they are too wide and flat.

They are narrower and more rounded on the props.
OpuhKv6.jpg


UtZEA6J.jpg


PzvoK9u.jpg


I haven't seen anyone correct this detail, it would have to be chiseled and sanded off then rebuilt. I wouldn't recommend doing it unless you plan to paint it anyway.

I used 3/64" styrene rods on my scratch build.
OKYHM48.jpg


olX8BZ5.jpg
 
So...can someone refresh my memory the chronological order of the various phaser paint colours? I'd love to stumble on an illustrated comparison.
 

Your message may be considered spam for the following reasons:

If you wish to reply despite these issues, check the box below before replying.
Be aware that malicious compliance may result in more severe penalties.
Back
Top