The Spinner - My Fujimi Blade Runner Build.

The strip back...

I may possibly regret this but I read elsewhere today that engine degreaser works as an effective stripper.

I haven't got any Dettol around home at the moment - so, against my better judgement, I decided to tried it out this afternoon - *very carefully*.

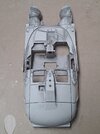
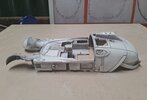
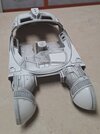
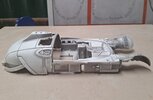
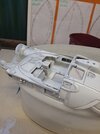
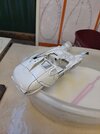
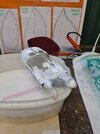
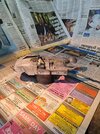
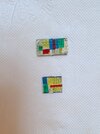
It seems to have actually worked. I worked carefully - rinsing the body throughly between applications and have got it back to this (see images). The crackling around the cone is annoying. I hope it's not embedded into the styrene. I'm taking a break for today - I'm nervous as heck...

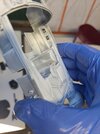
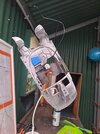
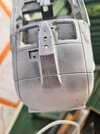
On another note, I got the gel sheets this week and I made some headway on the control panels. Very fiddly but the result is promising. I've employed some spray glue to help to secure them in place. I think the glue actually works as a but of a diffuser.
 

Attachments

  • 20211118_172205.jpg
    20211118_172205.jpg
    1.9 MB · Views: 143
  • 20211118_180956.jpg
    20211118_180956.jpg
    1.9 MB · Views: 146
  • 20211118_163613.jpg
    20211118_163613.jpg
    532 KB · Views: 143
Last edited:
I stripped a Fine Molds Slave 1 twice using a Mr. Hobby product but it was a chore. I would try some EZ off oven cleaner on a test piece but that would probably work. It’s a pain,but it’ll be worth it.
Doing okay with some oven cleaner this morning. I'm wondering, how long can I leave it on safely before rinsing it off?
 
Stripping update...

I've completed 3 passes with the oven cleaner now. Leaving it for 15 minutes then scrubbing with a tooth brush and wet sanding with 320 grit paper. I'm tempted to call the job done but it probably isn't...

Thoughts?
 

Attachments

  • 20211119_152904.jpg
    20211119_152904.jpg
    742.9 KB · Views: 139
  • 20211119_152932.jpg
    20211119_152932.jpg
    2.2 MB · Views: 128
  • 20211119_152944.jpg
    20211119_152944.jpg
    1 MB · Views: 138
  • 20211119_153010.jpg
    20211119_153010.jpg
    1.4 MB · Views: 143
Looks pretty OK from the images. I still think that the Dettol would have made the job a lot easier & safer and for €4.50 a 500ml bottle.
To show how effective the Dettol is , have a look at this image of part of a rare Bandai jagpanzer 1/30 I bought a while ago and was completely covered in black paint. Dettol stripped the paint off no problem, no effect on the plastic. You can handle the stuff without gloves as well, though not advisable. The only downside is that of the lingering odour of a cleaned bathroom.
3D79030D-4036-4E73-ABA4-C60F4DF642AB.jpeg
 
Last edited:
Looks pretty OK from the images. I still think that the Dettol would have made the job a lot easier & safer and for €4.50 a 500ml bottle.
To show how effective the Dettol is , have a look at this image of part of a rare Bandai jagpanzer 1/30 I bought a while ago and was completely covered in black paint. Dettol stripped the paint off no problem, no effect on the plastic. You can handle the stuff without gloves as well, though not advisable. The only downside is that of the lingering odour of a cleaned bathroom.View attachment 1513958
Wow! That looks great! I might pick up some Dettol over the weekend and try it out for a last push before I re-prime. The oven cleaner has been a bit nail biting but the body is holding up okay.
 
Looks pretty OK from the images. I still think that the Dettol would have made the job a lot easier & safer and for €4.50 a 500ml bottle.
To show how effective the Dettol is , have a look at this image of part of a rare Bandai jagpanzer 1/30 I bought a while ago and was completely covered in black paint. Dettol stripped the paint off no problem, no effect on the plastic. You can handle the stuff without gloves as well, though not advisable. The only downside is that of the lingering odour of a cleaned bathroom.View attachment 1513958
I might use Dettol to please the wife...Imagine killing two birds with one stone: removing paint without damaging your model and having the scent of a clean bathroom throughout the house:lol:
 
Make sure it’s the bottle with the earth/ brown coloured solution. I think the other coloured solution ( green etc.) are not effective. Happy stripping!


and just a side-note . That Bandai model is not related to Blade Runner. It is related to project connected to a movie with 3 cute robots named after Disney characters.
Now you've got me thinking...???
 
Dettol bath prepped and model body immersed. I went with a 500ml bottle of brown Dettol and have diluted with 500ml warm water. I figure a dilute mixture should be enough to loosen the last of the undercoat. I'll check it in a few hours.
 
Too late to tell you not to dilute the solution since you’ll weaken it. When you are cleaning the model, clean it with a brush dipped into unused Dettol until the all the paint is gone. The paint residue tends to gunk up a lot on the brush so clean the brush regularly in Dettol and wipe with paper kitchen towels. When you’re satisfied , clean the model with Isopropol alcohol , let it dry for a while and you can then wash it it warm soapy water.
 
Too late to tell you not to dilute the solution since you’ll weaken it. When you are cleaning the model, clean it with a brush dipped into unused Dettol until the all the paint is gone. The paint residue tends to gunk up a lot on the brush so clean the brush regularly in Dettol and wipe with paper kitchen towels. When you’re satisfied , clean the model with Isopropol alcohol , let it dry for a while and you can then wash it it warm soapy water.
I'm being overly cautious because I've never done anything like this before - stripping back.

I guess also - I started at the point at which I've removed 95% percent of the paint with the engine degreaser. The remaining paint is like a dirty shade on the styrene rather than paint that will clump - it's like someone has shaded areas of the body with a lead pencil.

I'll leave it overnight and review it in the morning. I don't think I'll get much more off of it to be honest.
 
It's looking good. Well done on the stripping. I wouldn't worry too much about the plastic looking 'stained'. As long as the surface is smooth, dry, and uncontaminated by grease or oils, that's all that matters really. The new coat(s) of primer should cover the 'staining' anyway and give you a nice consistent finish for the final paint. Good luck!
 
It's looking good. Well done on the stripping. I wouldn't worry too much about the plastic looking 'stained'. As long as the surface is smooth, dry, and uncontaminated by grease or oils, that's all that matters really. The new coat(s) of primer should cover the 'staining' anyway and give you a nice consistent finish for the final paint. Good luck!
Thank you sir. I did a last push this morning. A toothpaste scrub with the Dettol, then a wash with detergent and warm water, then a final rinse with rain water. Now I have her air drying in the sun for a bit.

I think she's ready.
 

Attachments

  • 20211121_090447.jpg
    20211121_090447.jpg
    1.6 MB · Views: 124
  • 20211121_090437.jpg
    20211121_090437.jpg
    1.8 MB · Views: 109
  • 20211121_071654.jpg
    20211121_071654.jpg
    1.5 MB · Views: 116
  • 20211121_071638.jpg
    20211121_071638.jpg
    1.4 MB · Views: 116
  • 20211121_071624.jpg
    20211121_071624.jpg
    1.5 MB · Views: 125
  • 20211121_071613.jpg
    20211121_071613.jpg
    1.7 MB · Views: 122
Re-priming...

Three passes at around 50cm away. I keep wanting to get in close to the cockpit because of that central console but I'm staying right away.

I think (??) I'm doing okay...
 

Attachments

  • 20211121_131746.jpg
    20211121_131746.jpg
    3.4 MB · Views: 126
  • 20211121_134043.jpg
    20211121_134043.jpg
    2.8 MB · Views: 128
  • 20211121_134112.jpg
    20211121_134112.jpg
    2.3 MB · Views: 125
Re-priming...

Three passes at around 50cm away. I keep wanting to get in close to the cockpit because of that central console but I'm staying right away.

I think (??) I'm doing okay...

Hmmm. Can I ask what primer you're using? Because that 'mottling' effect isn't usual, to be honest, and doesn't look right. Is the primed surface smooth to the touch? Or can you feel a texture to the mottling under your fingertip when you lightly brush across the surface? It's difficult to tell from the photos, to be honest, but it still looks as if the primer isn't smoothly covering the plastic. For comparison, the primed parts should look something like the grey areas on these (in whatever colour your primer is obviously) i.e. a smooth, almost silky surface which is all one colour (sorry, I haven't got photos of my spinner in its primed stage, but I used similar primers on both my PKD and the Alita figure below. For what it's worth the PKD was primed with Hycote standard grey primer and Alita was primed with Tamiya Fine Surface grey primer.

8AD2A4AA-656F-4B97-B14B-34A4702B8176.jpeg ABA2AF3A-C86B-4996-84E4-4684FEEA25AA.jpeg

If the surface is slightly textured, that 'mottling' may be because the paint is drying in the air before it gets the the surface of the parts, so instead of a smoothly coverage it's depositing 'clumps' of partly dry paint. Or the primer may be old and a bit viscous. Or it just might be cold (did you warm the can before spraying?). And that texture will show through any paint you apply I'm afraid, unless you wet sand it smooth again. :(

Here's an example of a similar sort of thing that can happen, albeit with metallic paint (this was a temporary disaster I had when painting a lightsaber hilt a while ago - fixed by stripping, sanding and re-priming/painting). Your mottling is a bit different though, and not something I've seen exactly before.

44D2CA29-C250-4472-A09E-F8149152BE37.jpeg

If, however, the surface is smooth to the touch, and the mottling is only cosmetic, you may still be OK as the actual paint layer(s) will hide it when they go on (the primer is really only there to provide a nice, stable base layer for the actual paint). But even if it does feel smooth to the touch, I'd still be tempted to give it a very light wet sand with a fine sanding pad, or a rub with a scotchbrite pad.

Fingers crossed the mottling effect is only visual and you've got a nice smooth surface, and you can carry on! Good luck!
 
Hmmm. Can I ask what primer you're using? Because that 'mottling' effect isn't usual, to be honest, and doesn't look right. Is the primed surface smooth to the touch? Or can you feel a texture to the mottling under your fingertip when you lightly brush across the surface? It's difficult to tell from the photos, to be honest, but it still looks as if the primer isn't smoothly covering the plastic. For comparison, the primed parts should look something like the grey areas on these (in whatever colour your primer is obviously) i.e. a smooth, almost silky surface which is all one colour (sorry, I haven't got photos of my spinner in its primed stage, but I used similar primers on both my PKD and the Alita figure below. For what it's worth the PKD was primed with Hycote standard grey primer and Alita was primed with Tamiya Fine Surface grey primer.

View attachment 1514559 View attachment 1514555

If the surface is slightly textured, that 'mottling' may be because the paint is drying in the air before it gets the the surface of the parts, so instead of a smoothly coverage it's depositing 'clumps' of partly dry paint. Or the primer may be old and a bit viscous. Or it just might be cold (did you warm the can before spraying?). And that texture will show through any paint you apply I'm afraid, unless you wet sand it smooth again. :(

Here's an example of a similar sort of thing that can happen, albeit with metallic paint (this was a temporary disaster I had when painting a lightsaber hilt a while ago - fixed by stripping, sanding and re-priming/painting). Your mottling is a bit different though, and not something I've seen exactly before.

View attachment 1514557

If, however, the surface is smooth to the touch, and the mottling is only cosmetic, you may still be OK as the actual paint layer(s) will hide it when they go on (the primer is really only there to provide a nice, stable base layer for the actual paint). But even if it does feel smooth to the touch, I'd still be tempted to give it a very light wet sand with a fine sanding pad, or a rub with a scotchbrite pad.

Fingers crossed the mottling effect is only visual and you've got a nice smooth surface, and you can carry on! Good luck!
I've advanced a few steps from these photos and I can confirm that it is a silky smooth and uniform coating that I'm building up.

I'm using a Vallejo matte black undercoat and yes, I did warm the can and shake it for a good three or four minutes before applying.

When I originally primed the surface, it did have an awful multiform texture but this time around, it is a uniform application that I'm pleased with.

I'll put up some updated photos in the next day or so...
Good news! (y)
 
Glad to see it’s working out. You will be glad you went through the trouble. I see people using Vallejo all the time and getting good result,I have found them to be a real crapshoot.
 
Glad to see it’s working out. You will be glad you went through the trouble. I see people using Vallejo all the time and getting good result,I have found them to be a real crapshoot.
If nothing else, I'm learning a truckload of things about the priming and painting process that I've *never* known before - and I am very glad that I took everyone's advice here and started again.

I should have said from the outset that I am a rank amateur.

I had a look at the body this morning and while I am happy with it, I reckon wayouteast was correct in his concern about mottling. If I'm brutally honest, the body towards the rear of the spinner is right on the edge. It is smooth to the touch...largely. If I leave my finger on it for too long I can feel some texture but it is clear to me that this second effort is far better than my first. I'm satisfied that the rest of the priming is smooth and there's no crackling anywhere - especially where it appeared previously. I plan to do one more coat today to ensure the cockpit and underside is complete.

This is the second time I've used Vallejo primer on a kit. I like undercoating in black. It seems to make the surface colours punchier. I partially immersed the can in hot water yesterday for a bit before spraying to warm it up and I shook the can for a full three minutes each time before I sprayed.
 

Your message may be considered spam for the following reasons:

If you wish to reply despite these issues, check the box below before replying.
Be aware that malicious compliance may result in more severe penalties.
Back
Top