The RGB Ghostbusters neutrino wand...

ltbries

New Member
Hello everyone...

I have been a long time lurker here on the RPF. And in that time i have never seen such a gigantic collection of talented artist build what million dollar Hollywood prop masters could only dream of!

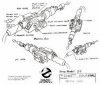
I can only assume all of you have at one time in your childhood felt that the officially licensed toy of a famous movie property was grossly inaccurate from the film you would ware out that four head VHS VCR rewinding and pausing to get that perfect glimpse of. And for me Ghost busters was the pinnacle of those films. I'm embarrassed to say it took me a long time in my youth to even get a good idea of what the movie accurate proton guns looked like. Mostly because i was ten and i already had a competing idea of what the guns looked like from the animated series. But long years passed, i grew up... Allegedly.. And proceeded to put such obsessive details to bed,,, Until I met all of you. All of your excruciating attention to detail and passion for your art. And make no mistake, you are all artist! Inspired me to do something a littel new. Now I have seen a great number of you reproduce on an uncanny level of detail the original movie Ghostbuster Proton Packs. However, only a select few have tried to reproduce the guns from the cartoons. Since this was what i was raised on before i was old enough to watch the movies i couldn't help my self to try to reproduce my own version that tried to honor both the movies and the 80's cartoon. RGB One.jpg

RGB Two.jpg

RGB Side 1.jpg
RGB Side 2.jpg

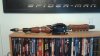
This is the first time i have made anything i felt was worth sharing with all of you. But with that being said. I'm not thin skinned and this piece is far from finished. If it sucks, by all means feel free to tear into it. I'm a graphics designer by trade and the only way you get better is by embracing constructive criticism, I'm so thankful for any one who takes interest long enough to take a look. Thank you all.
 

Attachments

  • RGB Side 1.jpg
    RGB Side 1.jpg
    145.8 KB · Views: 585
Last edited:
To be honest, I think it looks like a pile of absolute AWESOME. Seriously though, I think you did a fantastic job with this. You really captured the look of the cartoon design while still giving it that dirty, functional look of the movies. What else are you planning to add to it? My only advice would be to not add too much extra detail, because it might ruin the simple elegance you've achieved with this piece already. Are you planning on making a proton pack to pair it with? If so, you might want to start working on that along side this piece. Sometimes it can help inform your decisions on how much or how little detail to add when looking at the set side-by-side.
 
Thanks so much for your comments. I do agree with you that too much detail may make the wand too busy. I'm planning to add the trigger box from the movie guns to the rear section and attach a real Clippard valve to the forward portion of the gun. Right now i have a used film canister with and energy shot cap as a place holder... As for the pack I'm planning to build one in the same vain as this. Very familiar to the cartoon with elements of the movies. I only have a few hours free to my self a day due to the dreaded job, but i'll keep posting my progress. Thanks for the great feedback!
 
Not yet unfortunately, i'm still trying to figure out the lighting scheme. I'm considering making the very tip of the wand actually spin with LEDs hidden inside. The cartoon guns always looked like the stream was spinning into a ball at the point before firing the streams. I thought a fairly active effect would compare nicely to the movie guns. Other LED diodes and such will be added as well. I really want it to be just as active as the movie props.
 
Thank you so much!
These are a few pics from the bottom of the piece...Kneck Bottom.jpg
The grip is wrapped in vinyl leather, i had to add these raised bits to cover the seams.

Grip Bottom.jpgFull Bottom.jpg

And here's a comparison to my Matty wand for a reference of size...

size comparison.jpg
 
This is superb! Would you care to share a few WiP pics if you have any? Or just talk a little about how you made this. I'm planning my own live action RGB Venkman cosplay and this is amazing!
 
Unfortunately I didn't take any pics while i was building the prop initially. However, it's pretty easy to dismantle...
20150802_183650.jpg 20150802_183659.jpg 20150802_184201.jpg
So I started with a junction box designed for exterior security lights, alot of the parts are off the shelf from Home Depot.
Connected to the junction box is an 3/4" angled threaded connector.

20150802_183938.jpg 20150802_183916.jpg 20150802_183907.jpg
The angled connector acts as a mounting point for a 1" pvc pipe handle. Two screws hold it in place. The handle is wrapped in vinyl leather. I got a good amount of this from a Joanns. At first I didn't think it would conform to the shape I was intending to wrap it around because it wasn't real leather and would not stretch. Then I figured out you need to heat up Vinyl leather in order to make it pliable. Yes, I probably should have known that... Next I took some pvc pipe and sawed it in half to make the gun grip. I sawed out the finger groves to best match the movie wands. I filled in the grip with some magic sculpt I purchased from Tap Plastic. After that I wrapped the grip in vinyl leather and mounted it to the handle with two screws...

20150802_184148.jpg 20150802_183734.jpg 20150802_184133.jpg
For the top of the junction box I used a blank metal metal junction cover and made a bit of raised detail on top with the Magic Sculpt. I drilled the mounting holes in the plate for the switches. I used a Red led housing for the main lamp and an Amber rocker switch. (Had to order that on Amazon, can't find that anywhere)
A good place to find dials, switched, and overall realistic pieces for electrical props are Auto parts stores. I used thumb tightening screws to mount the black metal henge to the front of the junction box to connect the plate. You could mount the plate with the premade holes... but i thought the henge was cooler.

20150802_184045.jpg 20150802_184004.jpg 20150802_184031.jpg
Up next I used a plastic 3/4" threaded coupler from the junction box to a piece of 3/4" pvc. The forward grip is a 2" diameter pvc pipe piece formed with a heat gun to make the tight portion in the center. The 2" diameter pipe slips over the 3/4" pipe and butts up to the hilt of the junction box tightly. I had to use magic sculpt to make the Coke bottle shape of the grip just right. That is the most defining feature of the cartoon gun in my mind...

kenner gun.jpg Full Bottom.jpg GhostbustersinIntro1Collage.png rgb_art_sheet_timelife07.gif

20150802_183821.jpg20150802_183856.jpg20150802_183801.jpg
The tip of the gun is made out of two garden hose sprayers JB Welded to each other. I have a cut apart rubber furniture foot holding the forward grip in place. The cable is electrical conduit I got at Home Depot, I use a tightening clamp to secure it to the grip.

The sides of the gun are hand cut out of 1/4" acrylic. I hope this helps... I'll post more photos of the finished wand once I get it finished.
 

Attachments

  • rgb gun.jpg
    rgb gun.jpg
    11 KB · Views: 294
Last edited:
Hello, I just finished a bit of work on the gun...

I added the resin castings of the trigger box and clippard valve i ordered.20150802_184210.jpg

I also made the bridge that holds the metal conduit to the forward grip out of magic sculpt. This stuff is hard but brittle, it kept wanting to break under the strain the metal conduit cable put it under. Also, under the barrel I added a harpoon like hook, similar to the old Kenner toy for the conduit to plug into. After that a new paint job, i decided to repaint the weathering. I looked a bit much and the obvious plastic sheen compared to the actual metal bits was too uneven. Now all the Black bits are uniform. I'll re weather it a tad more conservatively after i'm closer to being complete. Till next time...

20150807_235219.jpg 20150807_235259.jpg 20150808_205514.jpg 20150808_205604.jpg 20150808_205628.jpg
 
I bought both a Wal-Mart. The tip is made out of this piece here k2-_9b58a9d4-f89b-4363-ba22-7c0c7a79839b.v1.jpg
you'd have to pull off the rubber coating and the adjusting lever. That would leave a large indentation you'd have to fill with jb weld or some other filler.

Then I used this as the neck to the pvc fitting.0004687858044_P255045_180X180.jpg
I just JB Welded it to the inside of the other nozzle. However you'll need to shave a bit of the pvc coupler interior diameter to get the nozzle base to fit inside as mine does.
 
Sorry for all the questions again, I put this on the shelf for a bit but have come back to it again, what were the dimensions of the junction box you used?
 
Gang box is 4 1/2" long
2 3/4" wide and 2" deep. It has a slight taper out to the opening. The thread is 3/4". This is almost exclusively for security lights. Bought it at home depot.
 
Last edited:
This thread is more than 8 years old.

Your message may be considered spam for the following reasons:

  1. This thread hasn't been active in some time. A new post in this thread might not contribute constructively to this discussion after so long.
If you wish to reply despite these issues, check the box below before replying.
Be aware that malicious compliance may result in more severe penalties.
Back
Top