The Mandalorian Gunslinger Armor build

Malibu139

Sr Member
RPF PREMIUM MEMBER
Hey Everyone I made the my original back armor out of foam and since there was very little reference the piece was not the right size. Also there was no template so it didn't fit right. Someone posted this pic and I had to take a second go at it
.
back shiled.png


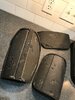
I have never worked with sintra so I got some in 3mm
formed it to my back with a little bit of the shape in the above picture.
Once I hade the shape I cut and identical piece out of 6mm foam and used dap to glue the foam to the sintra
Then I free handed the battle damage , cut it out of the foam with an exacto and then dremeled the edges of the damage smooth.
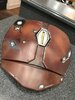
next step was cover it in XTC-3d , so I did couple coats of that to give the foam some added rigidity and it paints way better than foam sealed with plastidip .Then I taped it off , primed and painted and did the battle damage in Sliver
IMG_0047.jpg
IMG_0048.jpg
IMG_0052.jpg
IMG_0049.jpg
IMG_0051.jpg
IMG_0099.jpg
IMG_0101.jpg
IMG_0102.jpg


I like the outcome so much I am going to re do the front chest armor also...

IMG_0072.jpg
IMG_0074.jpg
 
Last edited:
Chest Armor progress.
Sketched the damage to the foam from reference pics.
IMG_0134.jpg


Carved/Cut the damage out with exacto and then dremmeled edges where needed.
IMG_0135.jpg
IMG_0136.jpg
IMG_0137.jpg


Then lightly heat sealed it and then covered with 3 thin coats of XTC-3d.
primer painting and weathering are next.
IMG_0142.jpg
IMG_0143.jpg
 
Got a coat of self etching primer o and wet sanded to 400
IMG_0144.jpg

Then primed it with flat red primer and wet sanded again
IMG_0145.jpg

masked off all the damage and diamond. then did a coat of high gloss black then 30 minutes later toped it with chrome
IMG_0147.jpg

IMG_0148.jpg


Next up : mask the damage and then prime/sand repeat.
Then topcoat with montana gold chestnut
then dry brush weather
then seal with matt clear
 
I decided to make the leg and buttplate armor too. Same process as the chest plate. Now on to weathering and silver damage on them all.
IMG_0173.jpg
leg piece.jpg
IMG_0188.jpg
IMG_0194.jpg
IMG_0198.jpg
IMG_0202.jpg
 

Attachments

  • leg piece.jpg
    leg piece.jpg
    78.8 KB · Views: 119
Looking great buddy! Very nice progress

Hey , Hey ! Thanks. Nowhere near as good as yours for sure. Thanks for the input. The more I see your posts on your helmet work the more I want to scrap my plans to paint mine and just send it to you.... seriously.

here are a couple more progress shots of the silver for the buttplate and thigh. Still needs weathering but I am going to do them all at the same time once I have the chestpiece painted. I have been putting that off.


IMG_0203.jpg
IMG_0204.jpg
 
Last post for the day sorry. left thigh plate silver completed. Next I need to get the chestplate painted with the correct montana gold browns. Then on to dirtying all the armor up and weathering it..

IMG_0215.jpg
IMG_0216.jpg
 
First off I will say I had a fairly difficult time dealing with Montana gold paints. I could not get it to go on evenly. On an early pass I had to sand it all the way back down and start from scratch with primer b/c it went on granular. I was lucky and had a nozzle/cap from a spaz stixs can that fit and that sprayed at what seemed a higher pressure. That seems to help. Any way I finally have it tp a point where I ma really happy with it but not without a lot of frustration.
IMG_0240.jpg
IMG_0241.jpg
IMG_0247.jpg
IMG_0248.jpg
IMG_0249.jpg

plan to lightly buff the shine down a bit too.
Still need to do some weathering around the damage and the some small details but that should we way less frustrating.
 
Thanks . Just finished up a scratch build left knee armor in a similar way. The only difference is the sintra is on the outside with the foam backing like. a real knee pad.

Last piece is the right lower leg. I am wanting to build it and not wanting to 3d print . I can’t come up with a good way other than foam but it’s not as durable. Thought or tutorials?
DBBC8063-AD98-49CF-9A16-A673165F25C7.jpeg
8118A83E-A2B5-4B28-8233-258614597B55.jpeg
3678E77C-44A1-4FCA-A7CE-6219EDA340CA.jpeg
0B051BFF-44BE-4B42-B3E3-CA2F0DFD74E2.jpeg
 
This whole suit is deceptively simplistic! So many details and pieces that need to be correct! It’s no Boba Fett in its completely, but damn if this doesn’t look pimp!!!!
 
This thread is more than 3 years old.

Your message may be considered spam for the following reasons:

  1. This thread hasn't been active in some time. A new post in this thread might not contribute constructively to this discussion after so long.
If you wish to reply despite these issues, check the box below before replying.
Be aware that malicious compliance may result in more severe penalties.
Back
Top