The Expanse Belter Vac Suit

Jesuit24

Well-Known Member
RPF PREMIUM MEMBER
I'm in love with the show. As a longtime BSG and Firefly fan, I'm seeing everything I love about those shows in The Expanse.

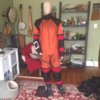
So I've started putting together a belter space suit. I'm planning on doing the Miller version, and might even make a pet nuke once I'm done. The first thing I got was a Guardian Fall Protection harness. These things are hard to find in the correct model. I managed to get a red strapped one with a buckled waist and legs for a reasonable price last year.

IMG_0112.jpg
I painted the straps with Tulip fabric paint; apparently 'black' comes out more of a shimmery gunmetal colour, but it gave some good contrast against the rest of the black parts so I left it. I also replaced the buckles with quick release connectors. I sewed on some extra nylon straps to the chest straps and put on more quick release connectors for the incoming backpack. The gun is from Traywick Designs on Etsy. I messaged them last year before they were offering them, wondering if it was possible to get their Total Recall gun without the bottom attachment (so an unmodified Chiappa Rhino 50D). They were really helpful and even seemed keen to make more Expanse weapons.

As for the lights, I have absolutely no idea what his chest lights are. They look like the front fascia has been removed but that makes IDing them even more difficult. I may have to get them 3D printed and solder up a lighting option. For the shoulder lights, originally I was going to get two Princeton Tec Meridian strobe lights in black, but after seeing this photo, I realised he's actually wearing the neon yellow ones which have been painted black. It's also interesting to note the continuity error in their placement; outside Eros they're above the quick release buckle, inside Eros they're below. I'm opting for above, just because it makes more sense for them to be further away from the chest lights. Also, those pictures show to toggle switch has been removed from the Meridians, and is replaced with a wire/tube. I'm assuming the prop department wanted more options for lighting than just a white/red strobe, potentially they hooked them up in sync. As far as my costume goes, I'm not going to worry about that.
attachment.jpg 085906be462c3914f348859963be0d81.jpg

For making mine, I masking off the light and spraying it black. While it was still wet, I rubbed off the edges with kitchen roll to reveal the yellow underneath and smudged the paint dry. Then I took fine steel wool and buffed the paint to bring out more yellow. I prefer this to the black; it brings some colour to the outfit and looks a lot more industrial rather than tactical.
IMG_0113.jpg

I've got the Ogio Mach5 backpack coming next. It was off Aliexpress, so I'm expecting a knockoff and I'm not sure if I'm going to get a Mach5 or a Mach3 due to dubious photos but for the price I'll be happy regardless. I've also ordered the Carhartt Impact gloves since I'm struggling to find any in the UK and I found a place that had one pair in stock.

The big question I have is how I'm going to do the jumpsuit. They were all made in-house by the costume department and there really isn't anything close aside from flight suits which aren't the right material. Since neoprene is just rubber sandwiched between fabric, I'm thinking about buying a regular flight/jumpsuit and gluing thin foam to the inside of the suit to give it thickness but I'm unsure how the fabric would drape after that.
 
Love your work on this- as a "non" cannon, but big time fan, to catch "the spirit" of the show I am planning on using some "Go Kart" jumpsuits to make up some costumes, that may be "seen in the background" of the show, just maybe, off camera, but in the vein of the show.Will watch your progress with interest.
 
The Ogio backpack took forever to get here. I was on the verge of putting a claim in for it when it arrived. The Carhartt gloves came a while ago; I expected them to be large on me but I was pleasantly surprised at the fit. I think I might have to sew some conductive thread into the fingertips to give me access to my phone. I've just finished sewing the straps to attach the backpack to the harness. I folded over the backpack straps; I don't want to cut anything off that will stop me using it as a backpack in the future. I also sewed some velcro to some more webbing which feeds through the original loops at the bottom of the pack and wrapped that around the waist webbing, so the backpack has four attachment points and stops it from swinging.
IMG_0121.jpg IMG_0122.jpg IMG_0123.jpg

Now I need to add details to the pack to stop it looking so much like parachute and more like a spacesuit. Most of the vac packs in the show have handles on the sides, but Miller's has jetpack attachments. I haven't seen many shots of the difference so I'm not sure if I'll go the handle or jetpack route yet. I also plan on using an old phone for the readings display on the back, but without a 3D printer, I'm not sure how I'll go about making the detail around it. I REALLY need a 3D printer...

In the mean time, I've ordered a MilTec cross draw vest to go underneath the harness.
 
The vest came so I've got most of the pieces now. It's starting to look like an actual costume. I might finish it for London MCM in summer as long as I don't mind roasting in the sun.
IMG_0124.jpg

Being belter thin, I was worried the vest might be too big, but it really is a one size fits all deal. It's slightly inaccurate in that the pockets on the front aren't modular. Most of the pockets are missing from Miller's vest (he doesn't have a need for pistol or rifle magazines), but given the harness hides most of them anyway, it really wasn't worth doubling/tripling the price for the proper branded vest.

I'm seeing why the jumpsuits are brightly coloured on the show; the whole thing blends into one when all the colours are dark. The orange jumpsuit will really help bring back some detail with the contrast.

Still mulling over the jetpack detail. I should really finish it before I buy more stuff.
 
Given that the Belters weren't really an actual organized force you can get away with using the "wrong" vest, that is unless you're specifically trying to be Miller. If, however, you're trying to do a fully accurate Miller costume, a bit of time and an Exacto or razor blade can make the costume more accurate.
 
Since taking screenshots, I've actually found out that Miller's vest isn't a crossdraw at all and he just shoves his Rhino in one of the magazine pouches.
Vest.png
Still glad I got the crossdraw though. I wouldn't trust the gun to stay in that pouch.

I've been working on the backpack. Going by the screenshots, it looks like Miller is wearing a PnK Canterbury pack with jetpacks attached (I don;t think we were supposed to notice). So given that, I decided to just do a standard PnK backpack with handles in case I wanted to do one of the Rocinante crew later down the line. This image helped me design it:
160202_NorthFront_Expanse_CanterburyCrew.jpg
I cut out a hole for my phone display, painted the trims blue and used my new die cutting machine to print off some stencils. I just need to weather up the white and add some Canterbury stickers that I'll print out. I've noticed my backpack is a lot thinner than the reference pictures I'm seeing. I'm not sure if that's because I bought it cheap from China.
IMG_0133.jpg

I also used my die cutter as a substitute 3D printer, designing shapes for the handles and the centre display, which I glued together in layers. These will be coated in resin and bondoed for strength. The centre display fascia was based off other peoples' cosplays but I've found the actual display is a lot different so I'll be redoing it.
IMG_0134.jpg Vac Pack 3.png
 
And we're done on the vac pack. Kinda. Still got to add some stickers to the back fascia and also deal with the pipe connector from the helmet, but I'll figure that out when I've got the helmet.
IMG_0141.jpg

The handles are a bit chunky and the middle section is a little rough due to the resin reacting with the paint, but it'll do. I'm using an old phone for the HUD.

Onward to the suit. I was debating buying an existing flight suit and gluing neoprene to the inside, but I've got a feeling that won't work, so I'm going to try and sew my own vac suit using a pattern. The first time I've tried making something so large from scratch so I'm hoping it goes okay.
 
And we're done on the vac pack. Kinda. Still got to add some stickers to the back fascia and also deal with the pipe connector from the helmet, but I'll figure that out when I've got the helmet.
View attachment 985764

The handles are a bit chunky and the middle section is a little rough due to the resin reacting with the paint, but it'll do. I'm using an old phone for the HUD.

Onward to the suit. I was debating buying an existing flight suit and gluing neoprene to the inside, but I've got a feeling that won't work, so I'm going to try and sew my own vac suit using a pattern. The first time I've tried making something so large from scratch so I'm hoping it goes okay.
Awesome!
That sir , is one great backpack.. i look forward to seeing how you set up the connectors for the helmet.
In a moment of crazy inspiration [and booze], I ordered 2 backpacks from the site you mentioned...and so begins the long wait???
Loving this thread,bravo!
 
Awesome!
That sir , is one great backpack.. i look forward to seeing how you set up the connectors for the helmet.
In a moment of crazy inspiration [and booze], I ordered 2 backpacks from the site you mentioned...and so begins the long wait???
Loving this thread,bravo!

Thanks! I'm going to wait and see how the helmet hose is looking before I figure it out. I'll be wanting to stick a fan and maybe a camelpak in the pack to feed into the helmet.

I know this isn't technically accurate, but I managed to get a really close looking hat off Etsy. Since the Guido Delgado in moss green is discontinued, I doubted I'd find anything close but this is the right colour, the right crown and brim dimensions and even has the right colour bound edge. The ribbon was all wrong so I replaced it with a 2" black grosgrain ribbon I made and I had to remove the leather sweatband since the hat was two sizes too small, but now it fits great. Just need a hat pin and some plumage to finish it off. The idea is, if the helmet turns out to be unbearably hot, I've got something else to distinguish me since I don't plan on shaving the side of my head.
IMG_0150.jpg

I worked on the arm display casing the same way as the other pieces. It still needs bondoed and painted but it fits my phone well.
IMG_0146.jpg Arm Display 3.png

And as for the suit, sewing is hard. Sewing neoprene is harder. I'm getting skipped stitches everyso often so a lot of it is needing to be handsewn over. I eventually wrapped my head around the instructions so I shouldn't have too many problems finishing it. 2mm neoprene seems like the right choice for fabric, and I'm liking the black textured vinyl I picked out for the arms and legs. I'm anxious to get to the stage where I try it on, because I've spent a lot of time working on it not knowing if it's even going to fit me.
IMG_0144.jpg
 
More great work!
I finally got my backpacks -both with fair sized dents in em,punched them out but the scars remain, but that just adds to the "worn world look"?
Can I ask how you dealt with removing the "ogio" lettering, or did you just work over the top of it?
If you did remove it, what did you use?
Cheers
Nick G
 
Fantastic work!

I'm just finishing up my Martian marine helmet, then I'm going to be working on Miller's helmet. Maybe we can compare notes :)

If you need the sidearm, Traywick Designs do a good kit of the Rhino.
 
I used a faux neoprene, and sewed some flexible tubing for possibly water cooling, which wasn't necessary. I wore this for 3 hours no problem with an ice pack inside the suit around the lower back.
BURNT ORANGE Neoprene Scuba Knit Fabric Polyester Spandex (60 in.) Sold BTY | eBay
I got most of my details from the tested.com video

The arms and legs are cordura with red air mesh bands and nylon webbing bordering the air mesh.
I don't have much in the way of patterning as i had to make the entire costume in 3 weeks and sort of freehanded the jumpsuit

IMG_1761.JPG
IMG_1762.JPG
 

Attachments

  • IMG_1761.JPG
    IMG_1761.JPG
    951.1 KB · Views: 1,158
Electrical system runs off a 12v battery and powers the helmet, chest, and visor lights. as well as the air circulation system.
the chest and helmet lights are on the same circuit and the visor is separate so they can be dimmed independently
IMG_1756.JPG

the blower takes air from the top of the backpack and routes it through the hose to the helmet.
I uploaded the chest lights 3d printing files to thingiverse as well as the backpack parts
https://www.thingiverse.com/thing:3545295
https://www.thingiverse.com/thing:3545325
IMG_1758.JPG
IMG_1766.JPG
 
Holy Crap!
That is incredible!
True fan, amazing costume-cant call it cosplay-its TOO good for that.
Beautiful work.
Nuff said.
 
Electrical system runs off a 12v battery and powers the helmet, chest, and visor lights. as well as the air circulation system.
the chest and helmet lights are on the same circuit and the visor is separate so they can be dimmed independently

the blower takes air from the top of the backpack and routes it through the hose to the helmet.
I uploaded the chest lights 3d printing files to thingiverse as well as the backpack parts
Belter suit chest lights (The Expanse) by Thebuildatorium
Belter Backpack Parts (The Expanse) by Thebuildatorium

That's incredible! I have so many questions. How did you get those ribbed sections on the jumpsuit?

My own jumpsuit is coming along slowly. I recently got back into sewing it after getting bogged down sewing the reflective bands on the legs.
 

Your message may be considered spam for the following reasons:

If you wish to reply despite these issues, check the box below before replying.
Be aware that malicious compliance may result in more severe penalties.
Back
Top