The Blue Mule from "White Line Fever"

Well, actually yes. Figured it was time to get back to getting some modeling stuff done. After I´ve applied the decals over a year ago, I´ve spent the last two days with mixing blue paint and spot painting the cab. The decals were very transparent and overlapping was a No-Go due to very obvious color changes. I´ve had to cut the decals into 50+ pieces to make them fit the cab and there were a lot of areas that needed to be spot painted. Especially to position the white line around the windshield was a real pain. This is where I started with the decals and everything else on the whole cab had to be cut to fit to it. This is one of the things in scale modeling that you don´t want to do twice in a lifetime. Finally it went the way I´ve had it planned and I´m really happy with the result. Now it´s time to protect and seal all the painstaking work with some clear coat. Still need to get some minor adjustments done on the cab, but not before everything has been cleared. The decals are hyper-sensitive and you need velvet gloves to handle the cab. As soon as it has been cleared I can get it done without being scared to death...:rolleyes

So here´s a little cab-walkaround.

3463633634363535.jpg


6437396664333962.jpg


3661363035333734.jpg


3834393266353734.jpg


The next updates will be on a frequent basis again. I´m totally back in the mood of modeling.:thumbsup

Best regards,
Kevin
 

Attachments

  • 3463633634363535.jpg
    3463633634363535.jpg
    197.3 KB · Views: 264
  • 6437396664333962.jpg
    6437396664333962.jpg
    193.3 KB · Views: 239
  • 3661363035333734.jpg
    3661363035333734.jpg
    189.8 KB · Views: 868
  • 3834393266353734.jpg
    3834393266353734.jpg
    190.3 KB · Views: 753
Last edited:
Great news Kevin. I, for one, am ecstatic to see the updates and hear that you're back on the horse, I mean, Mule. Looking forward to more updates!
 
Here´s the next update on the Mule build.

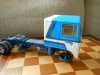
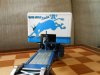
I´ve spent some time with scratchbuilding tubes for the intake and exhaust systems. It was of course not possible to use the parts from the donor kit as they came in the box. I did cut several small pieces of tube into shape, reglued them, added putty and sanded them. Finally the parts were painted, BareMetalFoil was added to the clamps and the intake and exhaust tubes were installed to the engine.

3561336437363863.jpg


The air intake and the exhaust muffler were scratchbuilt with parts from the kit and evergreen styrene tubes. The intake required some custom made arches on the top again which were done in the same way as the parts in the picture above. The parts were painted and clamps were finished with BMF.

6532303361643561.jpg


The intake and muffler are now easily attached to the pins that are seen in the first picture.

3836323132333132.jpg


The intake tube goes nice around the cab corner as seen on the real truck from the movie. It was quite some test fitting during the whole process to line up the tubes properly. It was also important to have the lower intake and exhaust tubes in the correct distance to each other as there is a structural support that predetermined the distance between the vertical tubes of the intake and exhaust.

6635323232336231.jpg


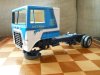
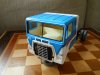
The cab has been clearcoated with a satin-gloss finish. This has been one of the most thrilling parts of this build. If the clearcoat had damaged the decals I would pretty much have shot myself. The decals have been a mess to work with with due to all the cutting that was required to make them all line up properly. Luckily it all went good with the clear coat. From now it´s just a matter of scratchbuilding some bits and pieces for the cab, painting and attaching some parts to the chassis, finishing the interior and preparing everything for final assembly. No pressure on me anymore, nothing can go wrong from here. Here are two mock-up pics of the truck. Pretty cool to see this come together, I have to admit. This is my first serious truck build since I was a kid and it will definately not be the last.

3639396231663039.jpg


6265326533356439.jpg


Next on my list is adding the tanks to the frame and adding some fuel lines to the engine. I´m currently in progress of preparing the supports for the tank and getting started with the interior which has already been primered.

To be continued soon...

Regards,
Kevin
 
Last edited:
It's artists like you that keep me searching the RPF for magnificent builds. The attention to detail is what I enjoy the most. Someday, hopefully, I'll be able to dive in and make a contribution to the forums. Until then, I'll continue to be inspired by the likes of you.

Truly great work and a love for the craft!!
 
fabulous build so far. no offense, but all that aftermarket kit must make this an expensive proposition.
 
Trust me kruleworld, it does. Unfortunately no kits were ever made and Kevin was nice enough to embark on this build on my behalf. One of my childhood dreams was to own a replica of the Blue Mule. Hopefully getting closer to that...
 
Final update on this build. The mule is finished.
A few small parts are not installed yet and missing in the pictures as the model is about to be shipped to its final location soon. Here´s a couple of outdoor pics:

6166356533653831.jpg


6330353264386335.jpg


6163356362326635.jpg


3964623162353363.jpg


3137643864316135.jpg


6333393030363235.jpg


6133626232386663.jpg


3166613639383835.jpg


3662656164613962.jpg


3134396363383736.jpg


It´s been a challenging and time consuming build. But it was also fun and I´m happy with how the build turned out.
Thanks for looking and best regards from the Stuntman ;)
 
Back
Top