Tales From The Loop - Stasis Device

ssdesigner

Sr Member
RPF PREMIUM MEMBER
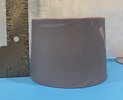
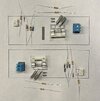
I'm looking to build this prop and get it as close to screen used as possible. If you've seen the series you know its significance in the episode and that it is fairly complex.

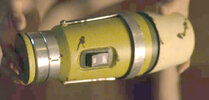
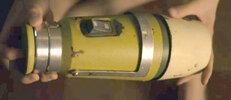
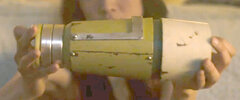
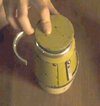
In a nutshell (spoiler): This was found by a young woman and she repaired it without knowing what it could do. When functional, this stasis will stop time, but whomever is wearing the metal clasp bracelets that are clamped to the tube, will not be effected by the time stop.

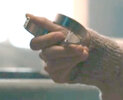
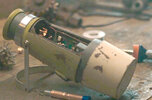
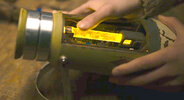
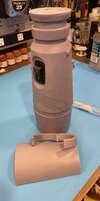
Looking for thoughts on build, potential found parts, etc. Here is the prop:
 

Attachments

  • stasis_screencap_1.jpg
    stasis_screencap_1.jpg
    257.8 KB · Views: 278
  • stasis_screencap_2.jpg
    stasis_screencap_2.jpg
    241.1 KB · Views: 191
  • stasis_screencap_3.jpg
    stasis_screencap_3.jpg
    345.4 KB · Views: 206
  • stasis_screencap_4.jpg
    stasis_screencap_4.jpg
    163.7 KB · Views: 184
  • stasis_screencap_5.jpg
    stasis_screencap_5.jpg
    142.1 KB · Views: 194
  • stasis_screencap_6.jpg
    stasis_screencap_6.jpg
    332.3 KB · Views: 184
  • stasis_screencap_7.jpg
    stasis_screencap_7.jpg
    51.8 KB · Views: 181
  • stasis_screencap_8.jpg
    stasis_screencap_8.jpg
    299.3 KB · Views: 189
  • stasis_screencap_9.jpg
    stasis_screencap_9.jpg
    498.5 KB · Views: 193
  • stasis_screencap_10.jpg
    stasis_screencap_10.jpg
    339.8 KB · Views: 203
I've looked all over for the rocker switch used on this prop and I feel like this is really close:


Attachments

  • NTE_electronics_2368-54-250W-ND.jpg
    NTE_electronics_2368-54-250W-ND.jpg
    24.1 KB · Views: 71
Update:

I have most of the components figured out now. What is left to do:

1) Wire up the momentary button just behind the copper clamp that the acrylic rod snaps into. The button will trigger an LED that will be in the acrylic rod holder and illuminate the acrylic rod.
2) Model the bracket that is used to prop the stasis up so that it can be serviced.
3) Acquire the circuit boards and random wires for dressing up the internals.
4) Cut ON/OFF graphics for outer switch.
5) Sand, paint, weather.
 

Attachments

  • IMG_0566.jpg
    IMG_0566.jpg
    1.7 MB · Views: 125
  • IMG_0565.jpg
    IMG_0565.jpg
    1.5 MB · Views: 131
Hey, Leinads! I was able to get everything printed and I have solved the electronics puzzle to get the acrylic rod to light up. Now I just need to prep all of the pieces, find a way to cut the ON/OFF lettering (need a very small vinyl cutter) and paint/assemble. My plan is to take this on over the winter months.
 
I’m super digging this prop, and am going to watch the show again as I enjoyed it so much during our collective lock-down! I love the utilitarian/ military-grade look of this, especially what appears to be the zinc chromate primer of the main body shell. google that color and you’ll
see the match better if you’re unfamiliar. they make knock-off primer matches that are less toxic for military and aerospace scale modeling. Good luck and cannot wait for new pics! (y)

OMG, wow. LOL. I haven't heard that primer name in a long time. It's GREAT stuff, but nasty. Used a lot of it back 20+ years ago because it was the only thing that stuck really really well to raw aluminum. I used that once to primer coat a glass Jim Beam jeannie bottle and it was fantastic.

I have watched the show many times but still not 100% sure on the colors for the stasis. I can see zinc chromate for sure. I almost thought at one time that it had a tinge of lime-green look to it. Are you thinking the other colors are a dark forest green and a basic light tan?

Also, I made a few of these to properly label the ON/OFF switch :)
 

Attachments

  • IMG_0902.jpg
    IMG_0902.jpg
    611.5 KB · Views: 48
OMG, wow. LOL. I haven't heard that primer name in a long time. It's GREAT stuff, but nasty. Used a lot of it back 20+ years ago because it was the only thing that stuck really really well to raw aluminum. I used that once to primer coat a glass Jim Beam jeannie bottle and it was fantastic.

I have watched the show many times but still not 100% sure on the colors for the stasis. I can see zinc chromate for sure. I almost thought at one time that it had a tinge of lime-green look to it. Are you thinking the other colors are a dark forest green and a basic light tan?

Also, I made a few of these to properly label the ON/OFF switch :)
looks good!
 
i haven’t used that color in ages - testors or tamiya equivalent i think? i see some pricy spray cans, etc. on amazon of actual primer. several companies make both enamel and acrylic in bottles if you airbrush, otherwise you’ll probably find a rattle-can of something close. def an outdoor spray project!
 
hey your modeling looks terrific! something does catch my attention about the screen device - it appears slightly conical along the main body and then the reverse at the tan end-cap than on your replica. i thought this was possibly just forced perspective or the shroud/ access panel in the pics but upon rewatching the episode i do see it. what’s your take?
 
hey your modeling looks terrific! something does catch my attention about the screen device - it appears slightly conical along the main body and then the reverse at the tan end-cap than on your replica. i thought this was possibly just forced perspective or the shroud/ access panel in the pics but upon rewatching the episode i do see it. what’s your take?

Thank you for the compliments, this was actually my first model that I created from nothing. And good eye for detail! The main body and bottom do both appear to be conical. The main body a bit more, but both for sure. My model does incorporate this but it's difficult to see at some camera angles. Here's a better photo of both:
 

Attachments

  • IMG_0904.jpg
    IMG_0904.jpg
    1.2 MB · Views: 81
  • IMG_0906.jpg
    IMG_0906.jpg
    1 MB · Views: 69
One other small detail that I noticed is that they used a textured effect on the main body and bottom pieces. It's super subtle, but definitely there. The dark olive green appears to not use this, so I'm thinking they did it to let the viewer know that this piece was meant to be handled. So the slight texture adds a bit of "grip" for the actors.

I'd like to add this when I paint the prop. Wondering if I could paint with a textured primer maybe? Hoping that it would transfer through to the final coats of ZC and light tan. I'm thinking something like this just under the main paint colors:

 
Last edited:
Thank you for the compliments, this was actually my first model that I created from nothing. And good eye for detail! The main body and bottom do both appear to be conical. The main body a bit more, but both for sure. My model does incorporate this but it's difficult to see at some camera angles. Here's a better photo of both:
okay - you’ve got it. your photos’ angle played tricks on me (i’m simple lol!) wow this is a such a fun prop
 
Quick update on my progress. All parts and pieces are fully sanded and prepped for painting. Now I just need some warm weather days to paint the parts that require a rattle can.

All internal circuit board components have been identified and sourced. Here's my map layout for those parts and a quick video test of the internal light for the fuse tube:


Attachments

  • IMG_1060.jpg
    IMG_1060.jpg
    854 KB · Views: 47
I had an entire can of this once. Was a navy paint that would cure even if it got wet. Pretty sure it was one of those paints that gave VOCs their identity for rapid cancer causing can of green color. I opened the can only once, vomited, closed the lid, continued to vomit and turned it in the next time our dump had a hazard-day free dropoff event. It was the coolest shade of WWII shell casing contrast letters to green base (base was that standard dark green, but this was the yellowish letters on top of the casing green). I think it is the same color they used to paint civilian submersible craft.

Just searched using those terms, Found one good example: Military Vehicle Paint - 1 x 500ml Yellow Inflatable Dinghy Paint. Boat, Rib, Fishing Raft. but could be the shading on their web page so pics are never a guarantee of color match:

Screenshot_20230211-070141_Samsung Internet.jpg
20230211_070549.jpg


Late to the build, so apologies if you already have your paint.

That website is a treasure house for historic military paint colors.
 
Last edited:

Your message may be considered spam for the following reasons:

If you wish to reply despite these issues, check the box below before replying.
Be aware that malicious compliance may result in more severe penalties.
Back
Top