You are using an out of date browser. It may not display this or other websites correctly.
You should upgrade or use an alternative browser.
You should upgrade or use an alternative browser.
T-47 Snowspeeder 1:1 full scale prop build
- Thread starter TXarmory
- Start date
Thursday May 7, 2015. Day 34.
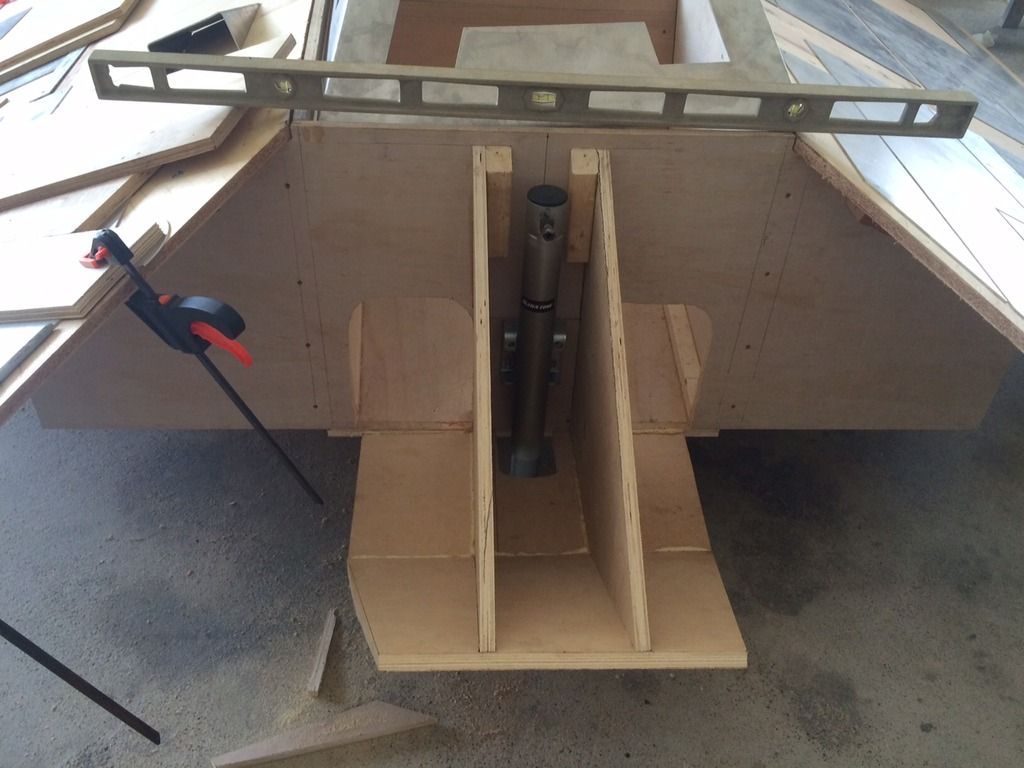
Now that the wings are set in position, we can commit to some of the other dimensions. Next is to trim the length of the engine box so that it sits 11 inches from the edge of the wing and flush at the top against the canopy housing.
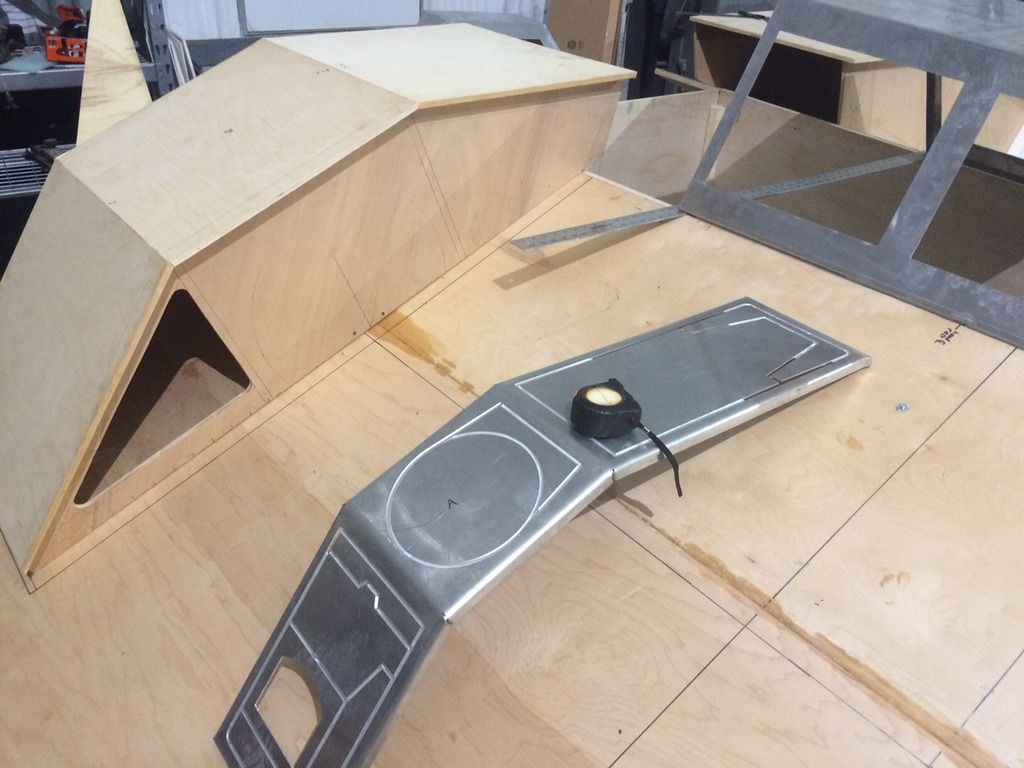
Now that the angle is set we can cut the front out of the box for the metal air grill, behind the vertical fins.
Cut and set most of the vertical fins on both boxes.
Now that the wings are set in position, we can commit to some of the other dimensions. Next is to trim the length of the engine box so that it sits 11 inches from the edge of the wing and flush at the top against the canopy housing.

Now that the angle is set we can cut the front out of the box for the metal air grill, behind the vertical fins.

Cut and set most of the vertical fins on both boxes.

Friday May 8, 2015.
Everything is taking 3 or 4 times longer to design, measure, cut and build than I planned in my head. At this pace, even putting in 4 to 6 hours each night, I'm getting very worried that it's not going to be ready to show off to the Houston crowd at ComicPalooza.
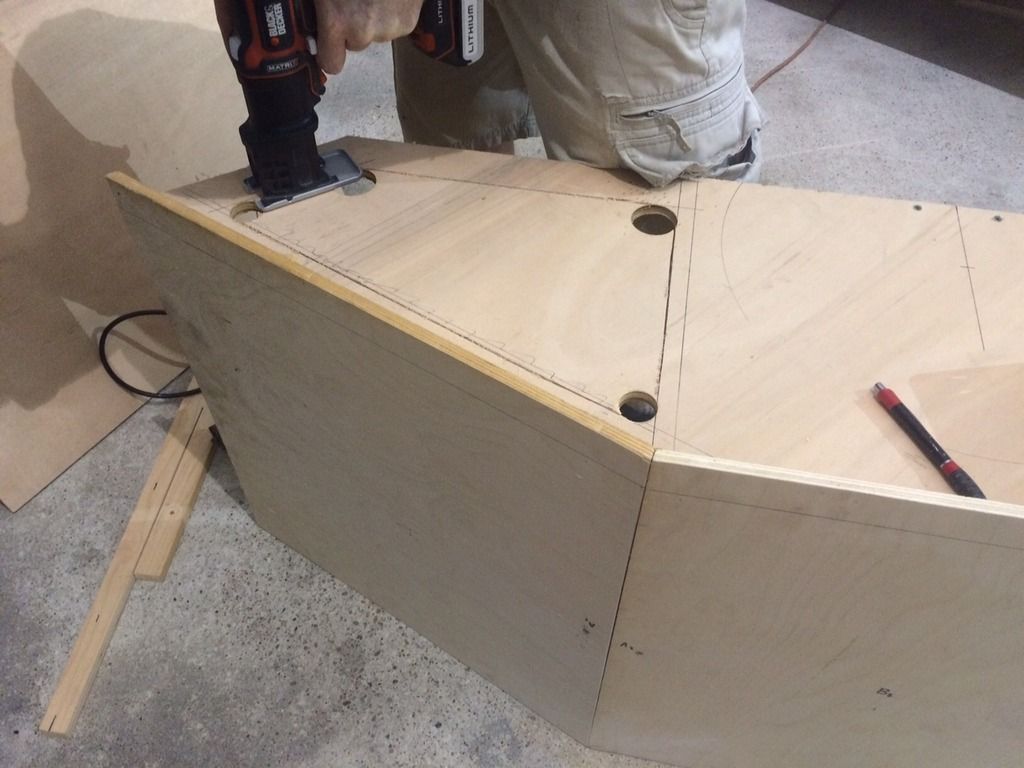
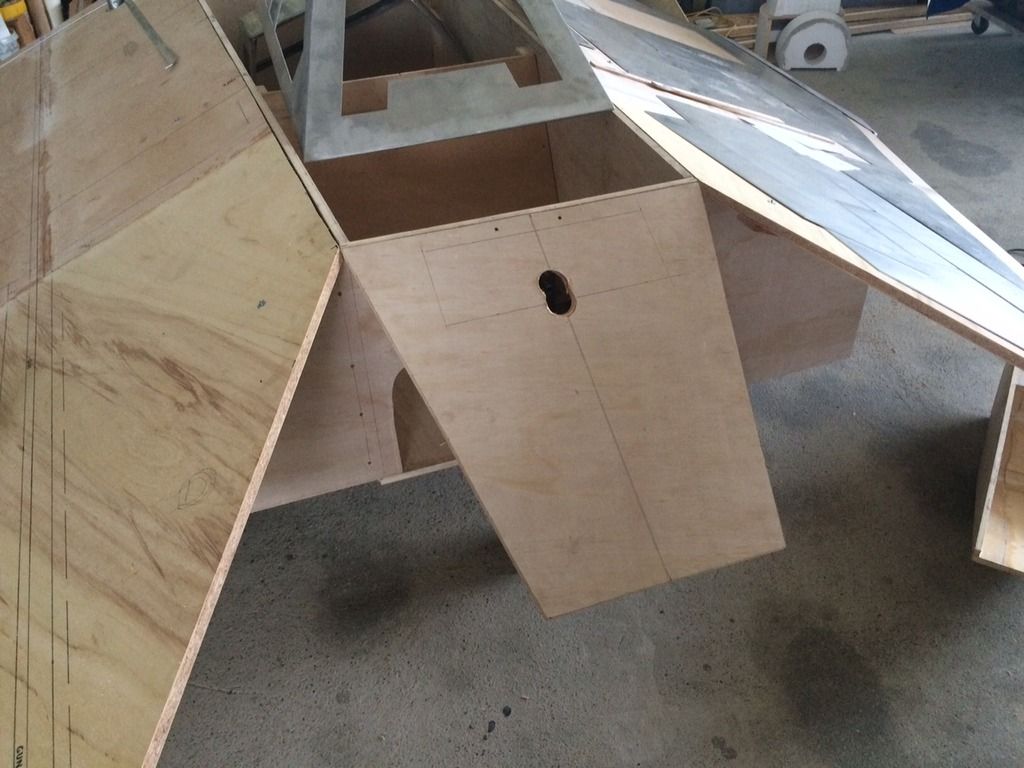
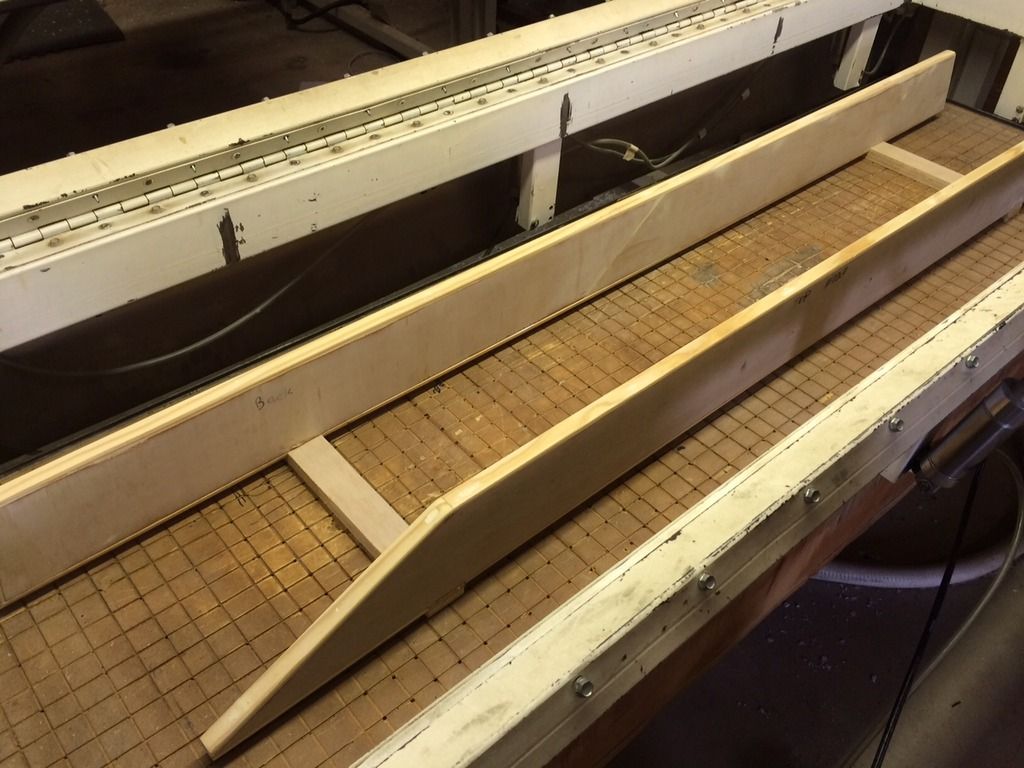
The wings are set so it's time to cut the front three panels that make up the nose of the speeder. First is to build a support frame for the flat 30 degree trapezoidal panel..

This will also finish out the inner foot well for the pilot's seat.

There is not much room up front for the front landing gear / wheel tube. We'll have an access hole for the ratchet drive so we can raise and lower the front end when needed.
Everything is taking 3 or 4 times longer to design, measure, cut and build than I planned in my head. At this pace, even putting in 4 to 6 hours each night, I'm getting very worried that it's not going to be ready to show off to the Houston crowd at ComicPalooza.
The wings are set so it's time to cut the front three panels that make up the nose of the speeder. First is to build a support frame for the flat 30 degree trapezoidal panel..

This will also finish out the inner foot well for the pilot's seat.


There is not much room up front for the front landing gear / wheel tube. We'll have an access hole for the ratchet drive so we can raise and lower the front end when needed.


Saturday May 9. Day 36 of build.
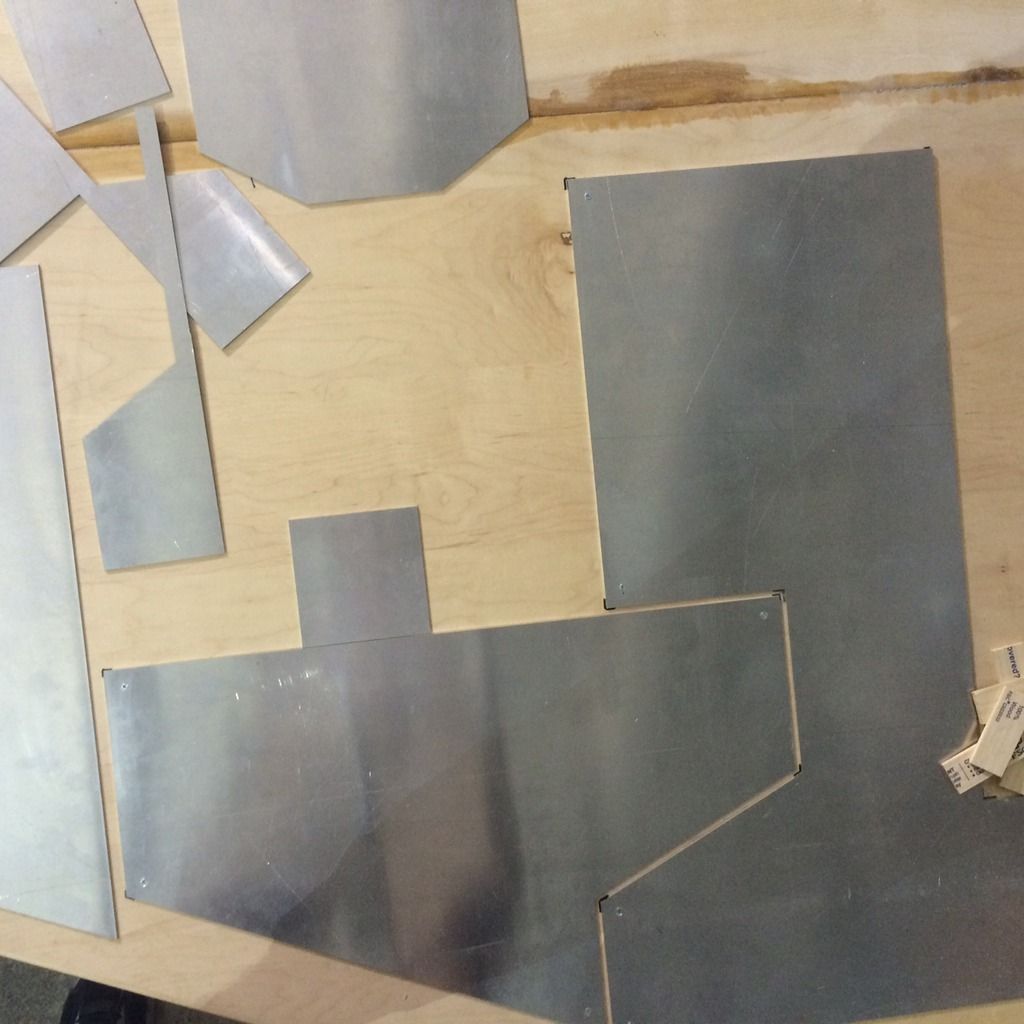
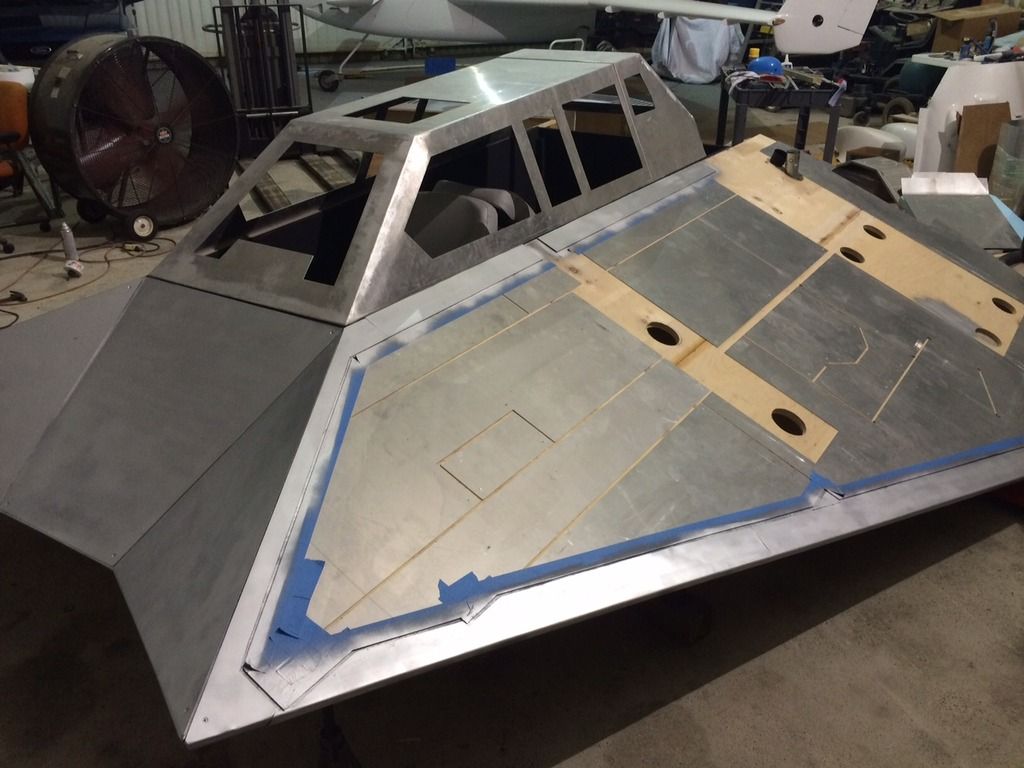
It's time to start armor plating this beast if it's ever going to be ready to take on those AT-AT's in Houston.
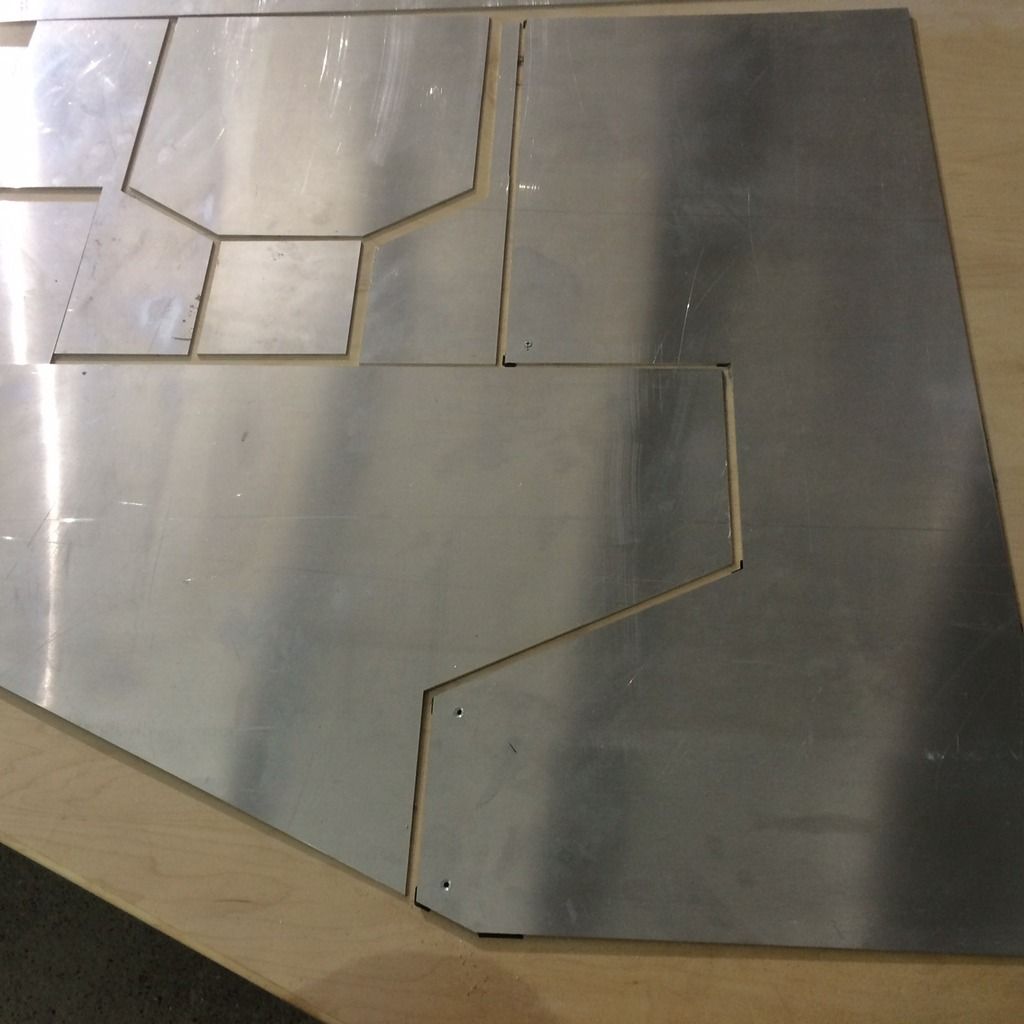
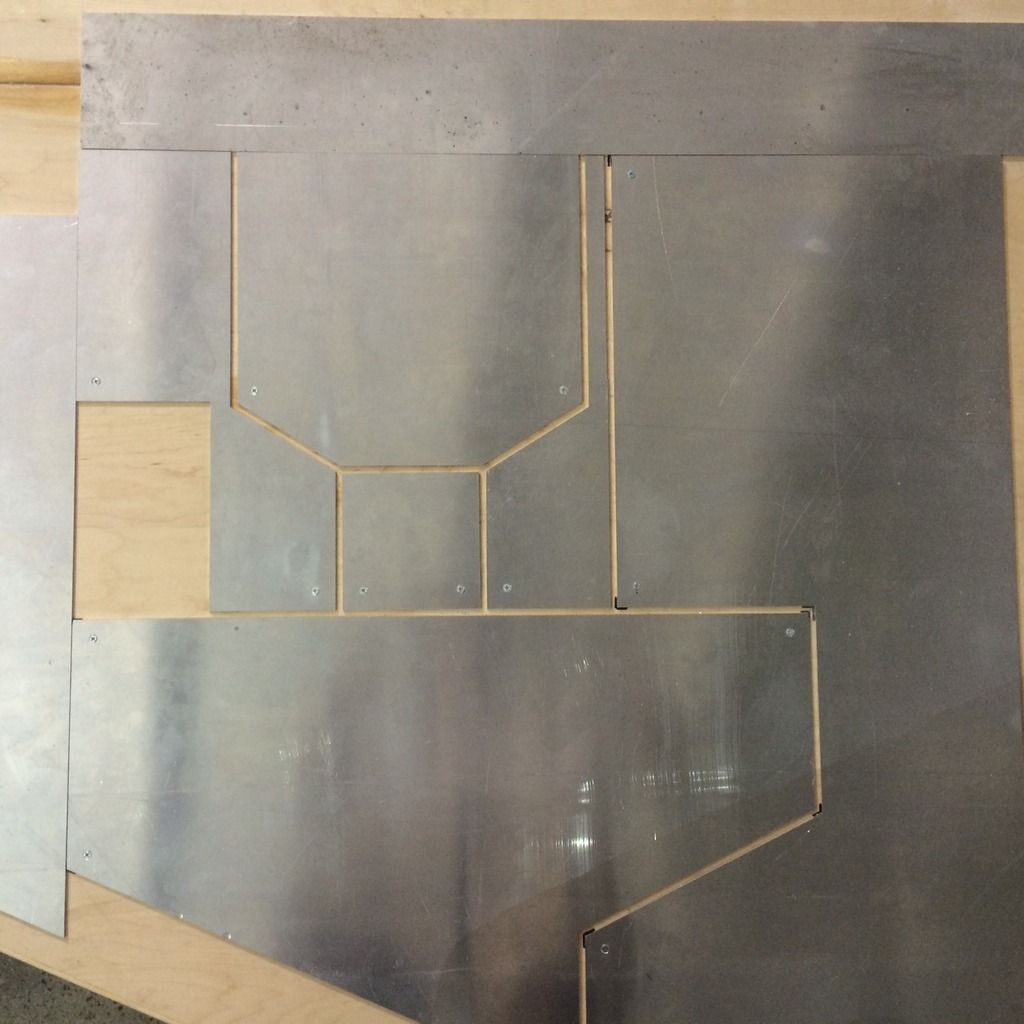
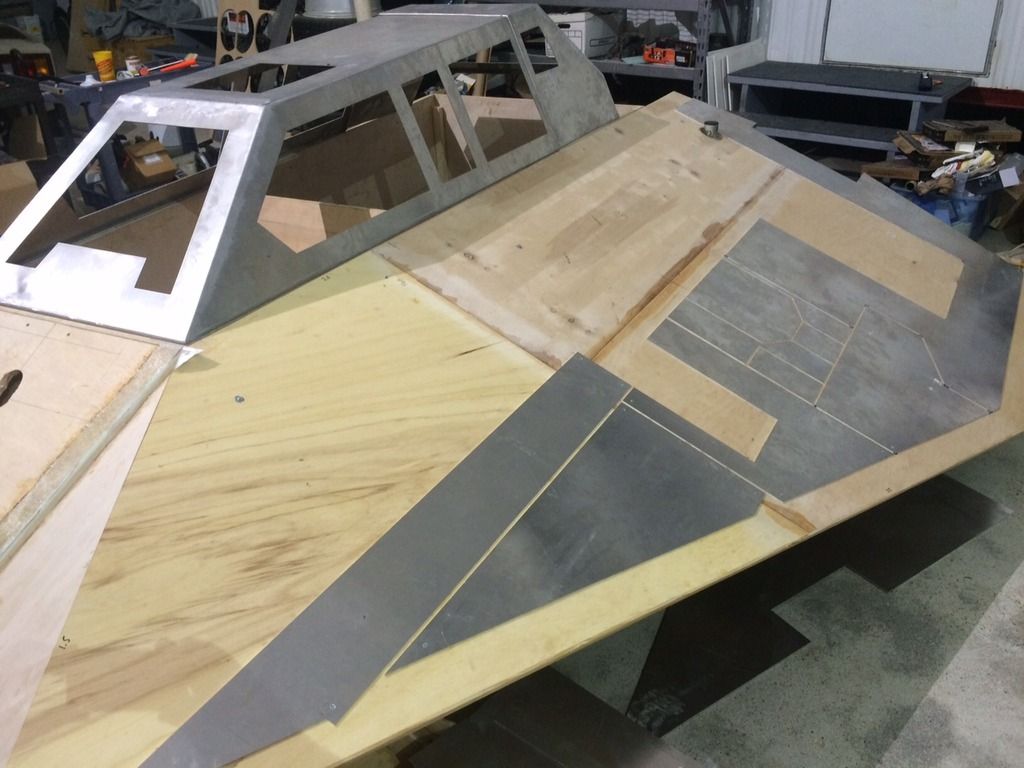
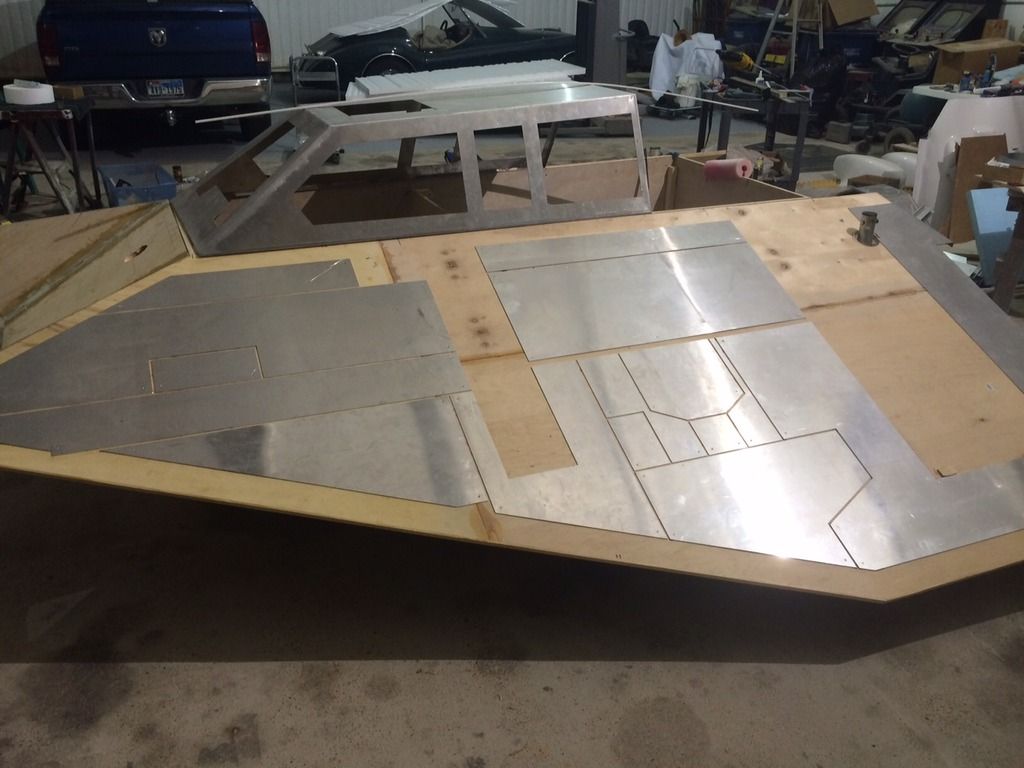
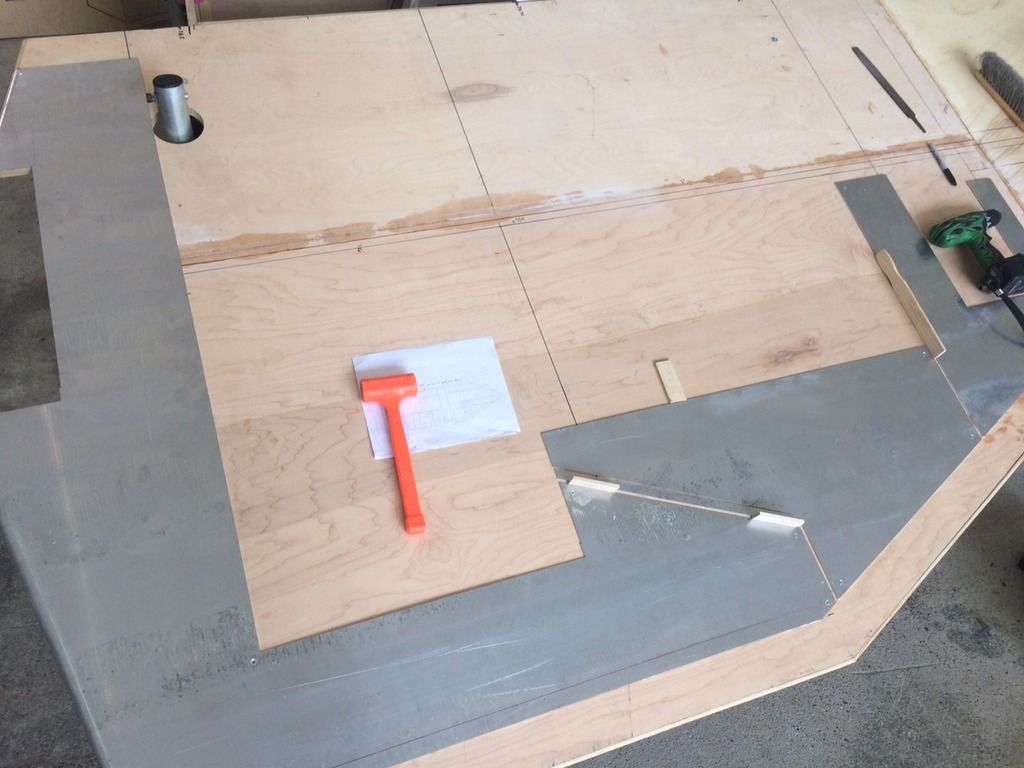
We laid a number of the aluminum plates out to confirm the 1/4" gap was going to look right and would cover the whole wing as planned.

The 22.5 degree angle of the wing is just enough that the panels will avalanche and all slide off if I bump into the wing. Starting with the largest piece at the rear of the wing, under the engine box, I gorilla glue and screw down one panel at a time.
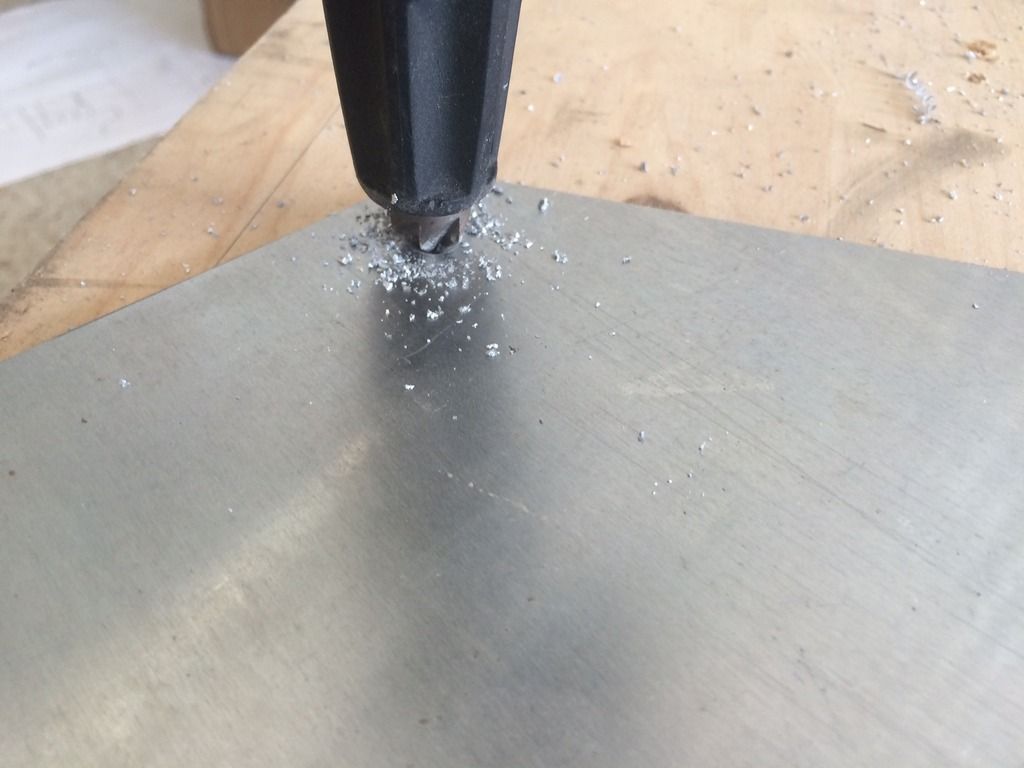
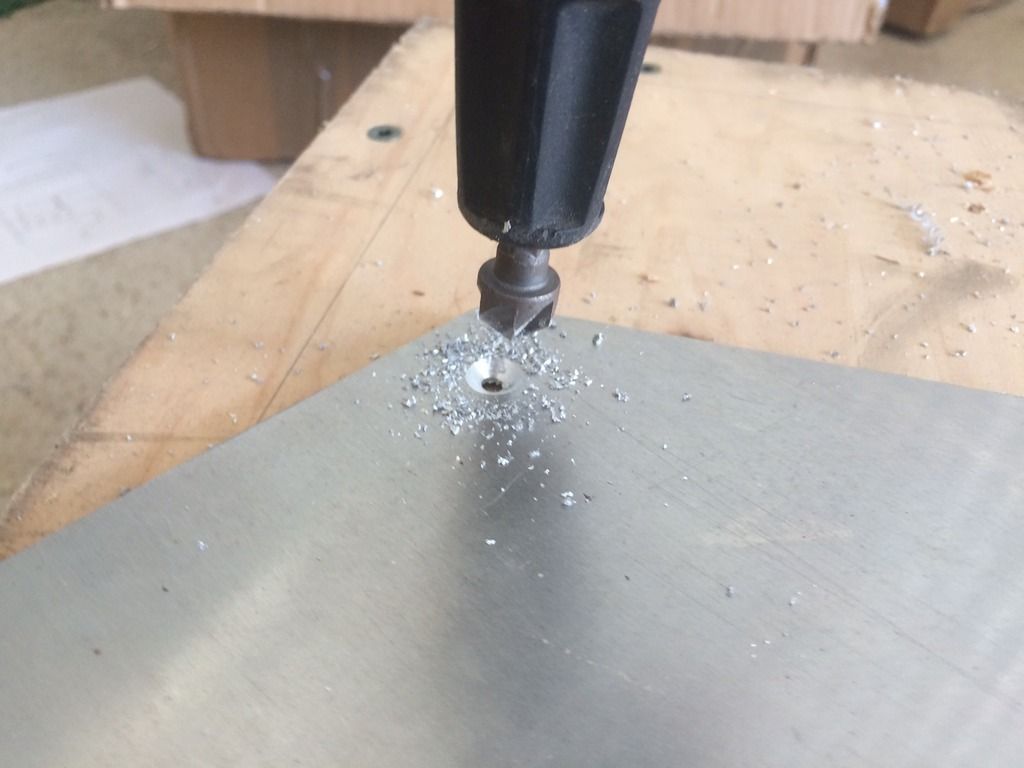
In select corners, drilled a 1/8" hole and then counter sink around the hole so that the screw head sits recessed flush with the deck plate.
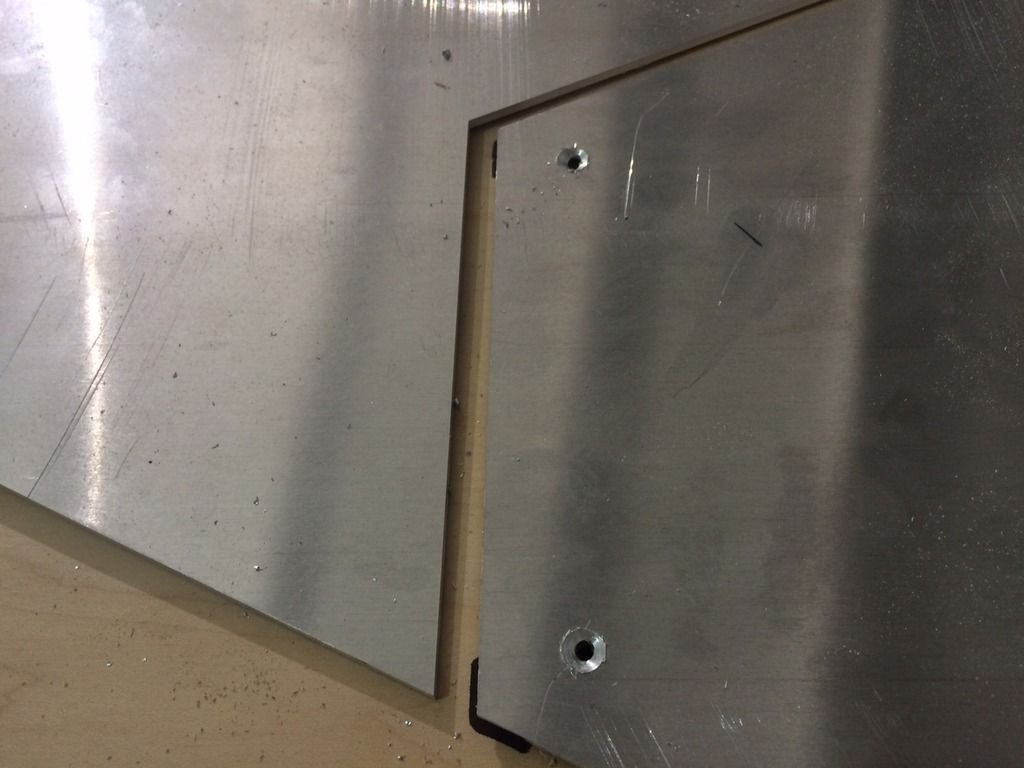
To maintain the 1/4" gap, cut a number of 1/4" wide wood spacers to place in between each panel while the glue dries and I set the screws.
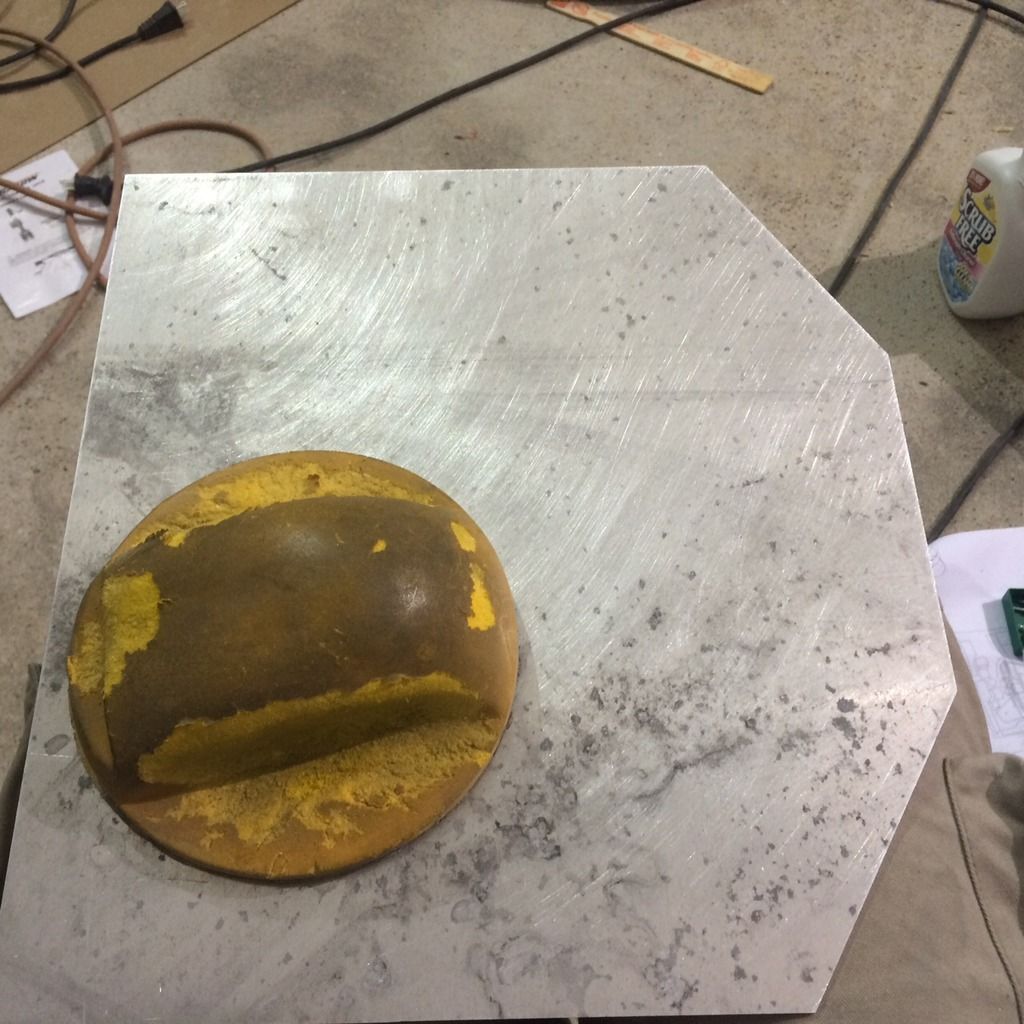
To give the urethane Gorilla glue some bite into the slick backside of each aluminum deck plate, I scuff each piece with 60 grit sand paper and wipe it down with our alcohol fiberglass degreaser prep spray.
It's time to start armor plating this beast if it's ever going to be ready to take on those AT-AT's in Houston.
We laid a number of the aluminum plates out to confirm the 1/4" gap was going to look right and would cover the whole wing as planned.

The 22.5 degree angle of the wing is just enough that the panels will avalanche and all slide off if I bump into the wing. Starting with the largest piece at the rear of the wing, under the engine box, I gorilla glue and screw down one panel at a time.

In select corners, drilled a 1/8" hole and then counter sink around the hole so that the screw head sits recessed flush with the deck plate.

To maintain the 1/4" gap, cut a number of 1/4" wide wood spacers to place in between each panel while the glue dries and I set the screws.


To give the urethane Gorilla glue some bite into the slick backside of each aluminum deck plate, I scuff each piece with 60 grit sand paper and wipe it down with our alcohol fiberglass degreaser prep spray.


Last edited:
Sunday May 10 and Monday May 11.
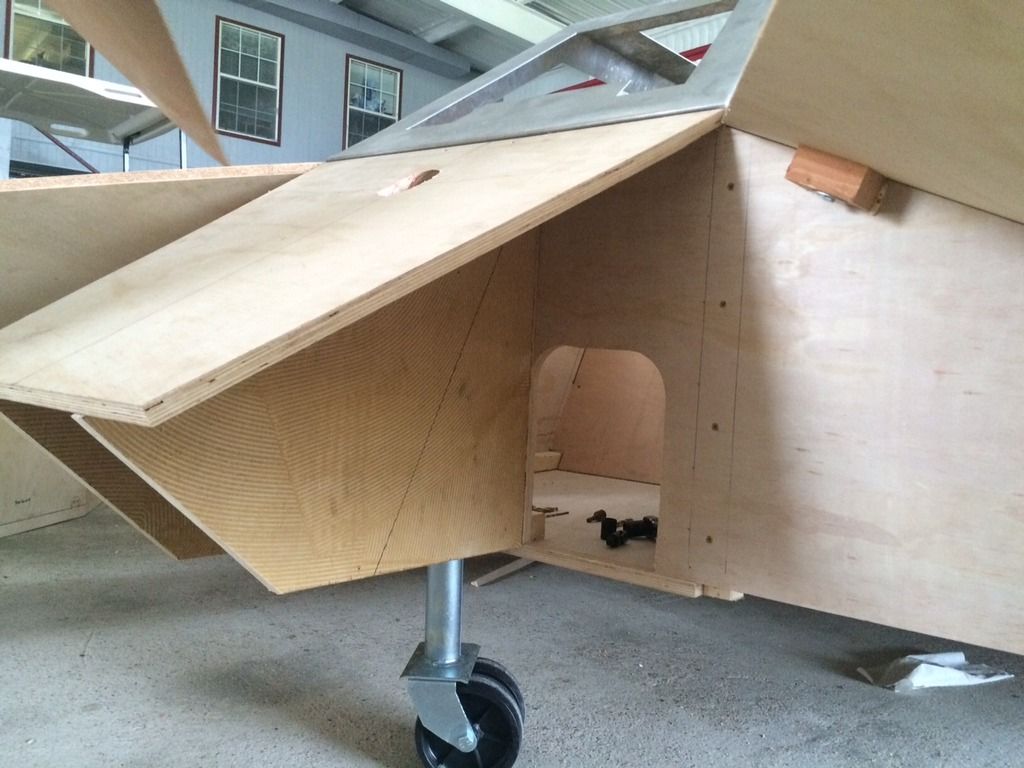
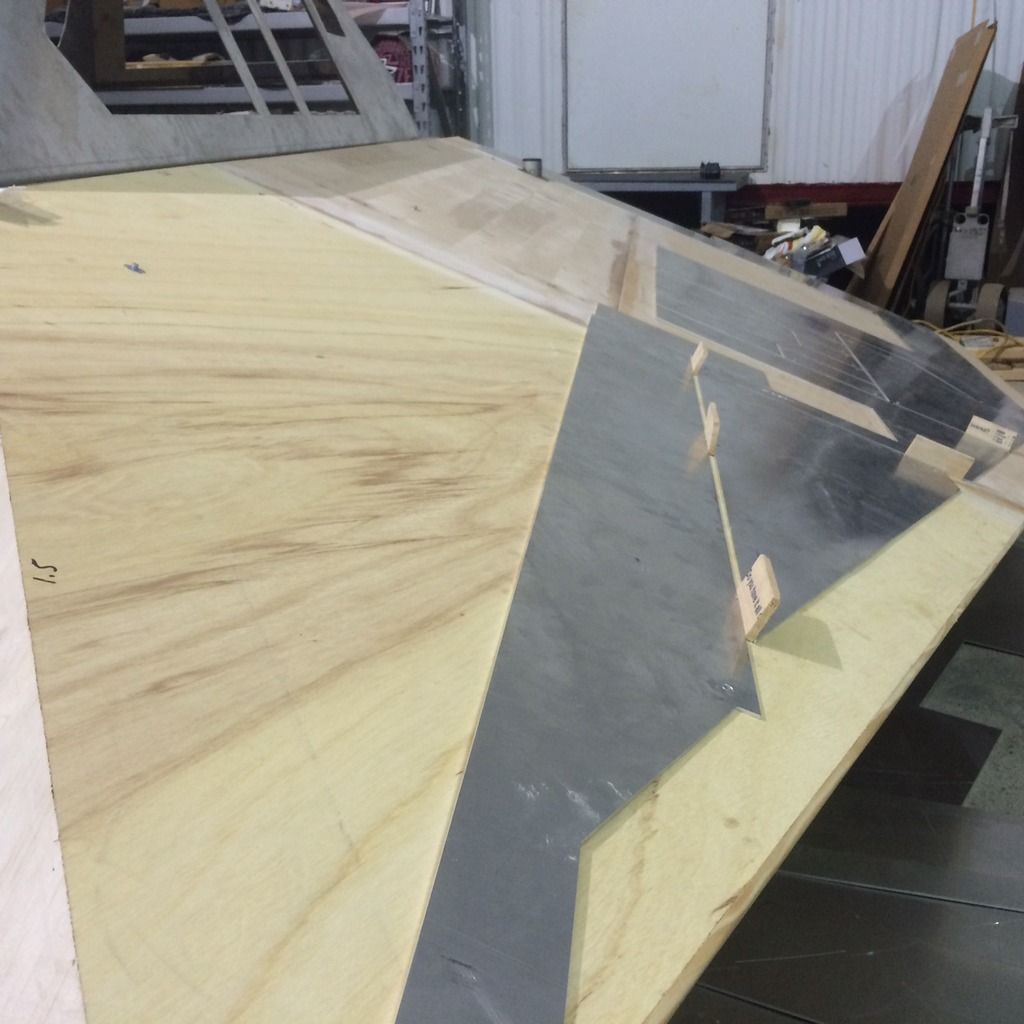
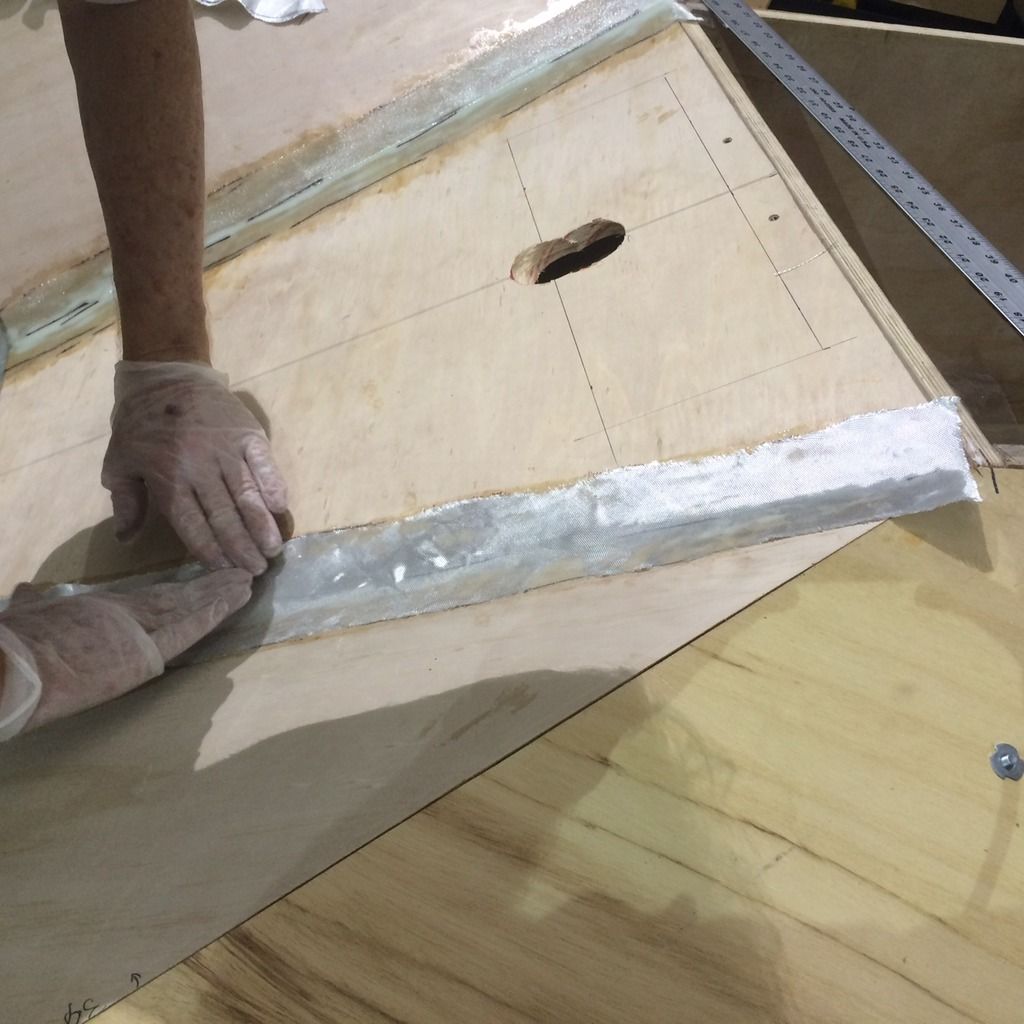
We've cut the two triangular nose pieces and are reinforcing the joints with double layers of 4" wide fiberglass on both sides. This three paneled front nose section will stay attached to the main cockpit tub when the wings are removed for transport. The fiberglass reinforcement will significantly stiffen the front end of the speeder sub-assembly.
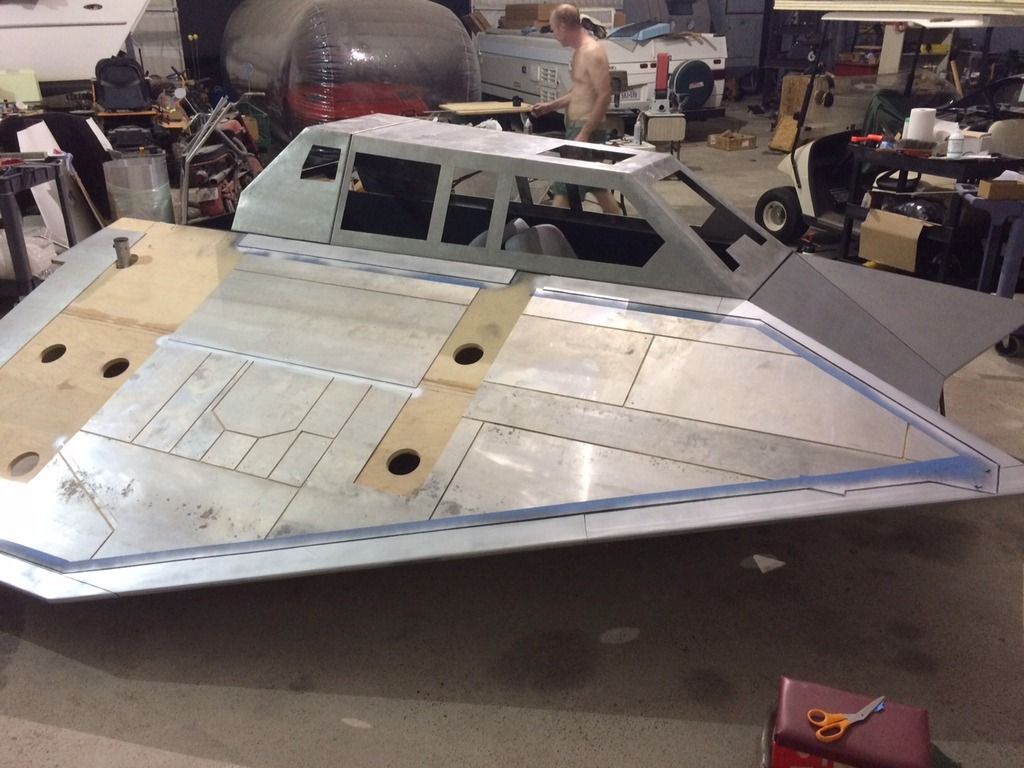
Continuing on with the armor plating on the port wing. Aligning all these puzzle piece angles and maintaining a perfect 1/4" gap spacing is taking a long time. I wanted to get the whole wing covered Saturday, now it's looking like it will take 3 days just to finish one wing. Yikes. Time is running out. But it sure is looking fantastic.

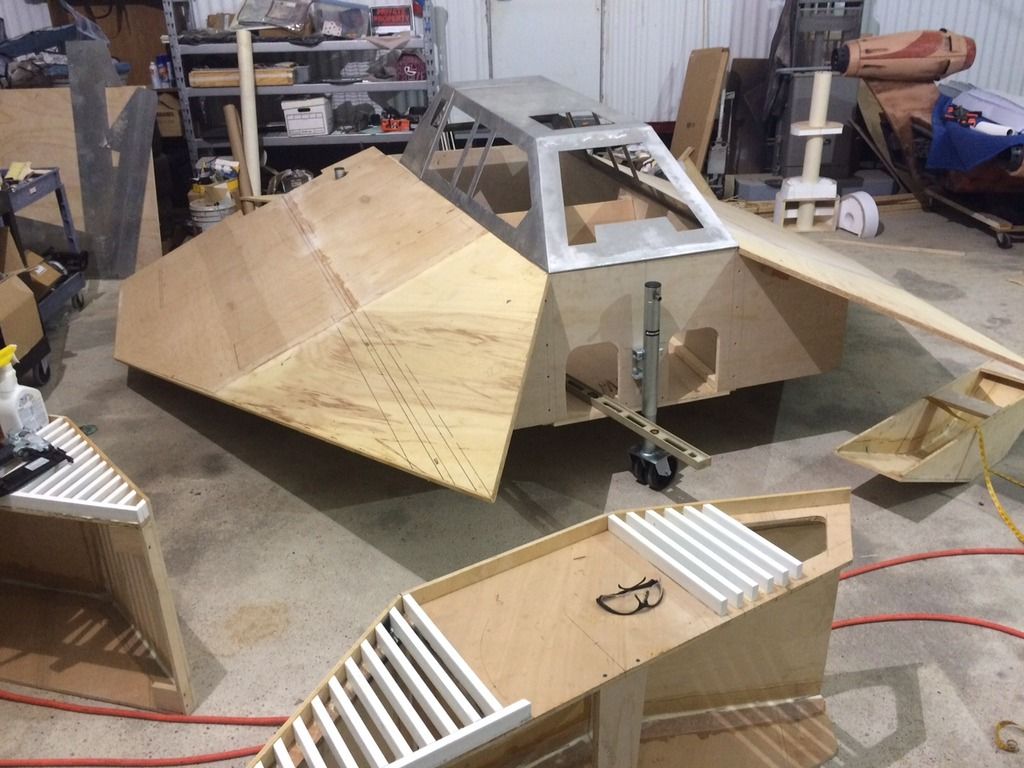
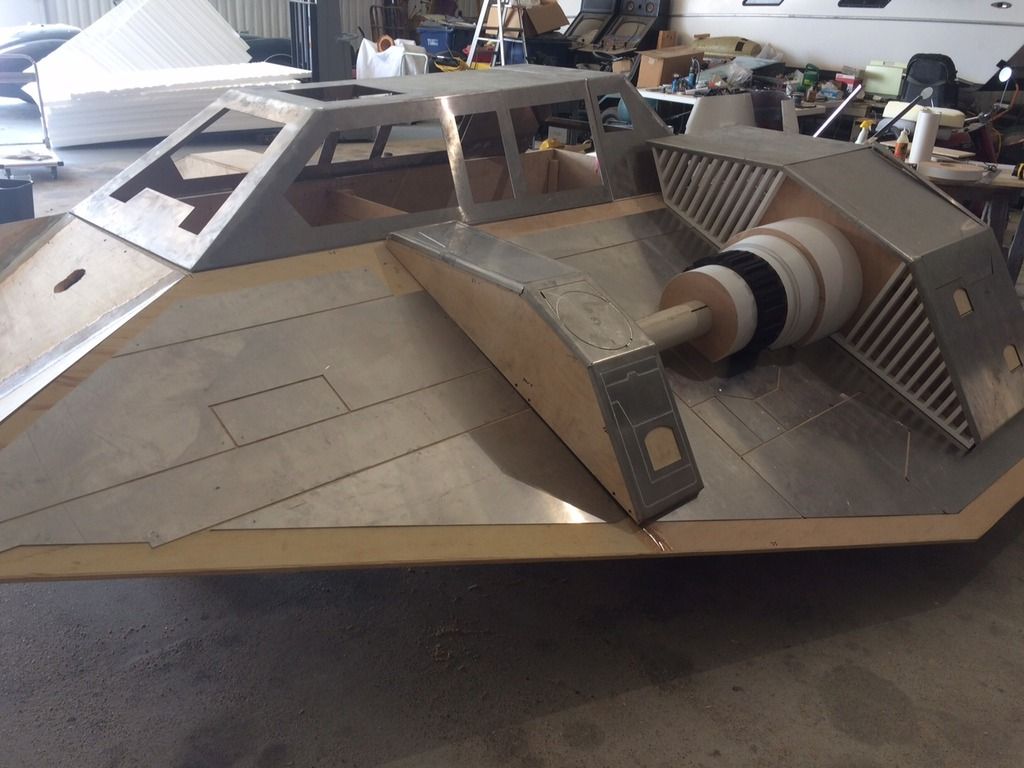
Set the gun and engine boxes temporarily in place for a motivational picture. Still not done with that wing, but getting close.
We've cut the two triangular nose pieces and are reinforcing the joints with double layers of 4" wide fiberglass on both sides. This three paneled front nose section will stay attached to the main cockpit tub when the wings are removed for transport. The fiberglass reinforcement will significantly stiffen the front end of the speeder sub-assembly.

Continuing on with the armor plating on the port wing. Aligning all these puzzle piece angles and maintaining a perfect 1/4" gap spacing is taking a long time. I wanted to get the whole wing covered Saturday, now it's looking like it will take 3 days just to finish one wing. Yikes. Time is running out. But it sure is looking fantastic.


Set the gun and engine boxes temporarily in place for a motivational picture. Still not done with that wing, but getting close.

Last edited:
Tuesday May 12. Day 39. Panic starting to set in.
Starting the armor plating for the starboard wing. Same procedure; Measure screw hole alignment, drill, counterbore, scuff, clean, apply glue, get glue on fingers and everything else that I touch, spray glue with activating water, position panel, set multiple 1/4" gap spacers, fumble around with the cordless screwdriver drill while trying to hold the panel in place and the tiny screws at the same time, repeat...
Starting the armor plating for the starboard wing. Same procedure; Measure screw hole alignment, drill, counterbore, scuff, clean, apply glue, get glue on fingers and everything else that I touch, spray glue with activating water, position panel, set multiple 1/4" gap spacers, fumble around with the cordless screwdriver drill while trying to hold the panel in place and the tiny screws at the same time, repeat...


Last edited:
Thursday, May 14. The smell of desperation in the air. Barely 1 week till deadline.
The 1/10" thick aluminum is covering the flat areas of the wings, but we also need to cover the edges of the wings. The plywood is 3/4" wide and we capped all the edges with a 3/16" thick corner mold strip, glued and nailed in place. This gives the wing edge a nice bull-nose radius. Eventually we will laser cut aluminum edge strips to cover the edge tips, but for now we are vacuum forming 1/8" PVC flat plastic sections that will cover over the wood edges and match the armor plate. The vacuum form table is 60" wide by 36" deep, so we set up a jig to form 3 panels at a time to maximize the expensive plastic sheet. After a few failed attempts, we reduced the jig to only two forms and had success.
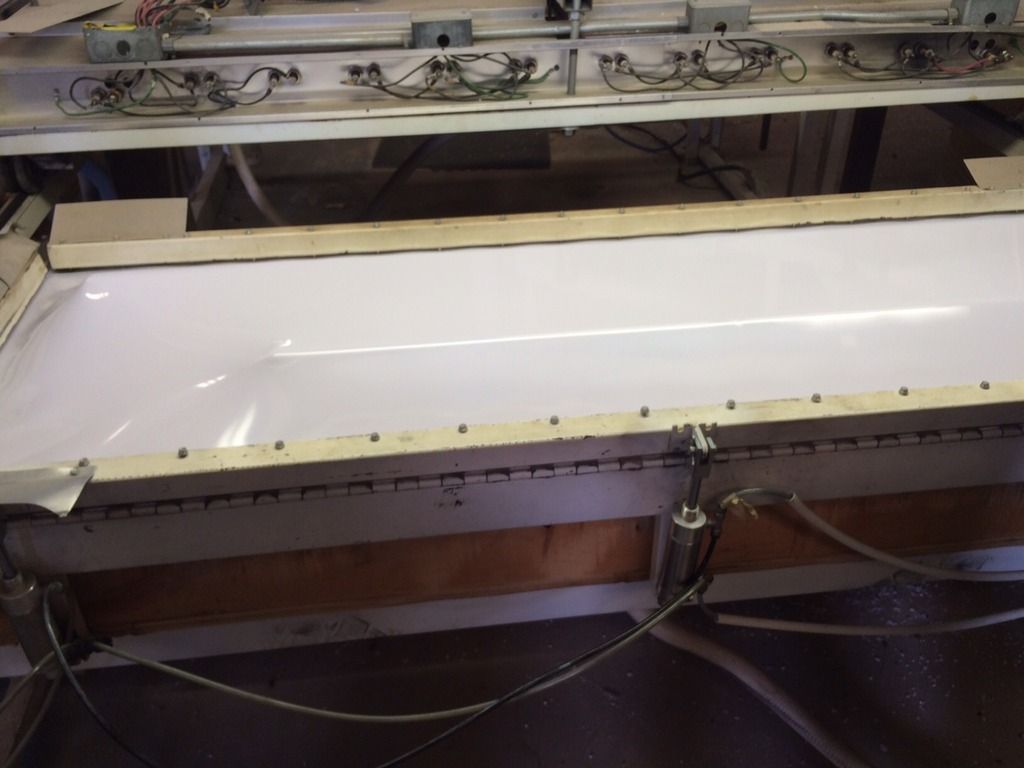
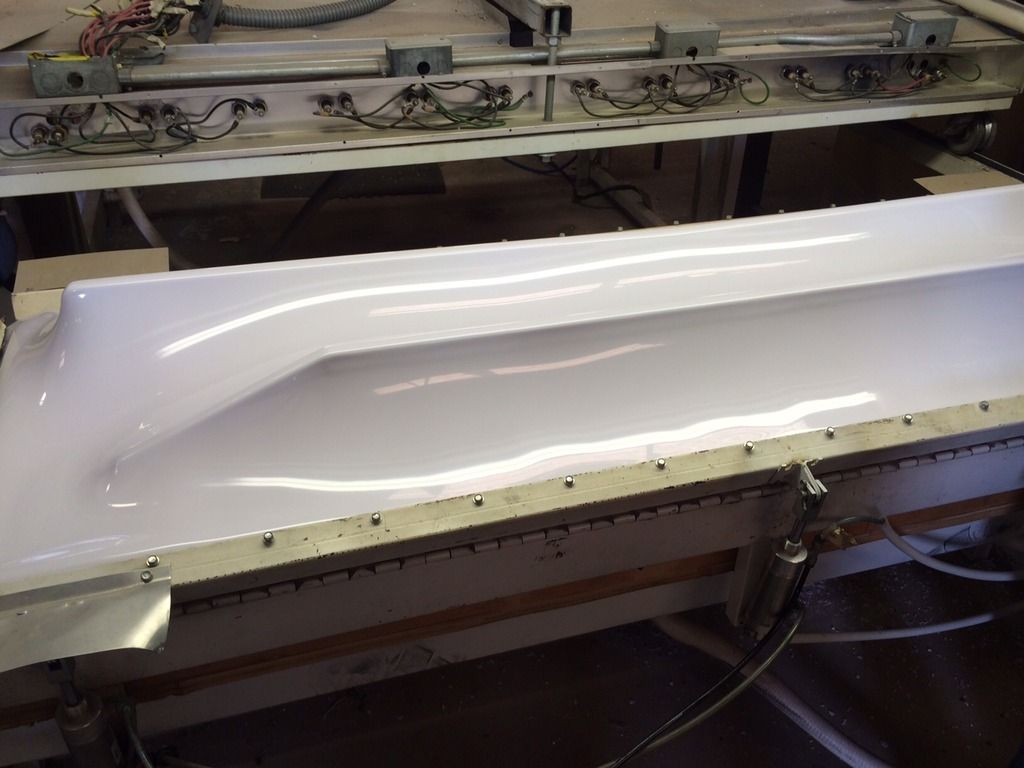
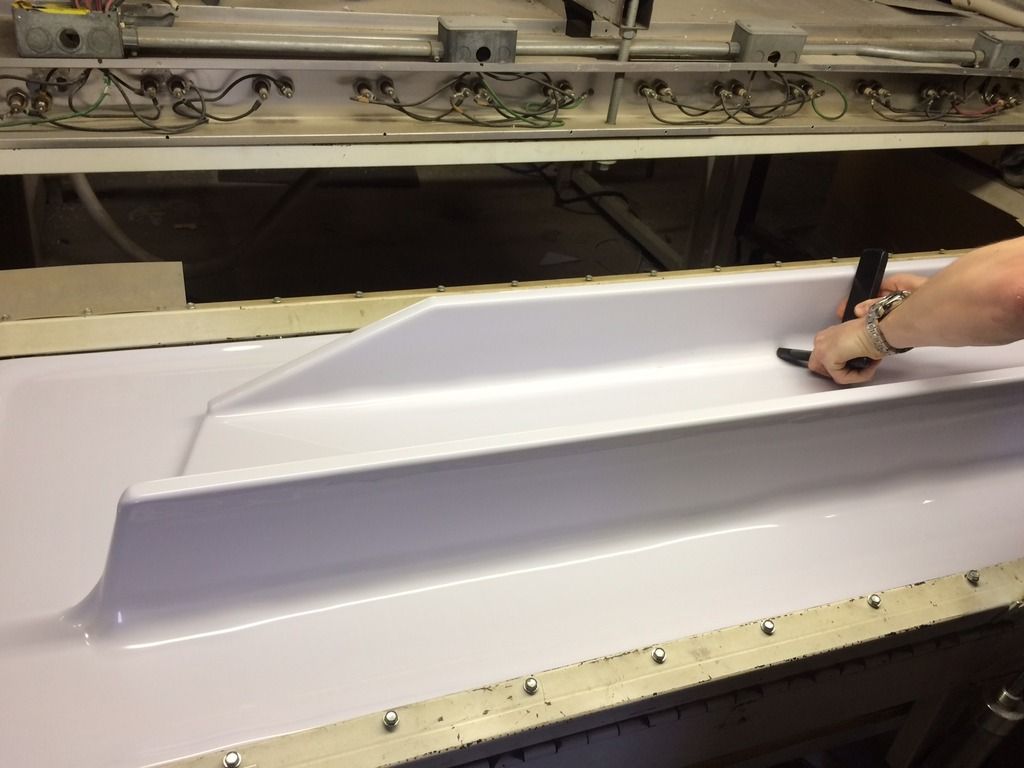
The 1/10" thick aluminum is covering the flat areas of the wings, but we also need to cover the edges of the wings. The plywood is 3/4" wide and we capped all the edges with a 3/16" thick corner mold strip, glued and nailed in place. This gives the wing edge a nice bull-nose radius. Eventually we will laser cut aluminum edge strips to cover the edge tips, but for now we are vacuum forming 1/8" PVC flat plastic sections that will cover over the wood edges and match the armor plate. The vacuum form table is 60" wide by 36" deep, so we set up a jig to form 3 panels at a time to maximize the expensive plastic sheet. After a few failed attempts, we reduced the jig to only two forms and had success.


Last edited:
May 15, Friday, 42 Days of straight, non-stop, never gonna stop, I'm going crazy from the heat, creating.
The white PVC plastic edge armor fit tightly over the wing edges and only required a few spots of urethane glue to lay flat. The blue painters tape is in place to keep the grey plastic spray paint primer and then the spray aluminum colored paint off of the aluminum armor panels.
The Krylon "aluminum" colored paint is pretty close in color to raw aluminum, but it does not have the same luster. We'll try topping it off with a dusting of Krylon "Bright Silver" to give it some life. Maybe some buffing and polishing after its dried and baked a few days. But its just temporary, so we are not going to put too much time into it.
Saturday May 16:
The front three wooden nose panels are also covered over with 1/10" thick fiberglass plastic flat panels, and primed and painted to better approximate the aluminum armor panel look of the real wing armor. Given more time in a few weeks I will replace all of this plastic with real aluminum pieces, after I draw it up on Autocad and get it sent over to the laser cutter. We will bend a double soft fold edge, think of a "J" profile, at the end of these edge panels so these aluminum armor panel will cover over the wing edge and back up underneath the wing for 2 or 3 hidden inches. So as people touch the edge of the wing it will feel completely covered in armor top and bottom. There will probably be a lot of hand finish welding and grinding and polishing to get these complex edge pieces finished. Not enough time to attempt that now before the shows.
We also painted the inside of the cockpit flat black and installed the rear gunner seat back plywood panel. Didn't take pictures of a lot of these smaller projects. Too busy to stop and get the camera out. Installed both pilot and gunner seat bottom and back rest cushions.
The white PVC plastic edge armor fit tightly over the wing edges and only required a few spots of urethane glue to lay flat. The blue painters tape is in place to keep the grey plastic spray paint primer and then the spray aluminum colored paint off of the aluminum armor panels.

The Krylon "aluminum" colored paint is pretty close in color to raw aluminum, but it does not have the same luster. We'll try topping it off with a dusting of Krylon "Bright Silver" to give it some life. Maybe some buffing and polishing after its dried and baked a few days. But its just temporary, so we are not going to put too much time into it.

Saturday May 16:
The front three wooden nose panels are also covered over with 1/10" thick fiberglass plastic flat panels, and primed and painted to better approximate the aluminum armor panel look of the real wing armor. Given more time in a few weeks I will replace all of this plastic with real aluminum pieces, after I draw it up on Autocad and get it sent over to the laser cutter. We will bend a double soft fold edge, think of a "J" profile, at the end of these edge panels so these aluminum armor panel will cover over the wing edge and back up underneath the wing for 2 or 3 hidden inches. So as people touch the edge of the wing it will feel completely covered in armor top and bottom. There will probably be a lot of hand finish welding and grinding and polishing to get these complex edge pieces finished. Not enough time to attempt that now before the shows.
We also painted the inside of the cockpit flat black and installed the rear gunner seat back plywood panel. Didn't take pictures of a lot of these smaller projects. Too busy to stop and get the camera out. Installed both pilot and gunner seat bottom and back rest cushions.
Last edited:
Nice progress. Look for ward to seeing this at a Con or wherever you intend to show it.
-eric
Eric, did you see our X-34 Landspeeder on display at the May Dallas Comic Con?
"James Kenobi" stopped by and introduced himself, but I think he was the only RPF member to get my attention that weekend.

- - - Updated - - -
That will be kinda weird because I intend on sitting in it and never ever ever leaving! ever!")
I'm building it just for you Greg. :thumbsup
Last edited:
Just found this thread. Really nice work! The Snowspeeder has always been a favorite of mine.
Too bad SWC wouldn't let you display your work. There was actually lots of free space on the exhibit floor. I wonder what their real reasons were?
I still don't know why either. I was mostly concerned that they canceled the Millennium Falcon cockpit display. I was only trying to get my X-34 landspeeder in at Celebration. You're right, it wouldn't have taken up much room. Turns out, I think MonCal was able to take his speeder instead. He's more than halfway closer to Cali than I am in Texas, so I'm glad it worked out for him. I think there was also a Snowspeeder brought in from Germany, but I never saw it on the live Youtube feed. Did anyone else see it and confirm it. Hopefully took pictures of it? post 'em please.
Last edited:
OH MY... I bow before this awesomeness! You guys have really raised the bar! BRAVO! WOW!
Am sitting here having a massive nerd-gasm here! I feel like Deiter on Sprockets... "I feel like a little girl!" This is really looking incredible guys! Just the temp shot of the side boxes on the wing gave me the nerd-pimples all over my arms! I know these pics were taken back in May, but I can't WAIT to see more of this beauty!
Eric, did you see our X-34 Landspeeder on display at the May Dallas Comic Con?
"James Kenobi" stopped by and introduced himself, but I think he was the only RPF member to get my attention that weekend.
I was unable to make it out in May. Hopefully, you'll be at the next event and I can check it out!
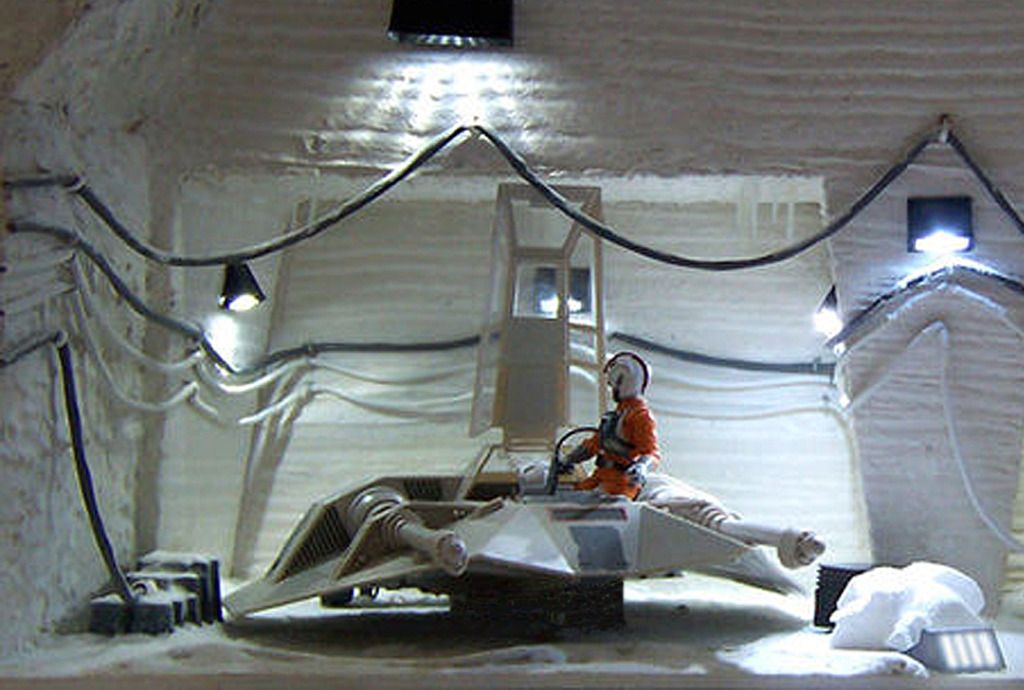
The 3D photo backdrop for the T-47 Snowspeeder will be a 20 foot wide by 8 foot tall by 2 foot deep, ice carved wall section of the Hoth "Echo Base" maintenance hangar.
We had the 8'x4'x3" thick Styrofoam sheets cut a few weeks ago. And we had planned to cut the wavy, jagged lines by hand. But after thinking about it awhile, I decide it would come out looking better if I had it CNC cut with a hot wire crossing the whole width, so when we put 4 panels side by side it would be a continues run of the jagged lines once we filled in the edge joints with filler and painted over the whole panel with ice colored latex paint. So we sent the panels back over to the foam cutter to have them cut my custom "random" jagged carved lines.
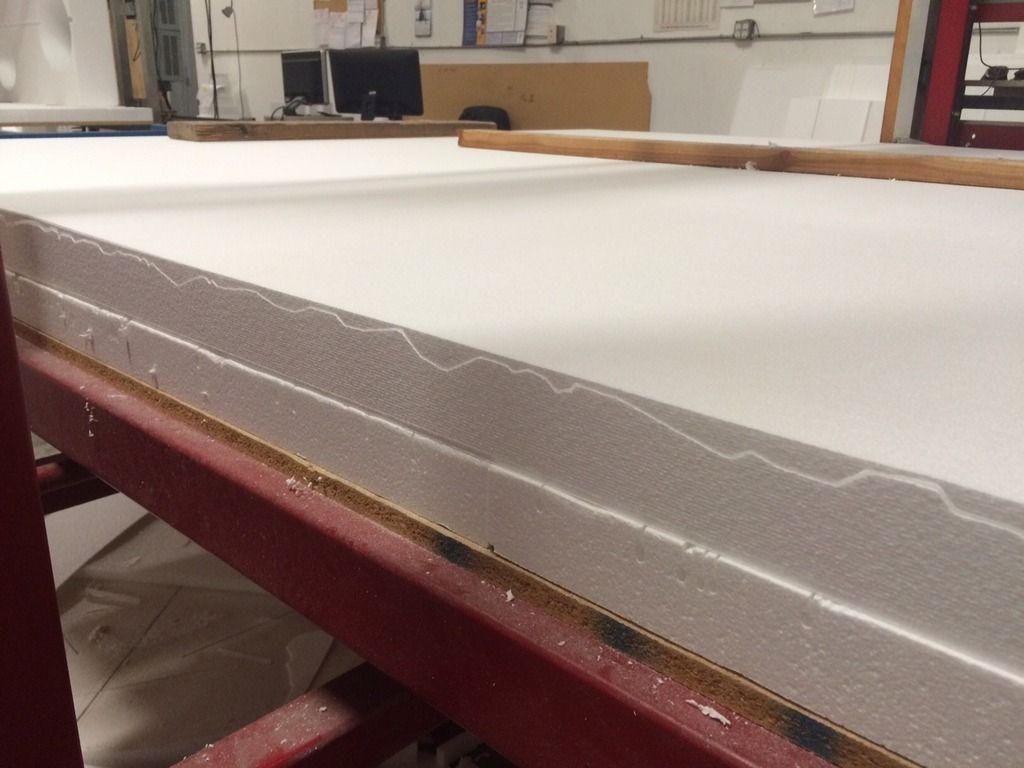
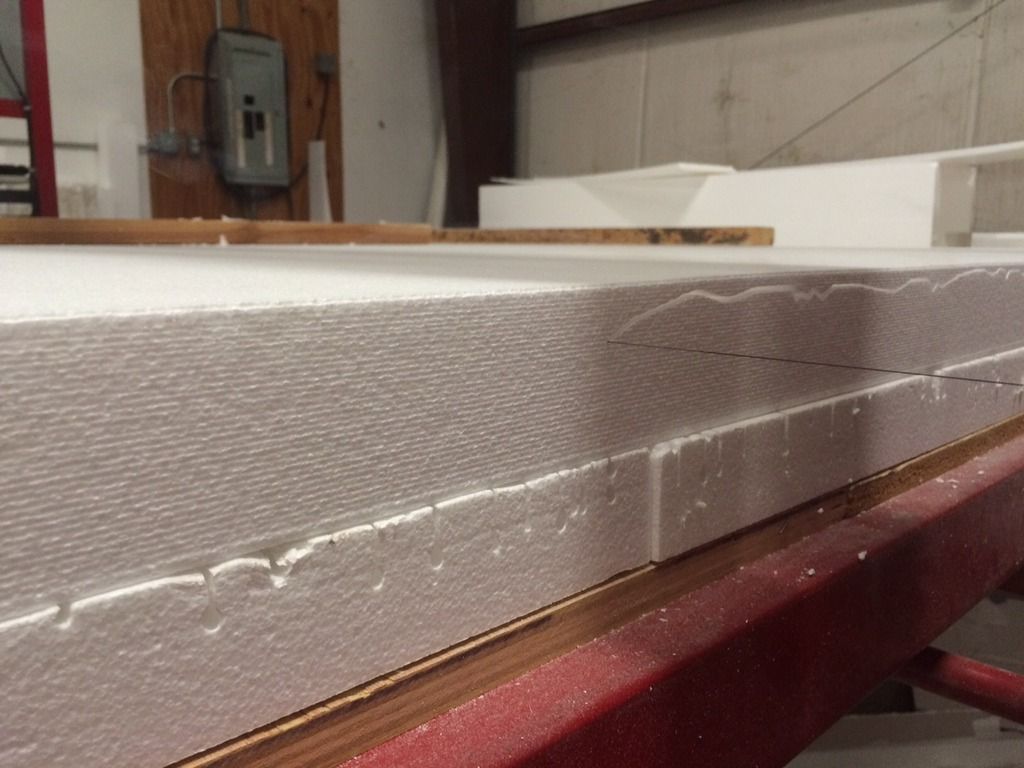
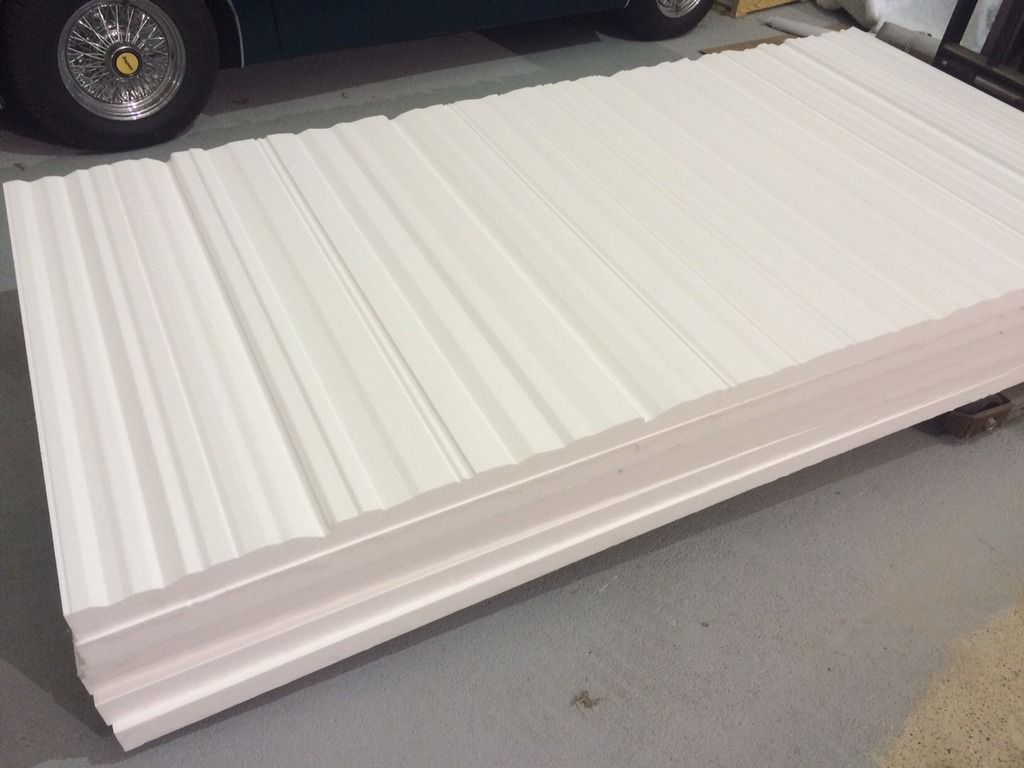
Here is two of the 8 foot tall by 4 foot wide panels standing side by side leaning against the hangar doors so I could see how well the joints line up. Disregard the shadow of an overhead wire. Once glued together on a 16 foot wide frame of plywood backer boards, I think the 4 panels are going to line up nicely and look like a solid 16 foot section of carved ice wall. The plan is to have the ice wall break down into 4 main pieces for transportation.
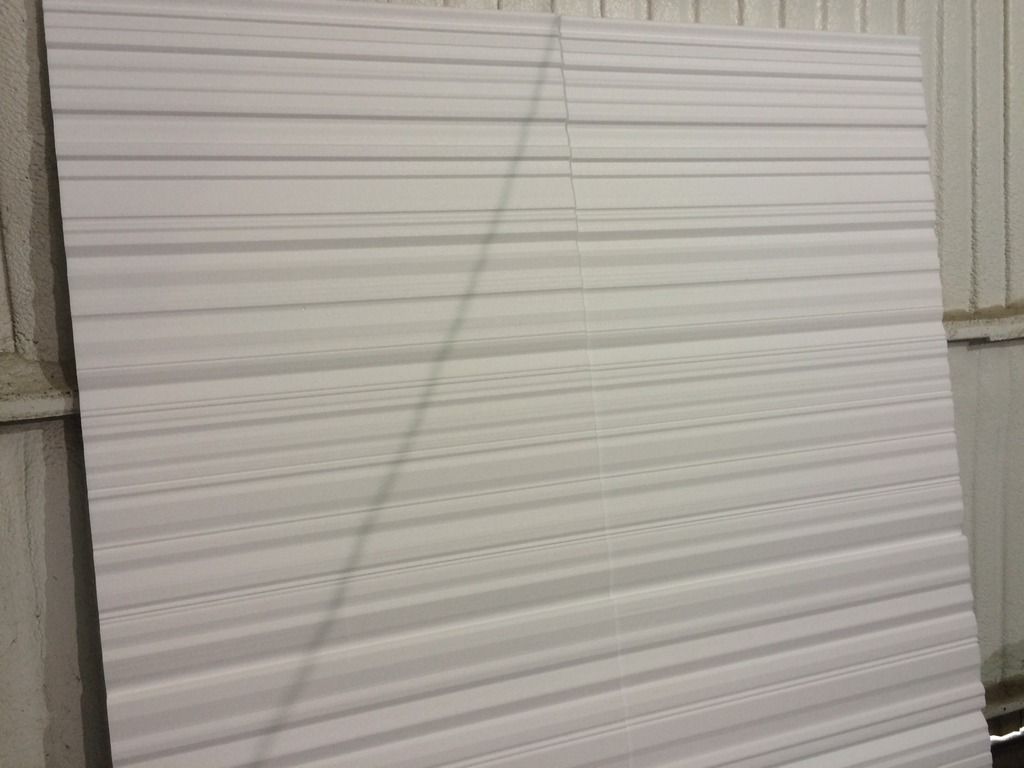

We had the 8'x4'x3" thick Styrofoam sheets cut a few weeks ago. And we had planned to cut the wavy, jagged lines by hand. But after thinking about it awhile, I decide it would come out looking better if I had it CNC cut with a hot wire crossing the whole width, so when we put 4 panels side by side it would be a continues run of the jagged lines once we filled in the edge joints with filler and painted over the whole panel with ice colored latex paint. So we sent the panels back over to the foam cutter to have them cut my custom "random" jagged carved lines.


Here is two of the 8 foot tall by 4 foot wide panels standing side by side leaning against the hangar doors so I could see how well the joints line up. Disregard the shadow of an overhead wire. Once glued together on a 16 foot wide frame of plywood backer boards, I think the 4 panels are going to line up nicely and look like a solid 16 foot section of carved ice wall. The plan is to have the ice wall break down into 4 main pieces for transportation.

Sunday May 17.
On the 3 axis router table, we cut out more detail pieces for the middle cannon sections. At the front end of each cannon, where it contacts the gun box, we built a 9" long detailed section of black expanded PVC plastic. Two 1" wide rings connected by 7" long ribs. Standard PVC irrigation/plumbing pipe, weld glue bonded all the parts together. It takes a little while for the primer and activator to combine and chemically melt the PVC parts together, but once it all kicked off, it is now a sturdy single piece. This is the last piece that needed to be added to the middle cannon section. It's now 40" long and we cut of the extra PVC support tube pipe. This whole 40" long sub-assembly will sit in between the front smaller "gun box" and the larger "engine box." The 12 foot long, 4" diameter aluminum gun barrel will slide inside of these three pices once they are attached to the wing.
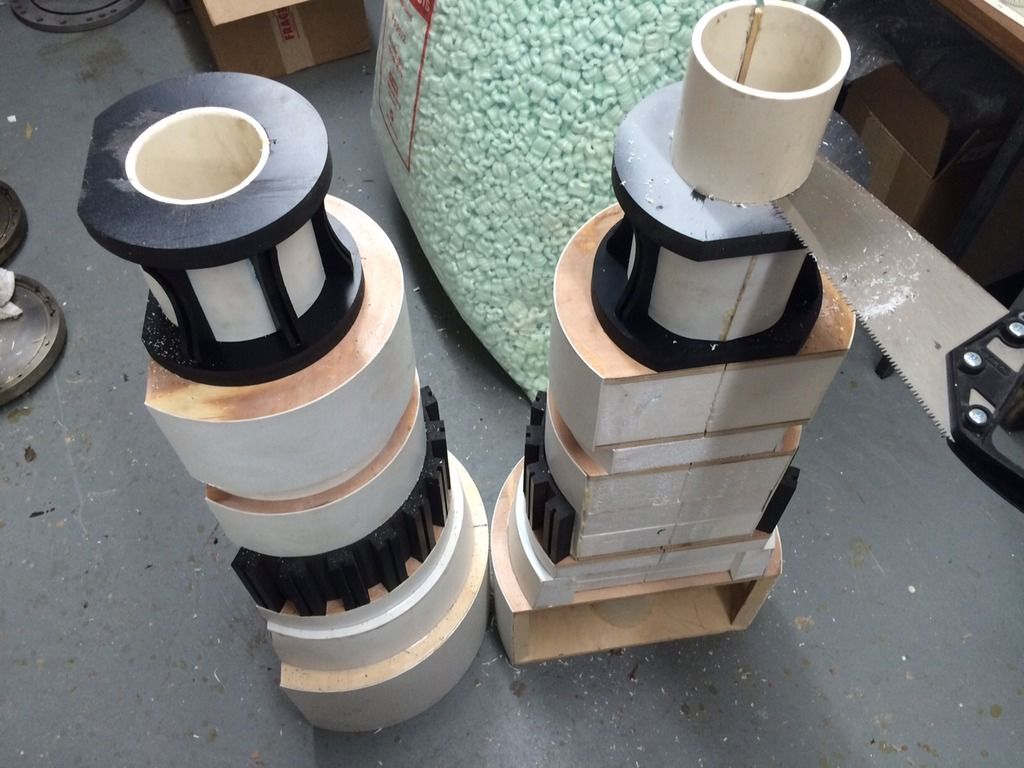
On the 3 axis router table, we cut out more detail pieces for the middle cannon sections. At the front end of each cannon, where it contacts the gun box, we built a 9" long detailed section of black expanded PVC plastic. Two 1" wide rings connected by 7" long ribs. Standard PVC irrigation/plumbing pipe, weld glue bonded all the parts together. It takes a little while for the primer and activator to combine and chemically melt the PVC parts together, but once it all kicked off, it is now a sturdy single piece. This is the last piece that needed to be added to the middle cannon section. It's now 40" long and we cut of the extra PVC support tube pipe. This whole 40" long sub-assembly will sit in between the front smaller "gun box" and the larger "engine box." The 12 foot long, 4" diameter aluminum gun barrel will slide inside of these three pices once they are attached to the wing.

Monday, May 18, 2015.
More painting today. We filled in some of the major gaps and voids in the sections of the cannon assemblies, then sprayed grey primer and sanded the primer coat.
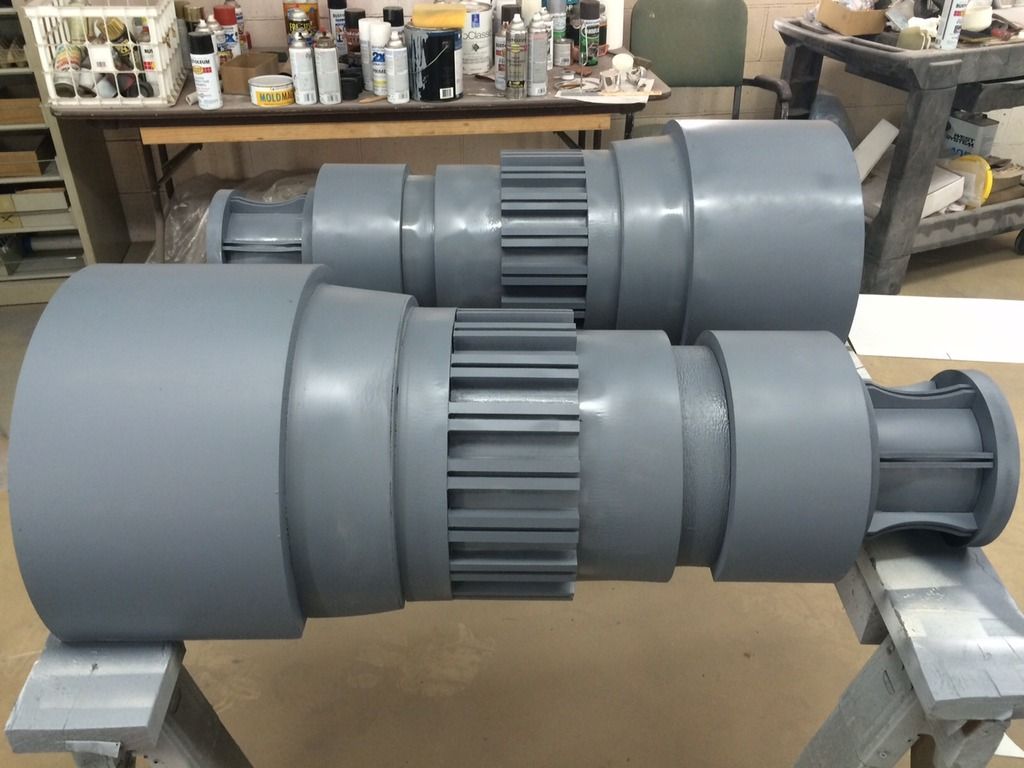
It was a rush job, and there are still a lot of joints and gaps that need better filling with joint filler. For now it will have to do. Running out of time.
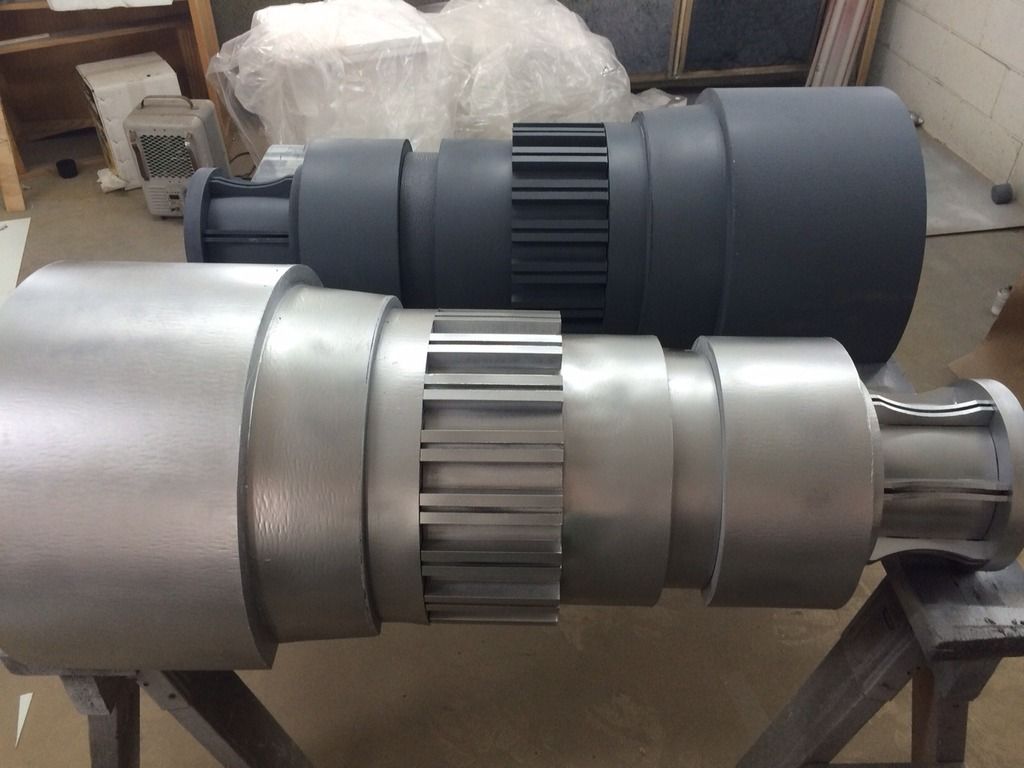
Krylon "aluminum" colored spray paint. Unless we are laying down a lot of paint, we don't use the big gravity feed spray gun, but instead use what colors we can match from "rattle cans" (spray paint).

Similar threads
- Replies
- 25
- Views
- 1,062
- Replies
- 10
- Views
- 537