Sword Art Online: Elucidator (Complete!) Revisited

drjag

Well-Known Member
EDIT: 20/08/14

If you want a full tutorial on how to make the Elucidator, check out my Instructable!
http://www.instructables.com/id/Sword-Art-Online-Elucidator-Prop-Sword/

After completing my Elucidator prop, I have decided to make my own full scale blueprint and templates for anyone who wants it.
(you may need to click on the image for the full sized image)


Hey RPF'ers! I have stemmed away from doing Borderlands props (the the time being) to make a prop from an anime known as Sword Art Online. The prop I'm making is a sword called the Elucidator and is wielded by the main character Kirito.

This project is actually for a close friend who is basically funding the project and in return, I get to use his father's workshop, get pictures for building a portfolio and gaining more experience for prop making. (plus this is technically my birthday gift to him :D)

This project started on July 13th and the deadline was August 1st (the day before his birthday) meaning the project from start to finish was 18 days; I have never taken a challenge with a deadline this tight but I'm confident in my skills to pull this off, plus I have a good idea of how to make it.

So on to the build!

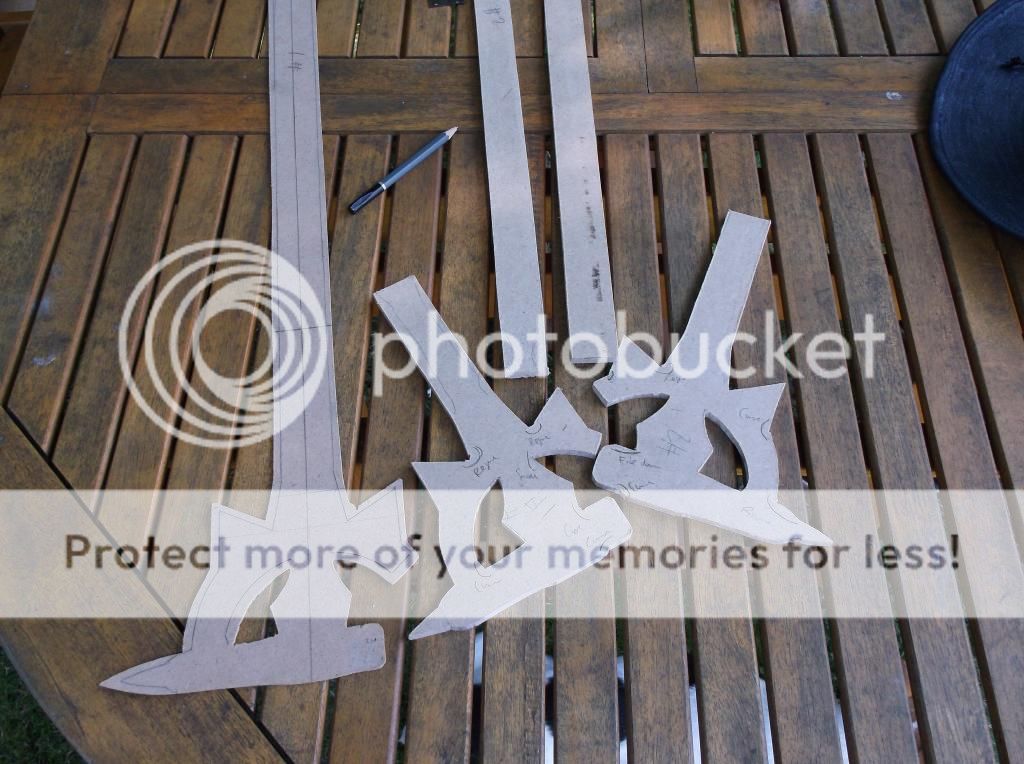
To start off this project, I had to scale a template to full size. (the blade is 90cm long, and the handle is 20cm long) The template I used to begin with was one I found on Sylgian's Elucidator page here on theRPF but since then, I have made my own templates.


The next thing to do was to translate the template to MDF. I'm using 1mm MDF as the centre, 6mm for the shaft and 3mm for the extra pieces. The build process of this is very similar to Sylgian's Elucidator, building up layers and filling/bevelling the sword with epoxy clay. All pieces were cut out using a jig saw.


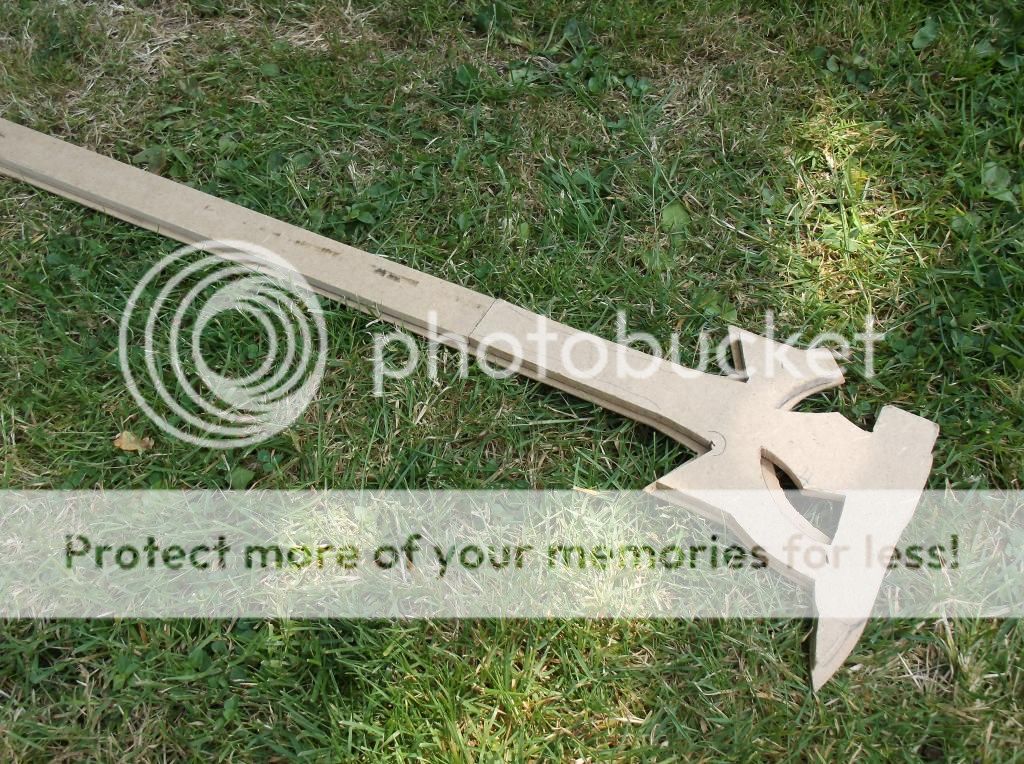
Once all pieces were cut out, The shaft was glued first, then the smaller pieces were glued on separately.


Here in this image, you may notice a patch of epoxy clay along the shaft, that's because the 6mm MDF wasn't long enough to cut it out in one piece so 2 pieces were cut instead.


Epoxy clay was then applied to the outskirts of the sword. (The grey epoxy is fast setting and cannot be manipulated with water so it's very hard to get it initially smooth.)


The clay was then refined using files and various grits of sandpaper.


That's all I'm posting for now as this first post is a lot bigger than my usual posts; I'll post more in the following days and once the project is complete (should be complete in 2 days from this post) I'll post finished pictures.

Until then...
 
Last edited:
Re: SAO: Elucidator

Continuing on from the first post, the sword has had it's initial refinement of smoothing the sword. The next step on my list was laying epoxy around the small pieces and smoothing out with polyfilla, once smooth, they were glued onto the sword with wood glue.


Once glued, I filed the edges around the surrounding area to blend it all in and I applied superglue around all of the exposed areas to harden and seal it. Superglue soaks into the MDF and it means you can file it and the edge won't go "fluffy" like MDF usually does when you cut/sand/file into it.


I moved onto the handle of the blade. I used a 19mm outer diameter PVC pipe with a 16mm inner diameter for the handle and a dowel has hammered into the pipe so it was stronger and to be able to thread a rod through it with no gaps. The hold drilled was done using a 8mm flat bit in a power drill.


A 7.5" length of threaded rod was cut using a junior hacksaw. With persistence, I cut through it but it made my arm ache for a short while.


A hole was drilled out of the sword using the same flat bit for the threaded rod to be fed through.


The threaded rod was dry fitted into the sword. As you can see, the hole is slightly too big so it had to be secured into place with Gorilla polyurethane expanding glue. I used expanding glue to ensure the rod was secured and the hole was filled with no gaps.


I may have put in a bit too much glue... Still, too much is better than too little for this situation.


Finally, I gave the sword a coat of silver to see imperfections. (I should of used primer but my friend wanted to see the "sheen" of the blade:facepalm) I also patched areas with milliput and ran a line of milliput on the base to fill the gap.


Not much is left for this project, the pipe needs to be secured to the sword, I need to sculpt the pommel and detail pieces on the tip of the blade and prime it, ready for paint.

Until then...
 
Re: SAO: Elucidator

Now that all of the previous work has been posted and is now up to date, I can start posting work that I've actually done on the same day. Today, I glued on the PVC pipe to the threaded rod with Gorilla glue, just like I did when glueing the threaded rod to the sword base.


Once the glue had cured, (about 80 mins later) I gave the sword a coat of red(ish) primer on both sides; the sword now feels and looks a lot better.


The last two things I did was filled 2 low spots where I sanded too vigorously with body filler to thicken it back up (not pictured) and begun to sculpt the pommel and the guard where the handle and sword meet.


I only sculpted half of the pommel because I wanted it to cure so I didn't accidentally squish it. Tomorrow, I will sculpt the rest of the pommel, sand everything smooth and prime it, ready for paint application.

Until then...
 
Re: SAO: Elucidator

Coooool. Wow, you've got a steady hand with your jigsaw, I'd have no chance of getting mine that neat! :p

Impressive that you made it so fast. Can I ask how it went down with your friend? fun idea :D
 
Re: SAO: Elucidator

Coooool. Wow, you've got a steady hand with your jigsaw, I'd have no chance of getting mine that neat! :p

Impressive that you made it so fast. Can I ask how it went down with your friend? fun idea :D

Thanks for the compliment! If I have one tip to share, always cut outside of the marked line, that way, you can never take off material that you need. I took that approach and any bits where I went off line, I just sanded it down to the line. Oh, also practice a lot!

Although the project started on July 13th, I didn't actually start physically working on it until the 17th, meaning that it took me only 13 days to complete the "master" ( I haven't got around to taking pictures)

P.s. It went very well with my friend; when I gave him the finished master, he had a massive grin on his face so I assume that means he liked it.
 
Re: SAO: Elucidator

Update:

Since last time, the "master" was almost finished with the exception of the pommel. Once the clay had cured, I sculpted on the second half of the pommel in a rough shape.


Once that had cured, I sanded it down to a better shape. The last thing I had to do was fill and file every corner around the base of the sword; this took a long time but eventually, every corner is now filled, filed and smooth.

Here is a picture of my friend who I made the sword for. I grabbed this image a few days ago but I haven't had the time to update until now.


The sword is now being left at that stage because there is a strong possibility that we will be moulding this at college, the thing is though, that won't happen for a while since college doesn't start until mid-September. If we don't mould it, I'll simply do nice paint job on it to finish it off.

Until then...

P.s. Happy Birthday Dec! :D
 
Re: Sword Art Online: Elucidator

Final Update:

It's been a couple of weeks since I got back on this, but now I have the rest of the supplies to finish the sword.

I decided to use high build primer on top of the regular primer to fill any tiny divots and to have a smoother surface to work with.


Once the primer had dried, I put on 2 coats of silver to start off with.


The edges were then taped up and the sword was painted flat black.


After the black had cured, I peeled back the tape and touched up any errors with Citadel silver acrylic paint. The sword was given 2 coats of protective clear coat and it was done!
(I grabbed these pics but I may take proper studio images in the future if I get the opportunity to.)


Overall, I am pleased with the build of the sword; I have learnt a lot about making props this way and it's a process I'll definitely incorporate and improve on as I make more props in the future. The only thing I'm disappointed in is the paint job; it's harder than it looks to have 2 crisp colours contrast strongly, plus this prop is not one you can weather which adds to the difficulty of getting a good clean finish.

I may repaint in the future but it may not be necessary since it's still quite likely that the sword can be moulded and casted, and I will paint a resin copy.

Hope you guys like what I have done here!
 
Re: Sword Art Online: Elucidator-Complete!

Just a quick post here, if anyone wants the instructions to build this step by step, I have made an Instructable, detailing every step from start to finish.
http://www.instructables.com/id/Sword-Art-Online-Elucidator-Prop-Sword/

I have also uploaded my own full sized templates I made on the first post on this thread, free for anyone who wants to download it. (You will need to click on the image to be directed to Photobucket, from there, click the "expand image" icon and you'll get to the full sized image.)
 
Re: Sword Art Online: Elucidator-Complete!

Looks great! Surprised you didn't add the little circular silver cross button thingy to the sword. Otherwise, great job!!
 
Re: Sword Art Online: Elucidator-Complete!

Looks great! Surprised you didn't add the little circular silver cross button thingy to the sword. Otherwise, great job!!

My friend who I made the sword for didn't want them on the sword straight away; we decided that if I can get the chance to mould it at college, the pieces would be added on.
 
Re: Sword Art Online: Elucidator-Complete!

Man you are a life savior, i was looking for good templates and you made amazing ones.
You've done really great job building this.
 
Re: Sword Art Online: Elucidator-Complete!

Man you are a life savior, i was looking for good templates and you made amazing ones.
You've done really great job building this.

Thanks for the kind words, although to be honest I only made those templates for my Instructable so people can make the sword without figuring out dimensions and stuff.

If you do indeed make an Elucidator in the future, please post an image of it on this thread; I love seeing other people's work that have been influenced by me!

If you haven't already, check out my Instructable for this as it shows how to make one from start to finish!
 
Last edited:
Re: Sword Art Online: Elucidator-Complete!

Good job, will you cosplay with the costume too?

At this point in time, I will likely never make a costume for the cosplay for myself as I have no interest in the anime or the character. This sword was "commissioned" by a friend who enjoys the anime and wanted a prop from it. There is the off-chance that I might make a costume for my friend in the future, but it won't be happening anytime soon.
 
Re: Sword Art Online: Elucidator-Complete!

How did you save the file so that when you print it, it prints on the 1:1 scale on seperate sheets? When I try to print it, it tries to print on a single sheet
 
Re: Sword Art Online: Elucidator-Complete!

How did you save the file so that when you print it, it prints on the 1:1 scale on seperate sheets? When I try to print it, it tries to print on a single sheet

Well the issue is, the image is pretty large both width and length so you can't just print it right off the bat. I had the good fortune of having access to a MASSIVE printer so I was able to print it in 1 go, I guess one way of making it print on seperate sheets is to "slice" up the image in something like Inkscape or Photoshop so each "slice" prints separately.

That's the only thing I can think of for your situation, unless you have access to a big printer. You could also go to a printers shop, bring the image on a USB stick and pay them to print it out 1:1
 
This thread is more than 8 years old.

Your message may be considered spam for the following reasons:

  1. This thread hasn't been active in some time. A new post in this thread might not contribute constructively to this discussion after so long.
If you wish to reply despite these issues, check the box below before replying.
Be aware that malicious compliance may result in more severe penalties.
Back
Top